For more information on any screen look for the blue question mark ➔
What do the icons on appointments mean?
| new | Indicates is a New Clients |
| ▼ | Clicking Blue Triangle Icon opens the Client Drop Down Menu |
| |
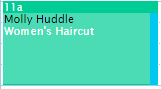
Appointment with Multiple Services |
| |
Appointment is Recurring |
| |
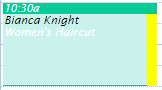
Client Requested Staff |
| |
Service has Finish Out (like a hair color service has a finish out at the end) |
| |
Text receipt to client |
| |
Email receipt to client |
| |
Search appointment, clients, etc.. |
| |
Appointment has Product sale |
| |
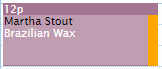
Appointment has client request note |
| |
Appointment has image |
| Lamar School | Client has tag / relationship |
| Open/Edit Staff Note Popup | |
| |
Appointment has staff only note |
| 27 | Client has loyalty points |
| |
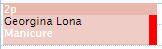
Client has a card-on-file |
| M | Client has a membership |
 |
Client has gift card |
| |
Is an Outcall Appointment |
| Multiple tickets linked together usually so all tickets can be checked out with one payment | |
| Pre-Booked Appointment Appointment created more than 1 hour before appointment | |
| W | Walk-In Appointment |
Other Icons
| ? | Press either help icon for more information |
| Clock-In/Out Staff | |
| W 2 | Waiting List the '2' indicates there are 2 people on the waiting list |
| pre | Appointment is pre-booked client pre-books when they book their next appointment before or during their last appointment |
| Forbid Online Booking for this Client | |
| |
Client Un-subscribed from Marketing Emails |
| |
Client Un-subscribed from Marketing Texts |
| |
Open Cash Drawer when enabled, top left of main calendar ➜ Enable/Disable here |
| |
Ticket/Appointment at different location (applies to businesses with more than 1 location) |
 |
Appointment Ends, Before calendar's start time so appointment not displayed on calendar ➜ press header to view early appointment |
 |
Appointment Starts, After the Last Time Displayed on Calendar so appointment not displayed on calendar ➜ press header to view early appointment |

|
Normal Work Start or End Time for this day has been changed ➜ How Change |
Reports
Report Tutorial: How to Use Reports
Quick Summary: All reports in ScheduleAnyone are interactive
- When viewing a report simply press any value for more information
- On any report, press the column header to sort the report by those values
- Start with the reports highlighted in Green on the Reports menu
- All reports can be filtered using the report header (at the top of the screen
Quickly Open a Staff's Service List on the Calendar
- On the Front Desk Calendar:
 + click a staff name in the header (at the top of the calendar), this will display the service list for that staff member
What are the shortcut keys?
All Pages
-
+ G
Focus on Search box
(in the upper right corner of the screen)
-
+ C
Open Create Appointment Box
-
+ A
On Create or Edit Appointment Popup, Add Service
-
+ R
On Create or Edit Appointment Popup, Remove Service
-
+ S
Save
-
+ P
Print
-
 + P
Put Application in Full Screen | Exit Full Screen
+ P
Put Application in Full Screen | Exit Full Screen
- ESC Close Any Popup | Cancel Any Appointment Drag/Drop
Reports
-
+ F
Toggle Between: Fit Report to Screen / Display All Columns
Calendar
-
 +
+  Previous Day (In Week View is Previous Week, in Month View is Previous Month)
-
+
 Next Day (In Week View is Next Week, in Month View is Next Month)
-
+
 Previous Week
(On week view is previous month, month view is previous year)
Previous Week
(On week view is previous month, month view is previous year)
-
+
 Next Week
(On week view is previous month, month view is previous year)
Next Week
(On week view is previous month, month view is previous year)
-
+ R
Refresh Appointments
(checks if any appointments on the page have been updated; by default this happens at least every 5 minutes or faster based on what you are doing on the calendar)
-
+ T
Navigate to today
-
+ H
Navigate to Main Calendar (i.e. Home)
-
+ D
Switch to Day View
-
+ W
Switch to Week View
-
+ M
Switch to Month View
Calendar's Week View
-
+ 1
Switch to Day View, and go to Sunday
-
+ 2
Switch to Day View, and go to Monday
-
+ 3
Switch to Day View, and go to Tuesday
-
+ 4
Switch to Day View, and go to Wednesday of the current week
-
+ 5
Switch to Day View, and go to Thursday
-
+ 6
Switch to Day View, and go to Friday
-
+ 7
Switch to Day View, and go to Saturday
Calendar's Month View
-
+ 1
Switch to Week View, and go to the first week of the month
-
+ 2
Switch to Week View, and go to the second week of the month
-
+ 3
Switch to Week View, and go to the third week of the month
-
+ 4
Switch to Week View, and go to the fourth week of the month
-
+ 5
Switch to Week View, and go to the fifth week of the month
Setup Kiosk Mode
Kiosk mode on Windows and Apple computers put ScheduleAnyone in full screen mode on your computer and do not display the print preview when printing receipts
Kiosk mode restricts the browser to just ScheduleAnyone (if you still want your staff to browse the internet just have them use a different browser)
Easiest to use the Quick Kiosk Setup or you can follow the step by step instructions below
To setup kiosk mode
- Go to this url and then click "Ctrl" + S to download the image Schedule Anyone Icon
-
Right click the Google Chrome shortcut and select "Properties"
-
Go to the "Shortcut" tab and in the "Target" input box enter this after the link to the chrome exe:
--kiosk --kiosk-printing https://www.scheduleanyone.com?kioskmode=1
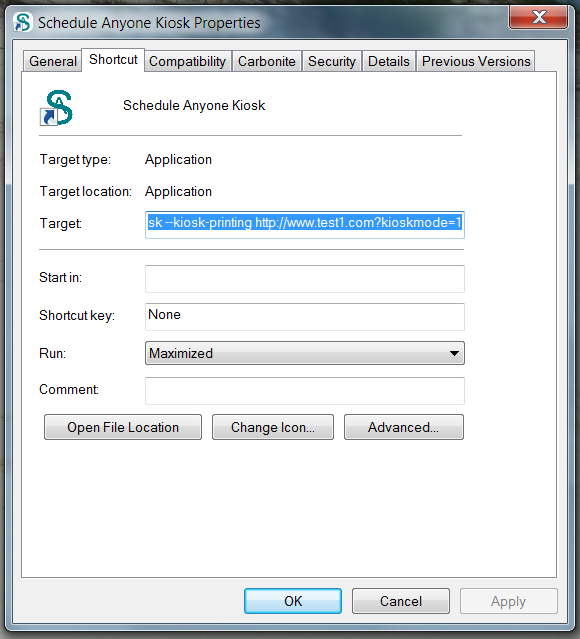
-
Click the "Apply" button so your Target should look like this:
"C:\Program Files\Google\Chrome\Application\chrome.exe" --kiosk --kiosk-printing https://www.scheduleanyone.com?kioskmode=1
- Click the "Change Icon" button and enter the path to where you saved the Schedule Anyone icon in step 1
-
Close all your browser windows and click on your new Schedule Anyone icon to open Schedule Anyone in kiosk mode
Congratulations you can now use Schedule Anyone in full-screen mode and receipts will print automatically
Exit Kiosk Mode
Different computers have different ways to exit kiosk mode
-
Apple Computer
- Hover your cursor over the top left corner of the screen until you see the window bar. Then click the Exit full-screen button (It's red and looks like an X)
- Use the keyboard shortcut: Control + Command + F
-
Window Computer
- hold + press

- press the key

- hold
-
Another Option
- Press the 'Exit' option at the bottom of the screen
Your Online Business Card
How Automatically Send Reputation Management Texts?
Automatically Send Appointment Follow-Up Emails?
How Automatically Send Happy Birthday Emails?
How Automatically Send Welcome New Client Emails?
Comming Soon...
How Send Text Message Blast?
How Send Email Blast?
Email Marketing Recomendations
Text Marketing Recomendations
Make Your Website a Great Marketing Tool
Setup Your Free Schedule Anyone Website
When you setup your address, hours, services, and staff in ScheduleAnyone we automatically create a website for you
Simple website management anytime you add a new service, delete a staff, change a service price, etc... it is immediately changed on your website
Your website is also Search Engine Optimized (SEO) for Google, Facebook, Instagram, Twitter, Bing, and other search bots
Your website will work great on any device iPhone, Android, Windows, Mac, iPad, Chromebook, etc...
To customize your website in ScheduleAnyone go to Profile → Website, you can
- Link to all your Social Media Accounts
- Sell Gift Cards
- Customize Colors & Font
- Customize Online Bookinging
- Setup Your About Page
- Your Location Page
- Customize Service Descriptions
- Add a Welcome Message
- Customize SEO
- Create an Unlimited Number of Galleries
Need a landing page, hiring now page, or other custom page? We can help
How Online Booking Works
ScheduleAnyone has a Highly Customizable Online Booking
- Makes it easier to book appointments ➜ encouraging more appointments from clients
- Saves you time coordinating with clients on appointment times
- Adds traffic to your website
- Builds your client database
Learn how ScheduleAnyone Online Booking Works
Your Digital Business Card
Your website is your modern Business Card and includes
- Your QR code
- All your Social Media sites
- Your Booking Link
- Your Custom iPhone and Android app (if you have one)
- Your location with directions
- Gift card purchase option (if you sell gift cards)
Website Galleries
Can add an unlimited number of galleries to your website
The images in your gallery will be automatically sized for the device: phone, computer, or tablet - you can also upload different images for phones and computers
You can add pre-built galleries to highlight a Service Group, Classes offered, Past and Future Events, Product Brands, or Product Categories
Can also add a custom gallery which can used for a Blog, Before/After Picture gallery, or any idea you may have
How Highlight a new special, event, or something else important?
Add a welcome message popup or banner to your website that clients can click to be directed for more information or do something like book the service, buy the gift card, etc..
Create a custom Welcome Message
How Connect My Custom Web Domain to Schedule Anyone Website?
- In ScheduleAnyone go to Profile → Website, Step #3: Set Web Address and enter your website domain
- Go to your domain registrars DNS Settings
-
Set these 2 DNS Records:
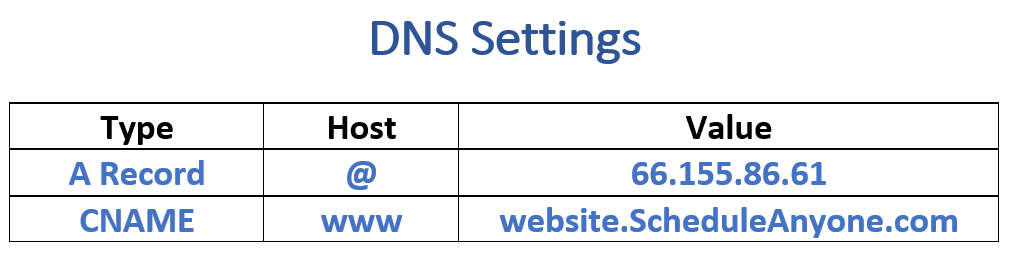
- Remove any domain forwarding you might have setup
How Connect My Go Daddy Domain?
- Go to Profile → Website, Step #3: Set Web Address so ScheduleAnyone knows to connect your website domain
- Then come back here for additional steps that are available once you complete the step above
Add Book Online banner to Website with Another Company
If your website is not hosted by ScheduleAnyone you can easily add a book appointment banner to your website to easily allow your clients to book online
Please login to see your banner information.
Add Book Online Button to Website with Another Company
If your website is not hosted by ScheduleAnyone you can add a book appointment button to your website to easily allow your clients to book online
Please login to see your banner information.
ScheduleAnyone send many different types of email and text messages to both your clients and your staff
Review the many different message types in the ➜ Emails & Text Message Guide
What Email and Text messages does ScheduleAnyone Send?
Customize Emails Sent to Your Clients
You can customize your emails to clients at: https://www.scheduleanyone.com/provider/webtemplate/email
How Change Message Package (the number of messages I can send each month)?
Most messages are free, except for email/text blasts and text reminders where the client has not explicitly opted-in
Every month you get free messages to send email/text blasts
These messages also count towards sending text reminders to clients (who have not explicitly opted-in to text messages by providing their phone company)
You can add more messages by going to Change Message Package
When are Text Messages sent (will I get a text message at 2 am?)
Text messages are only sent from 9:00 am - 9:00 pm or during normal business hours (if your normal business hours start before 9:00 am or end after 9:00 pm)
If a text message is scheduled to be sent after 9pm and before 9am then it will be sent at 9am
For example, if text reminders are setup to be sent to clients 4 hours before the appointment time; then, if you have an appointment at 10 am, the text message reminder would be scheduled to be sent at 6 am, but instead it will be sent at 9 am
When are Client Confirmation Emails Sent?
Confirmation emails are sent to clients when a new appointment is created or moved to a different date or the special request field is changed
Confirmations are sent to clients on a 10 minute delay, often multiple updates are made within 2-3 minutes and this avoids spamming clients with multiple confirmation messages
Managers and Admin can set when client confirmations are sent for all staff at Profile -> Advanced, clients tab Or for each staff at Reports -> Staff -> Profiles
Other staff can set when their own clients receive confirmations (except for staff with the role Read-Only and Employee who cannot change this setting) by going to Menu -> Profile
When are Client Reminders Sent?
An email reminder and text reminder can be sent to the client before each appointment
Review each reminder that has been sent and is schedule to be sent by going to Schedule -> Reminders
Managers and Admin can set when client confirmations are sent for all staff at Profile -> Advanced, clients tab Or for each staff at Reports -> Staff -> Profiles
Other staff can set when their own clients receive confirmations (except for staff with the role Read-Only and Employee who cannot change this setting) by going to Menu -> Profile
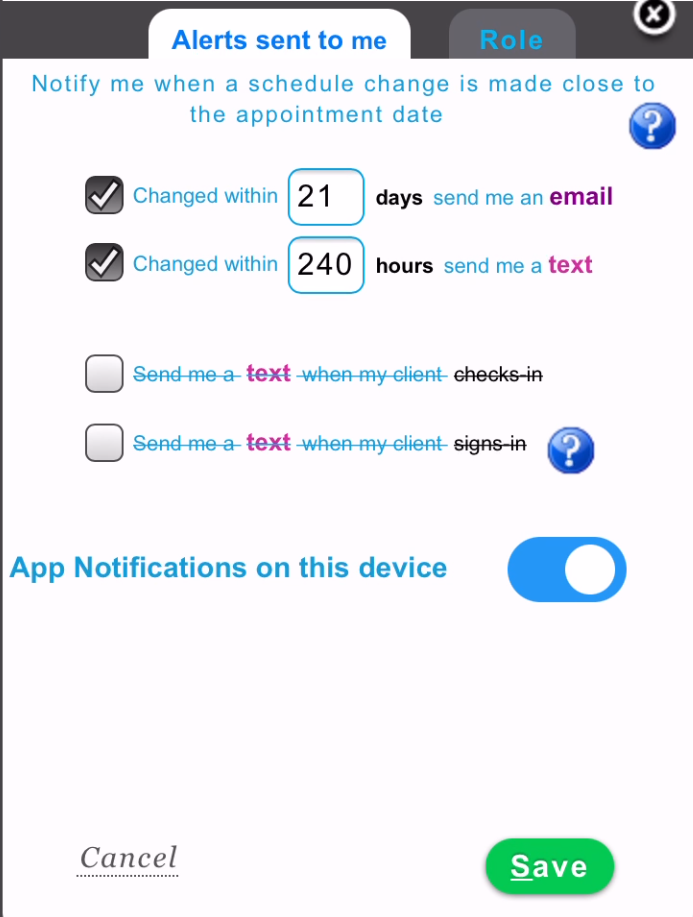
When are Staff Appointment Alerts Sent?
Alert email and app notifications are sent to staff when a new appointment is created or moved to a different date or the special request field is changed.
Alerts are sent on a 10 minute delay, this is because often multiple updates are made within 2-3 minutes and this avoids sending multiple messages. The only exception to this is if the changed appointment occurs within an hour then the app notification is sent immediately.
Alerts are not sent to a staff member when they update their own appointment because they should know about that update.
![]()
Each staff can setup when they want to receive alerts by going to their own profile and press the My Alerts button
Managers, Admin, and Receptionists can view/set when each staff receives alerts by going to Reports -> Staff -> Profiles
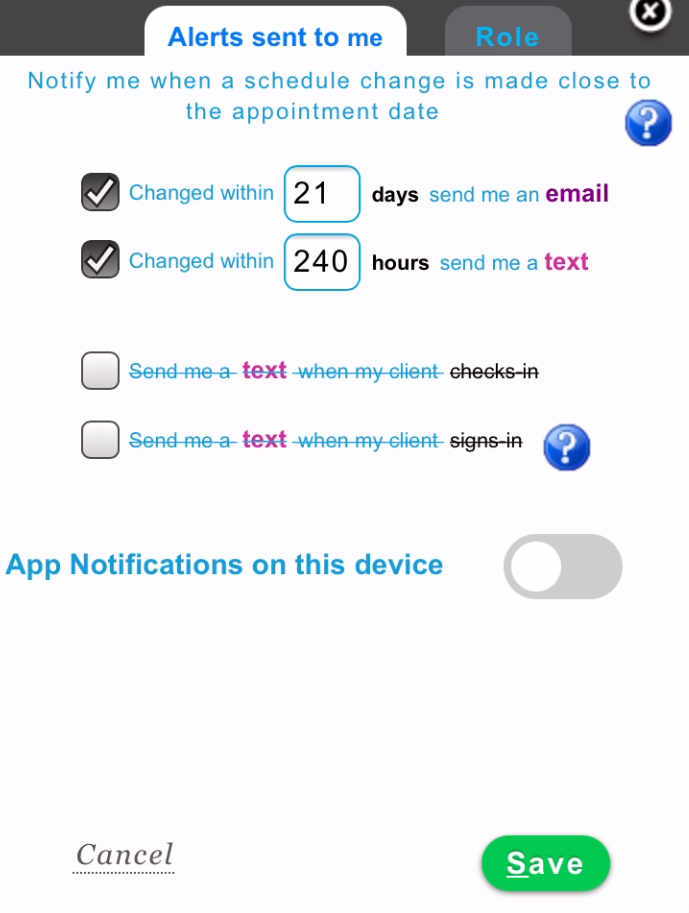
How Setup In-App Notifications?
Each staff can download the ScheduleAnyone app and enable in-app notifications for appointment create/update/delete alerts, client sign-in alerts, and appointment check-in alerts
iPhone Instructions
- Download the ScheduleAnyone app on the staff members phone
- Open the ScheduleAnyone app on the staff members phone
- Go to Profile ➜ Me
- Press the "My Alerts" button
-
In the popup, move the App Notifications on this device toggle to the right until it is blue

Android Instructions
- Go to the Settings app on your phone
- select Apps
- scroll down to the ScheduleAnyone app
- In the ScheduleAnyone App Info page press Notifications and turn them on (if not already enabled)

Not Receiving In-App Notifications?
First verify that Do Not Disturb is Not turned on - if Do Not Disturb is turned on then turning off Do Not Disturb should fix the problem
If you stop receiving in-app notifications you might need re-enable in-app notifications due to new software update, restoring factory settings, logging into phone with new Apple Id or Google Id, etc..
To fix this issue turn off notifications in
-
the ScheduleAnyone app (under your profile)
 ➜
➜
-
And in your phone's settings, disable notifications for the ScheduleAnyone app
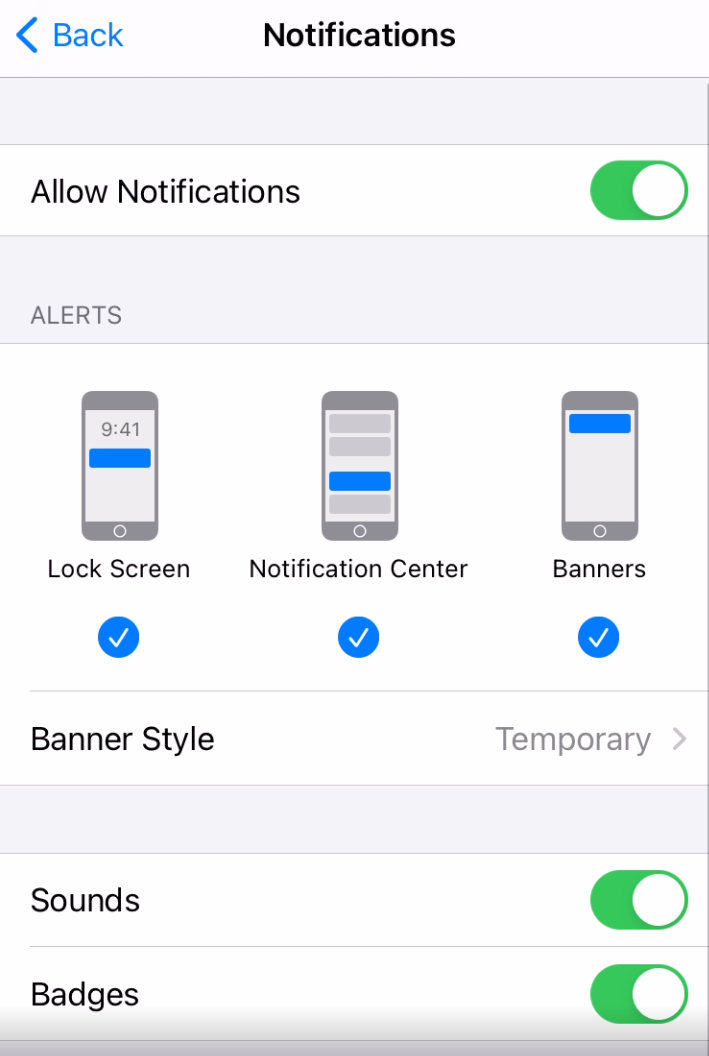 ➜
➜

- Then in your phone's settings, re-enable notifications for the ScheduleAnyone app
- And in the ScheduleAnyone app (under your profile) re-enable notifications
ScheduleAnyone has everything you need to optimize checking out clients
To customize your P.O.S. go to Profile → Advanced
Credit/Debit Card Payments
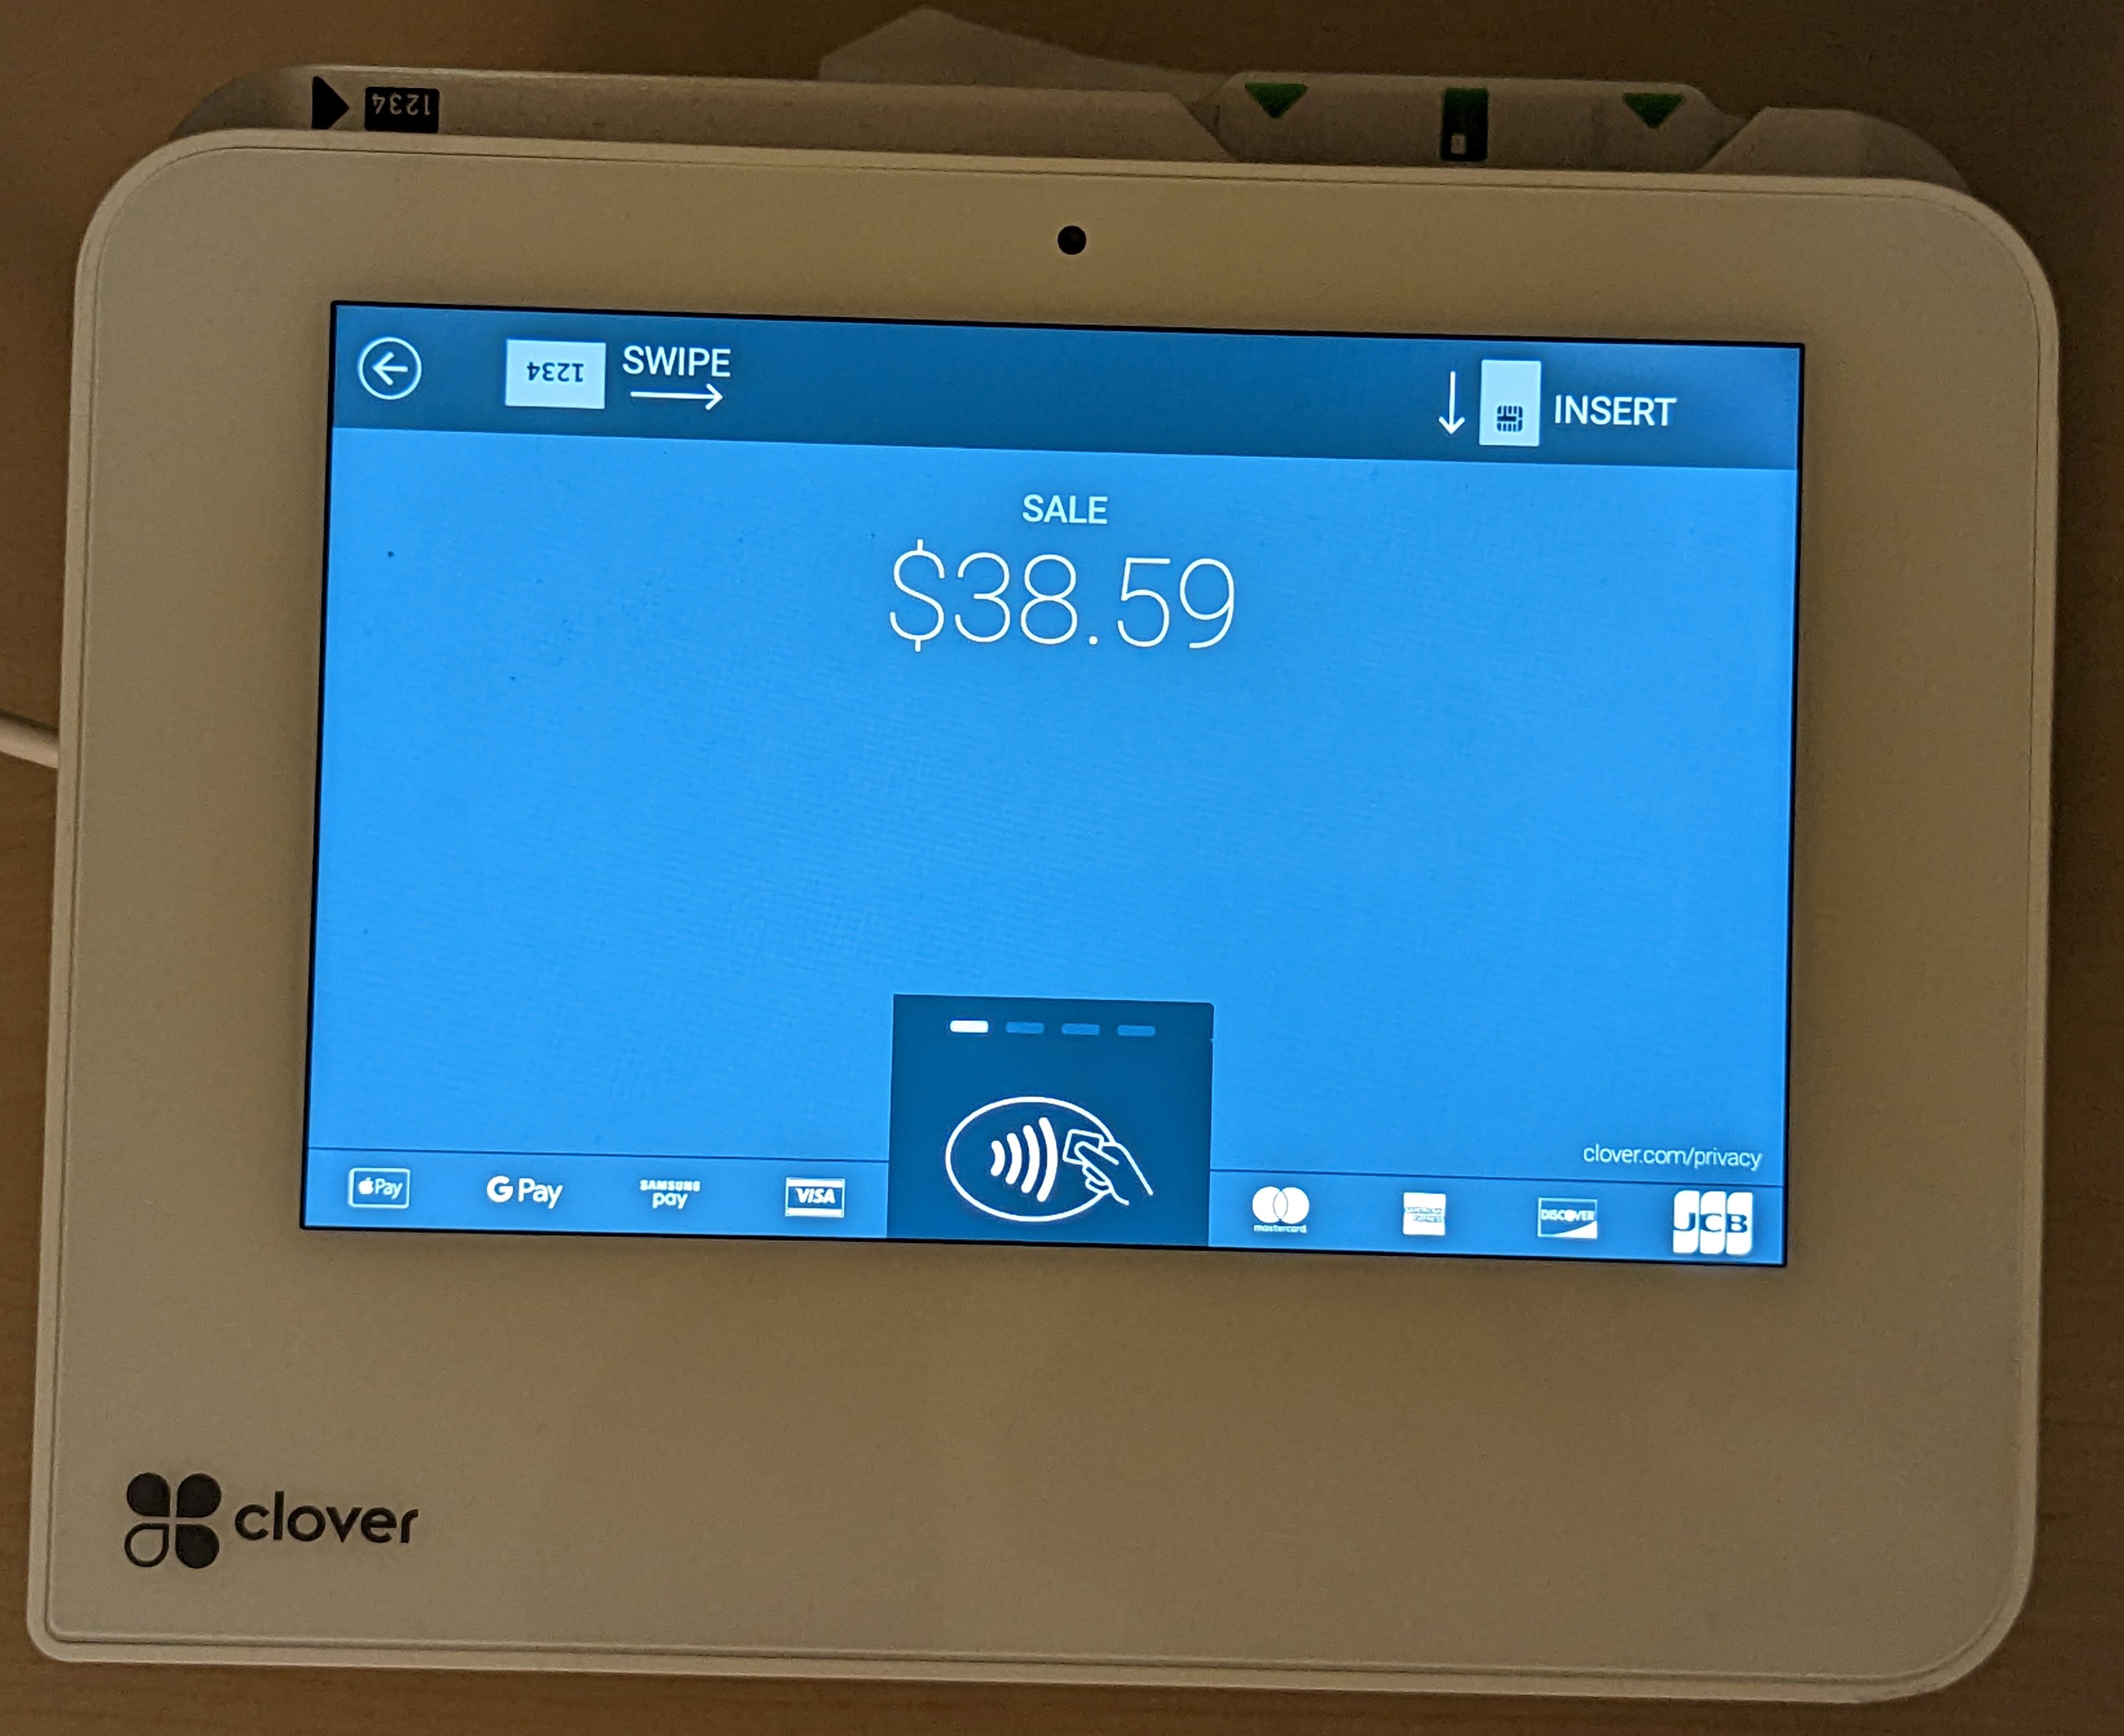
How Checkout Appointment with Credit/Debit Payment?
To process credit cards in ScheduleAnyone
-
Open the appointment + in the Edit Appointment popup press the price (top left corner of appointment: $66 in example below)
-
In the Ticket popup select Credit Card as the payment method
 ➜
➜
-
When you see the Insert Card popup ➜ complete checkout on the credit card machine (or enter the card number manually in ScheduleAnyone)
-
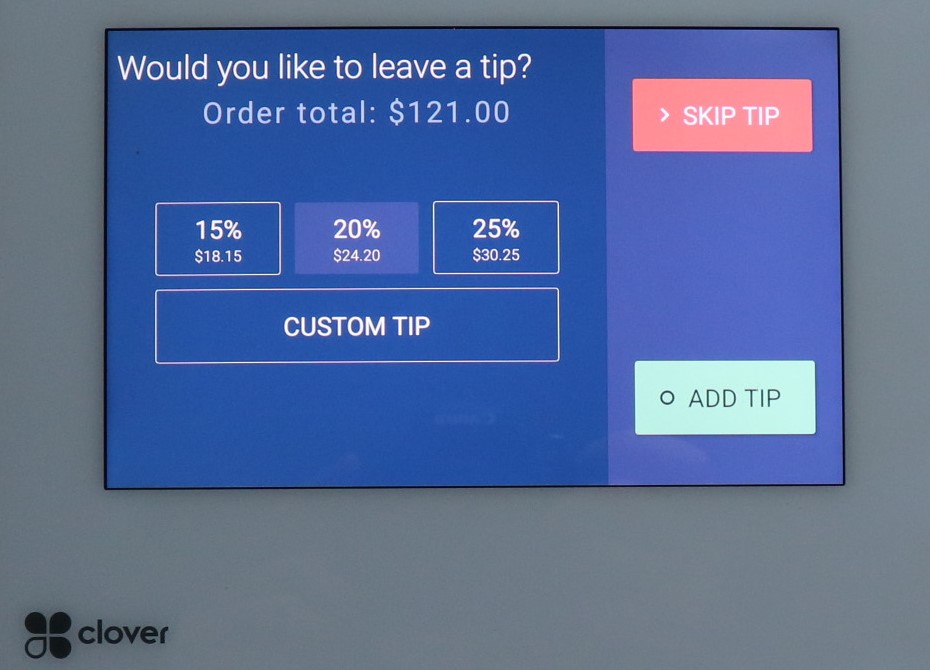
The Client sees the ticket price on your Clover device (or other credit card machine like a PAX or Ingenico device)
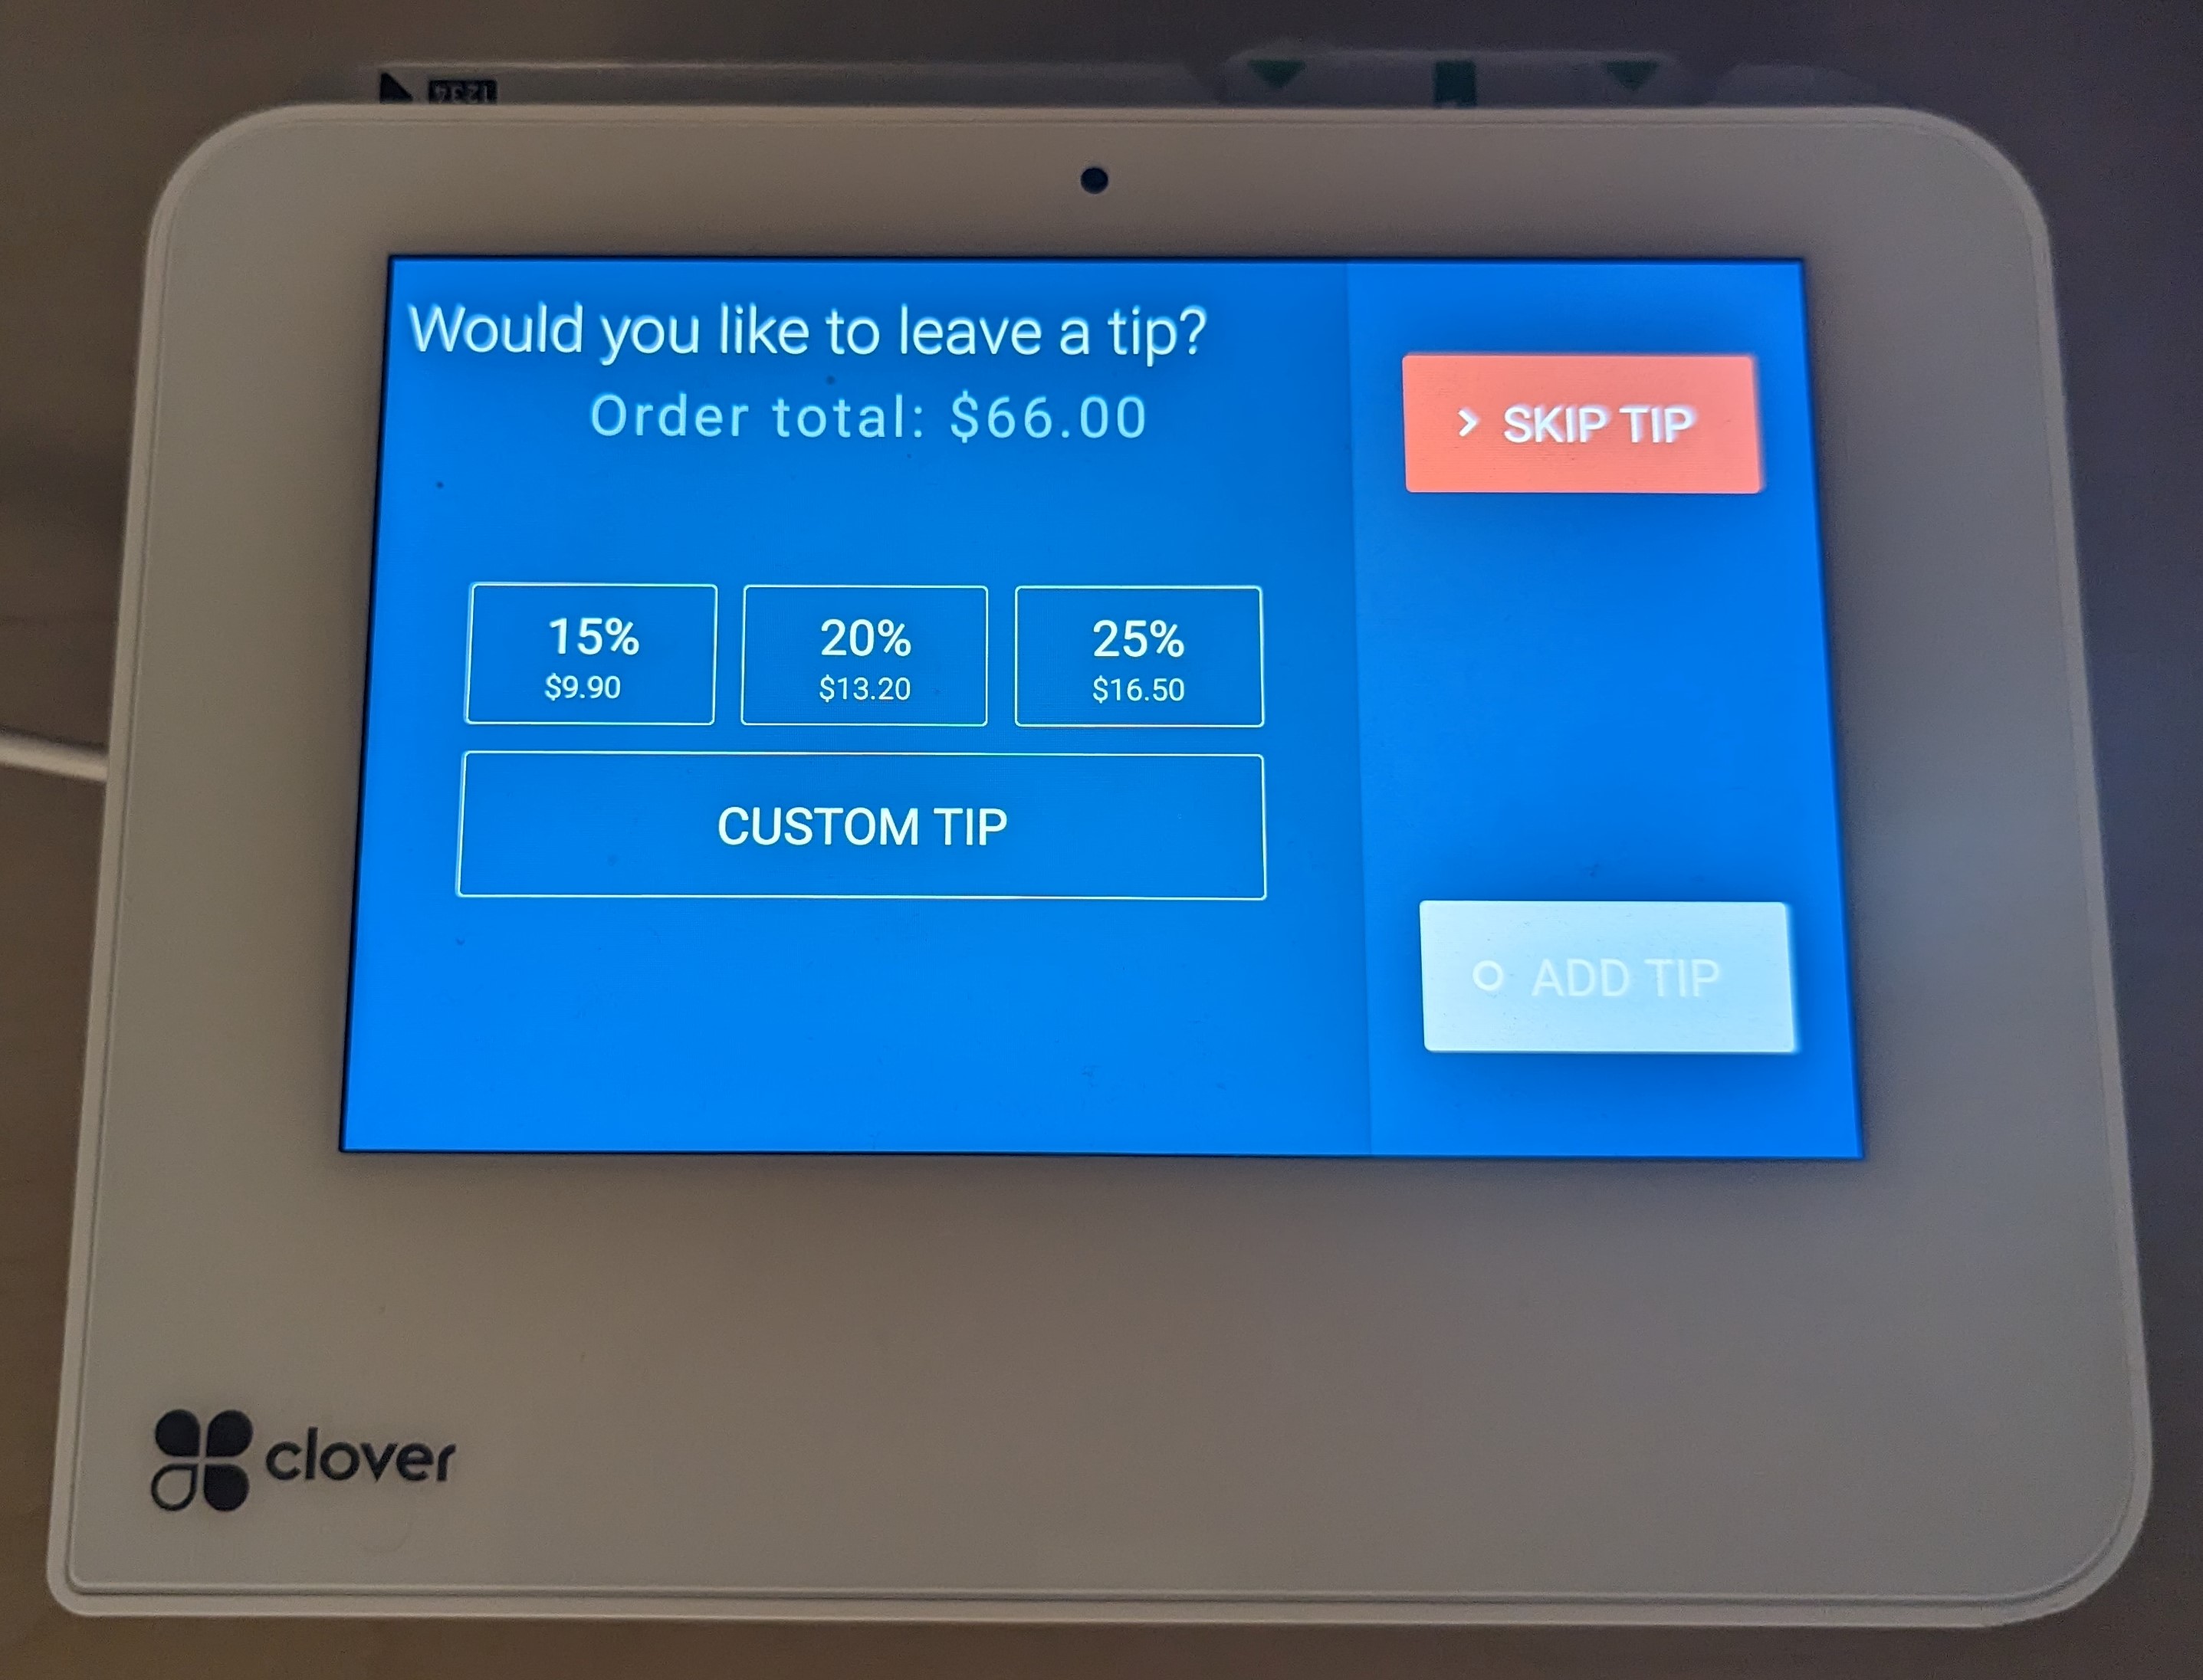
The client is then offered the tip options you have setup on the payment device
To customize tipping see the Client Tipping section below
How Checkout Multi-Merchant Appointment?
ScheduleAnyone supports the ability for staff to have their own merchant accounts, this is great if you have booth renters or other independent staff who need their own merchant account
If multi-merchant is enabled, you can setup any staff with their own merchant account
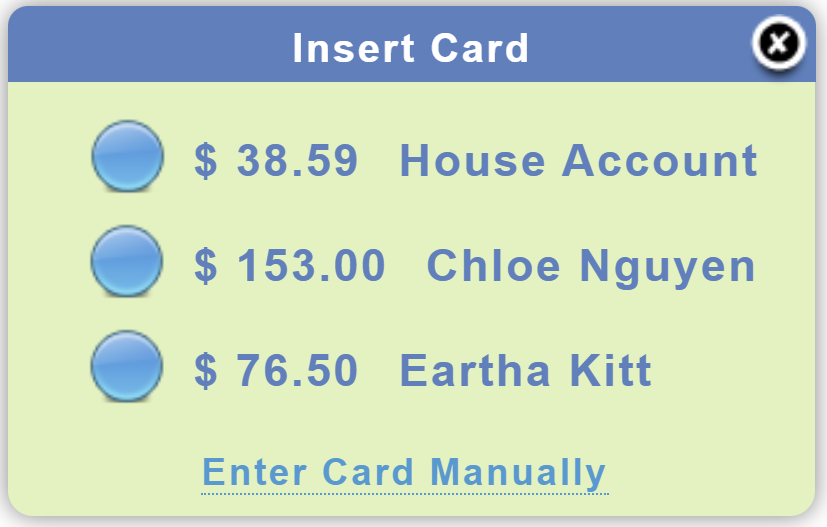
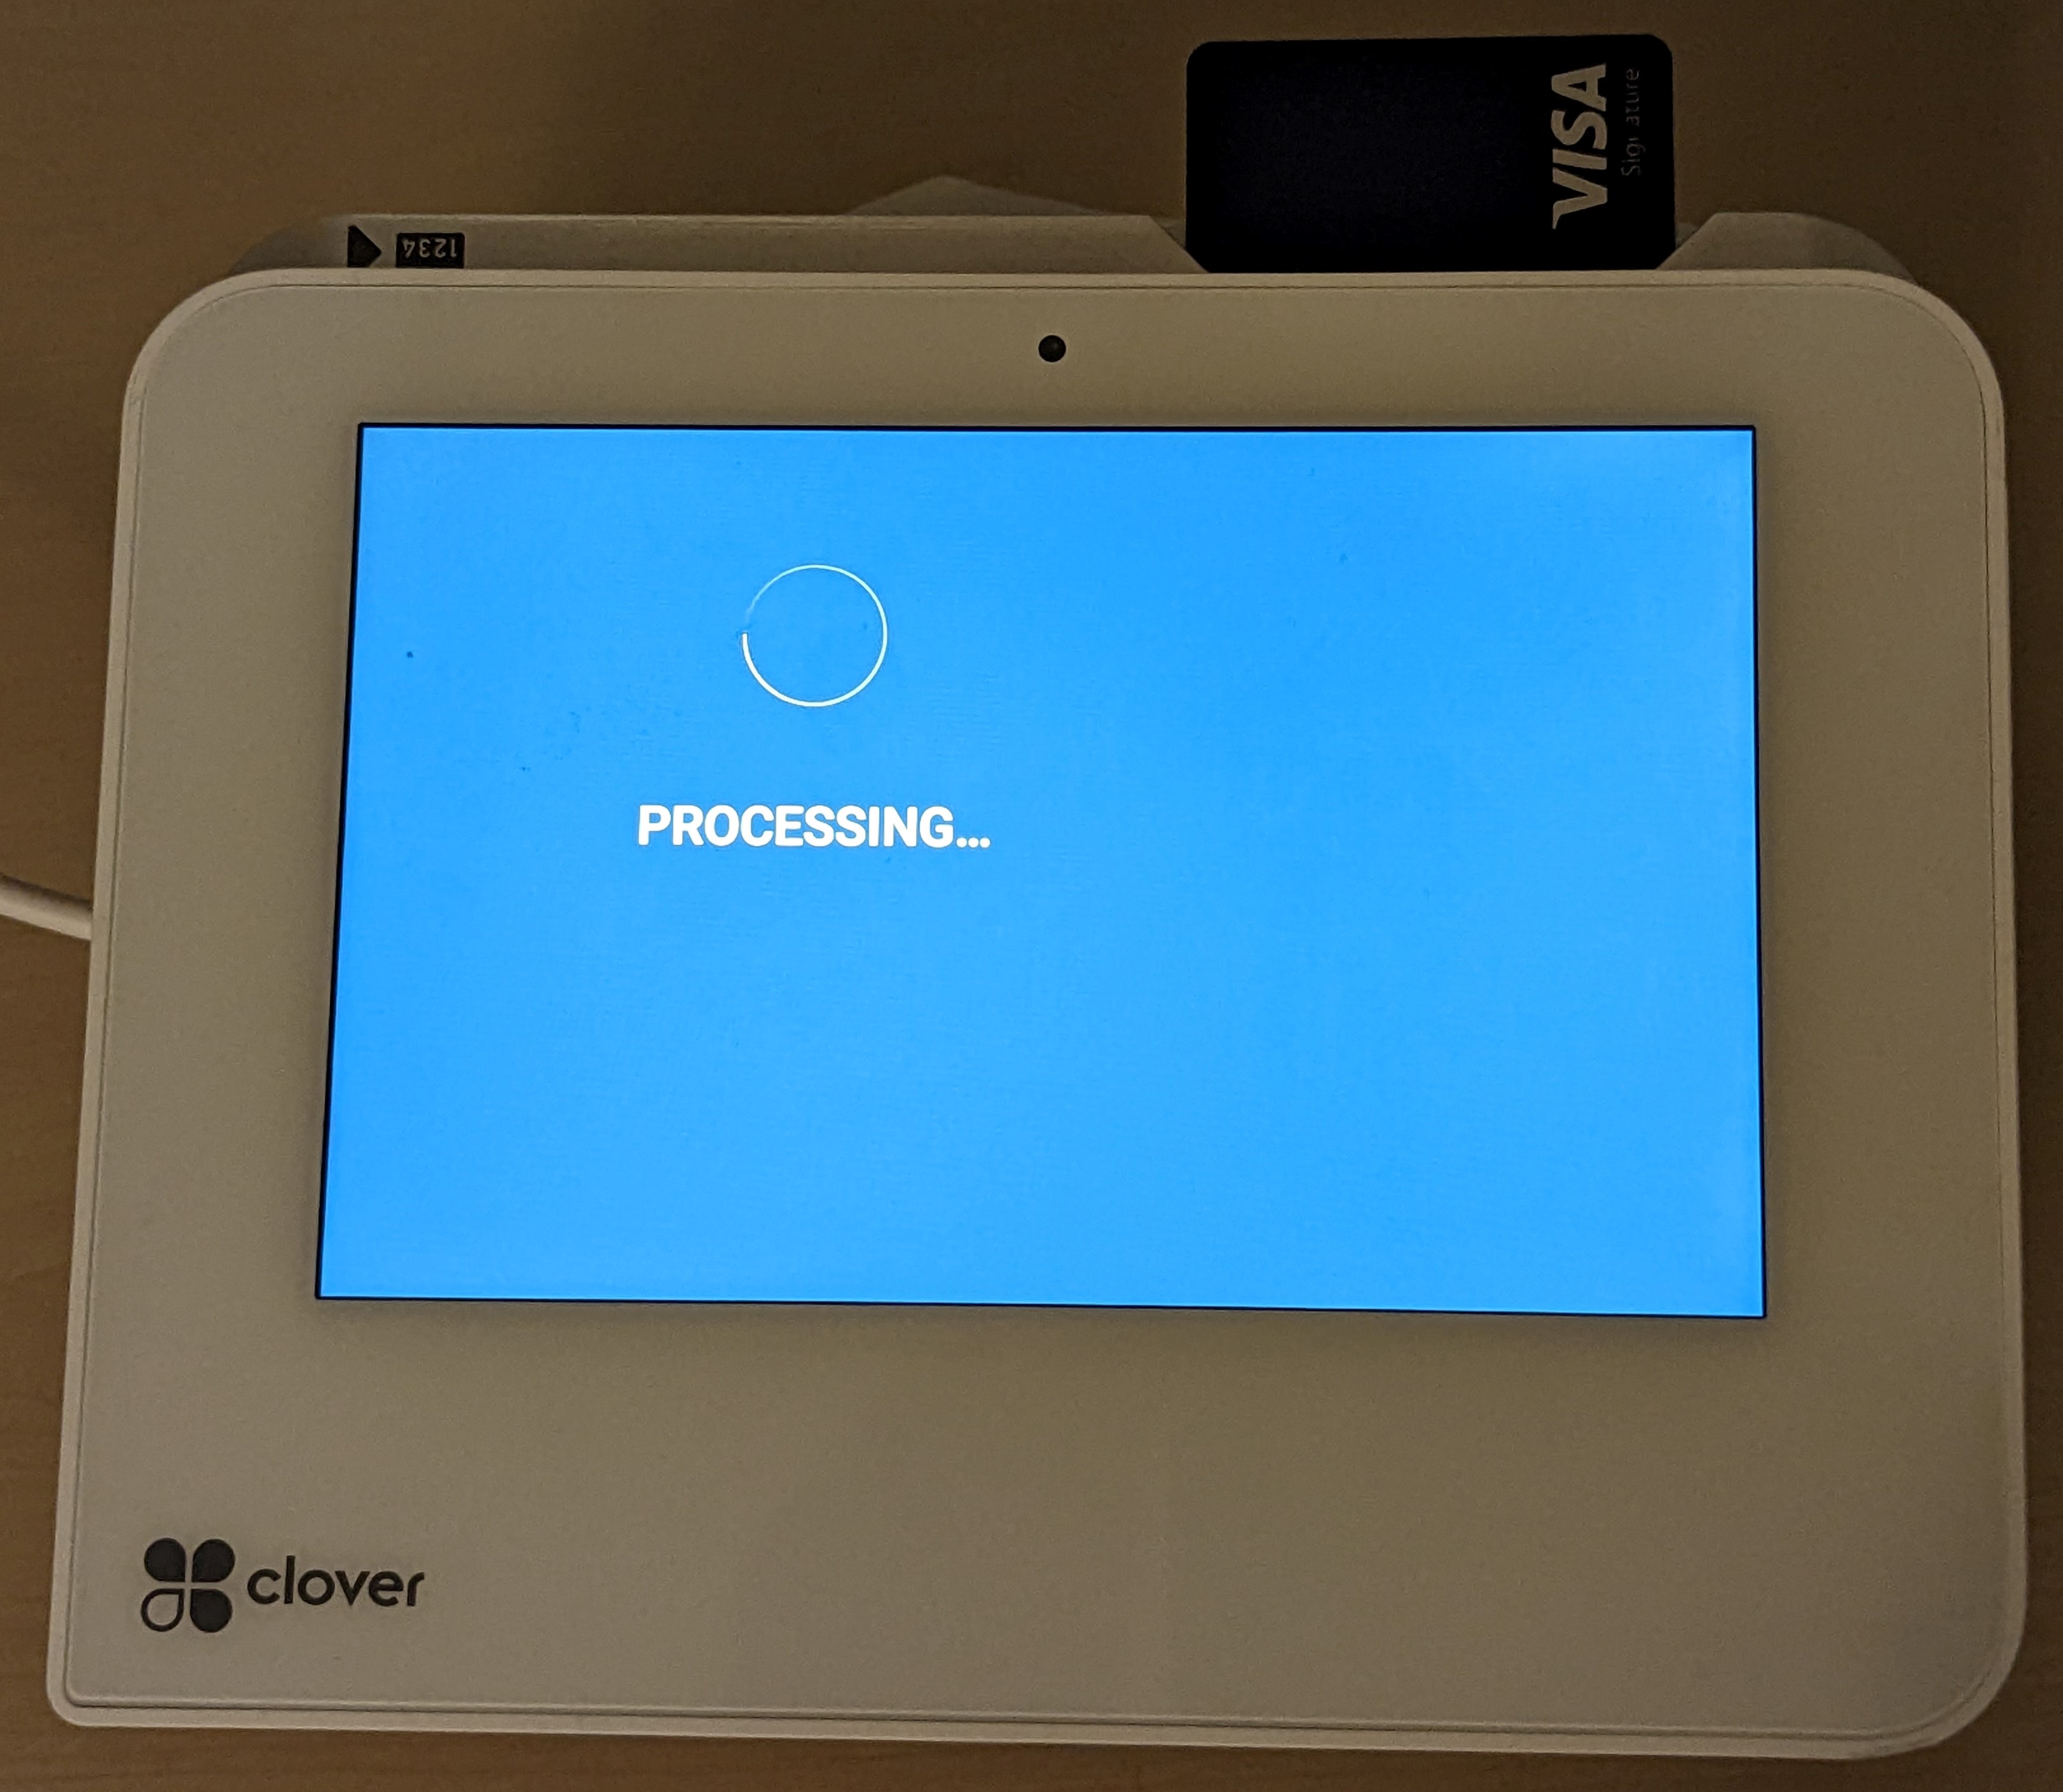
When an appointment has multiple merchant accounts then checking out the appointment works slightly different then a single merchant appointment
In the example below each staff has their own merchant account and the product sale goes to the house merchant account, so the appointment below has 3 payments (one for each merchant account)
Checkout the appointment normally (see above: How Checkout Appointments with Credit/Debit Card)
-
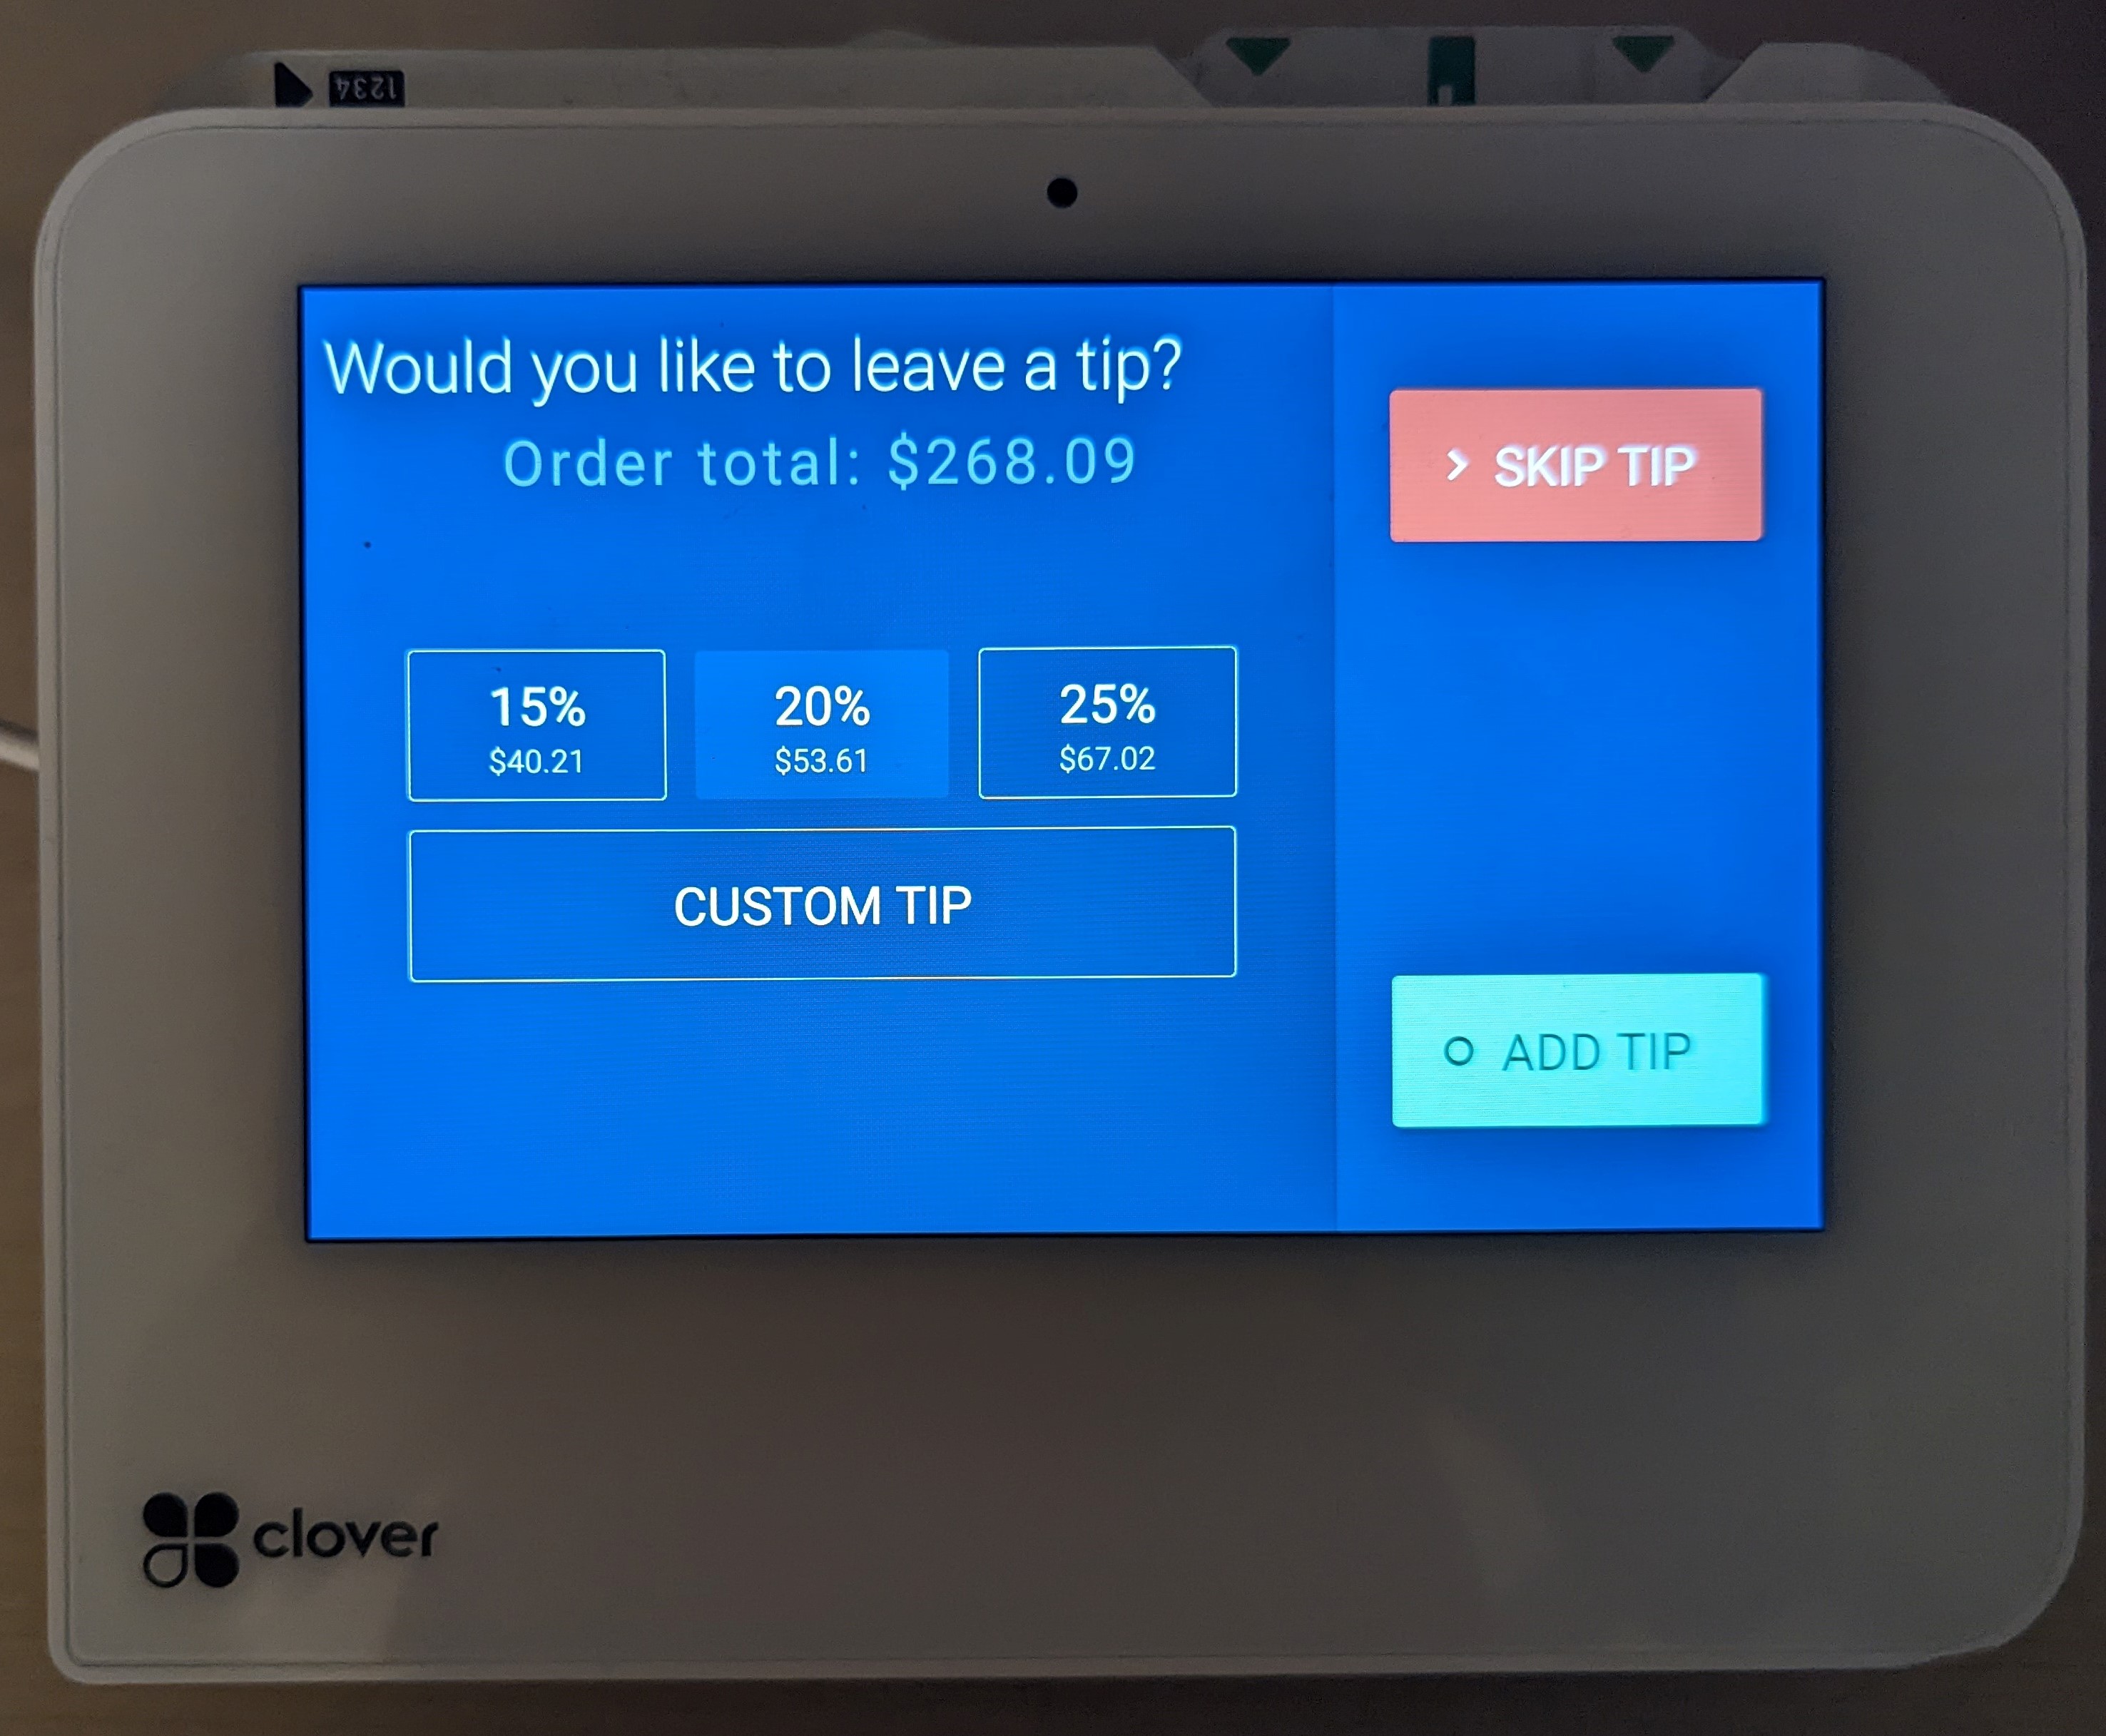
The Insert Card popup will display the payment amount for each merchant, when there are 2 or more merchants on the ticket
-
The Clover machine displays the total price with the option to tip
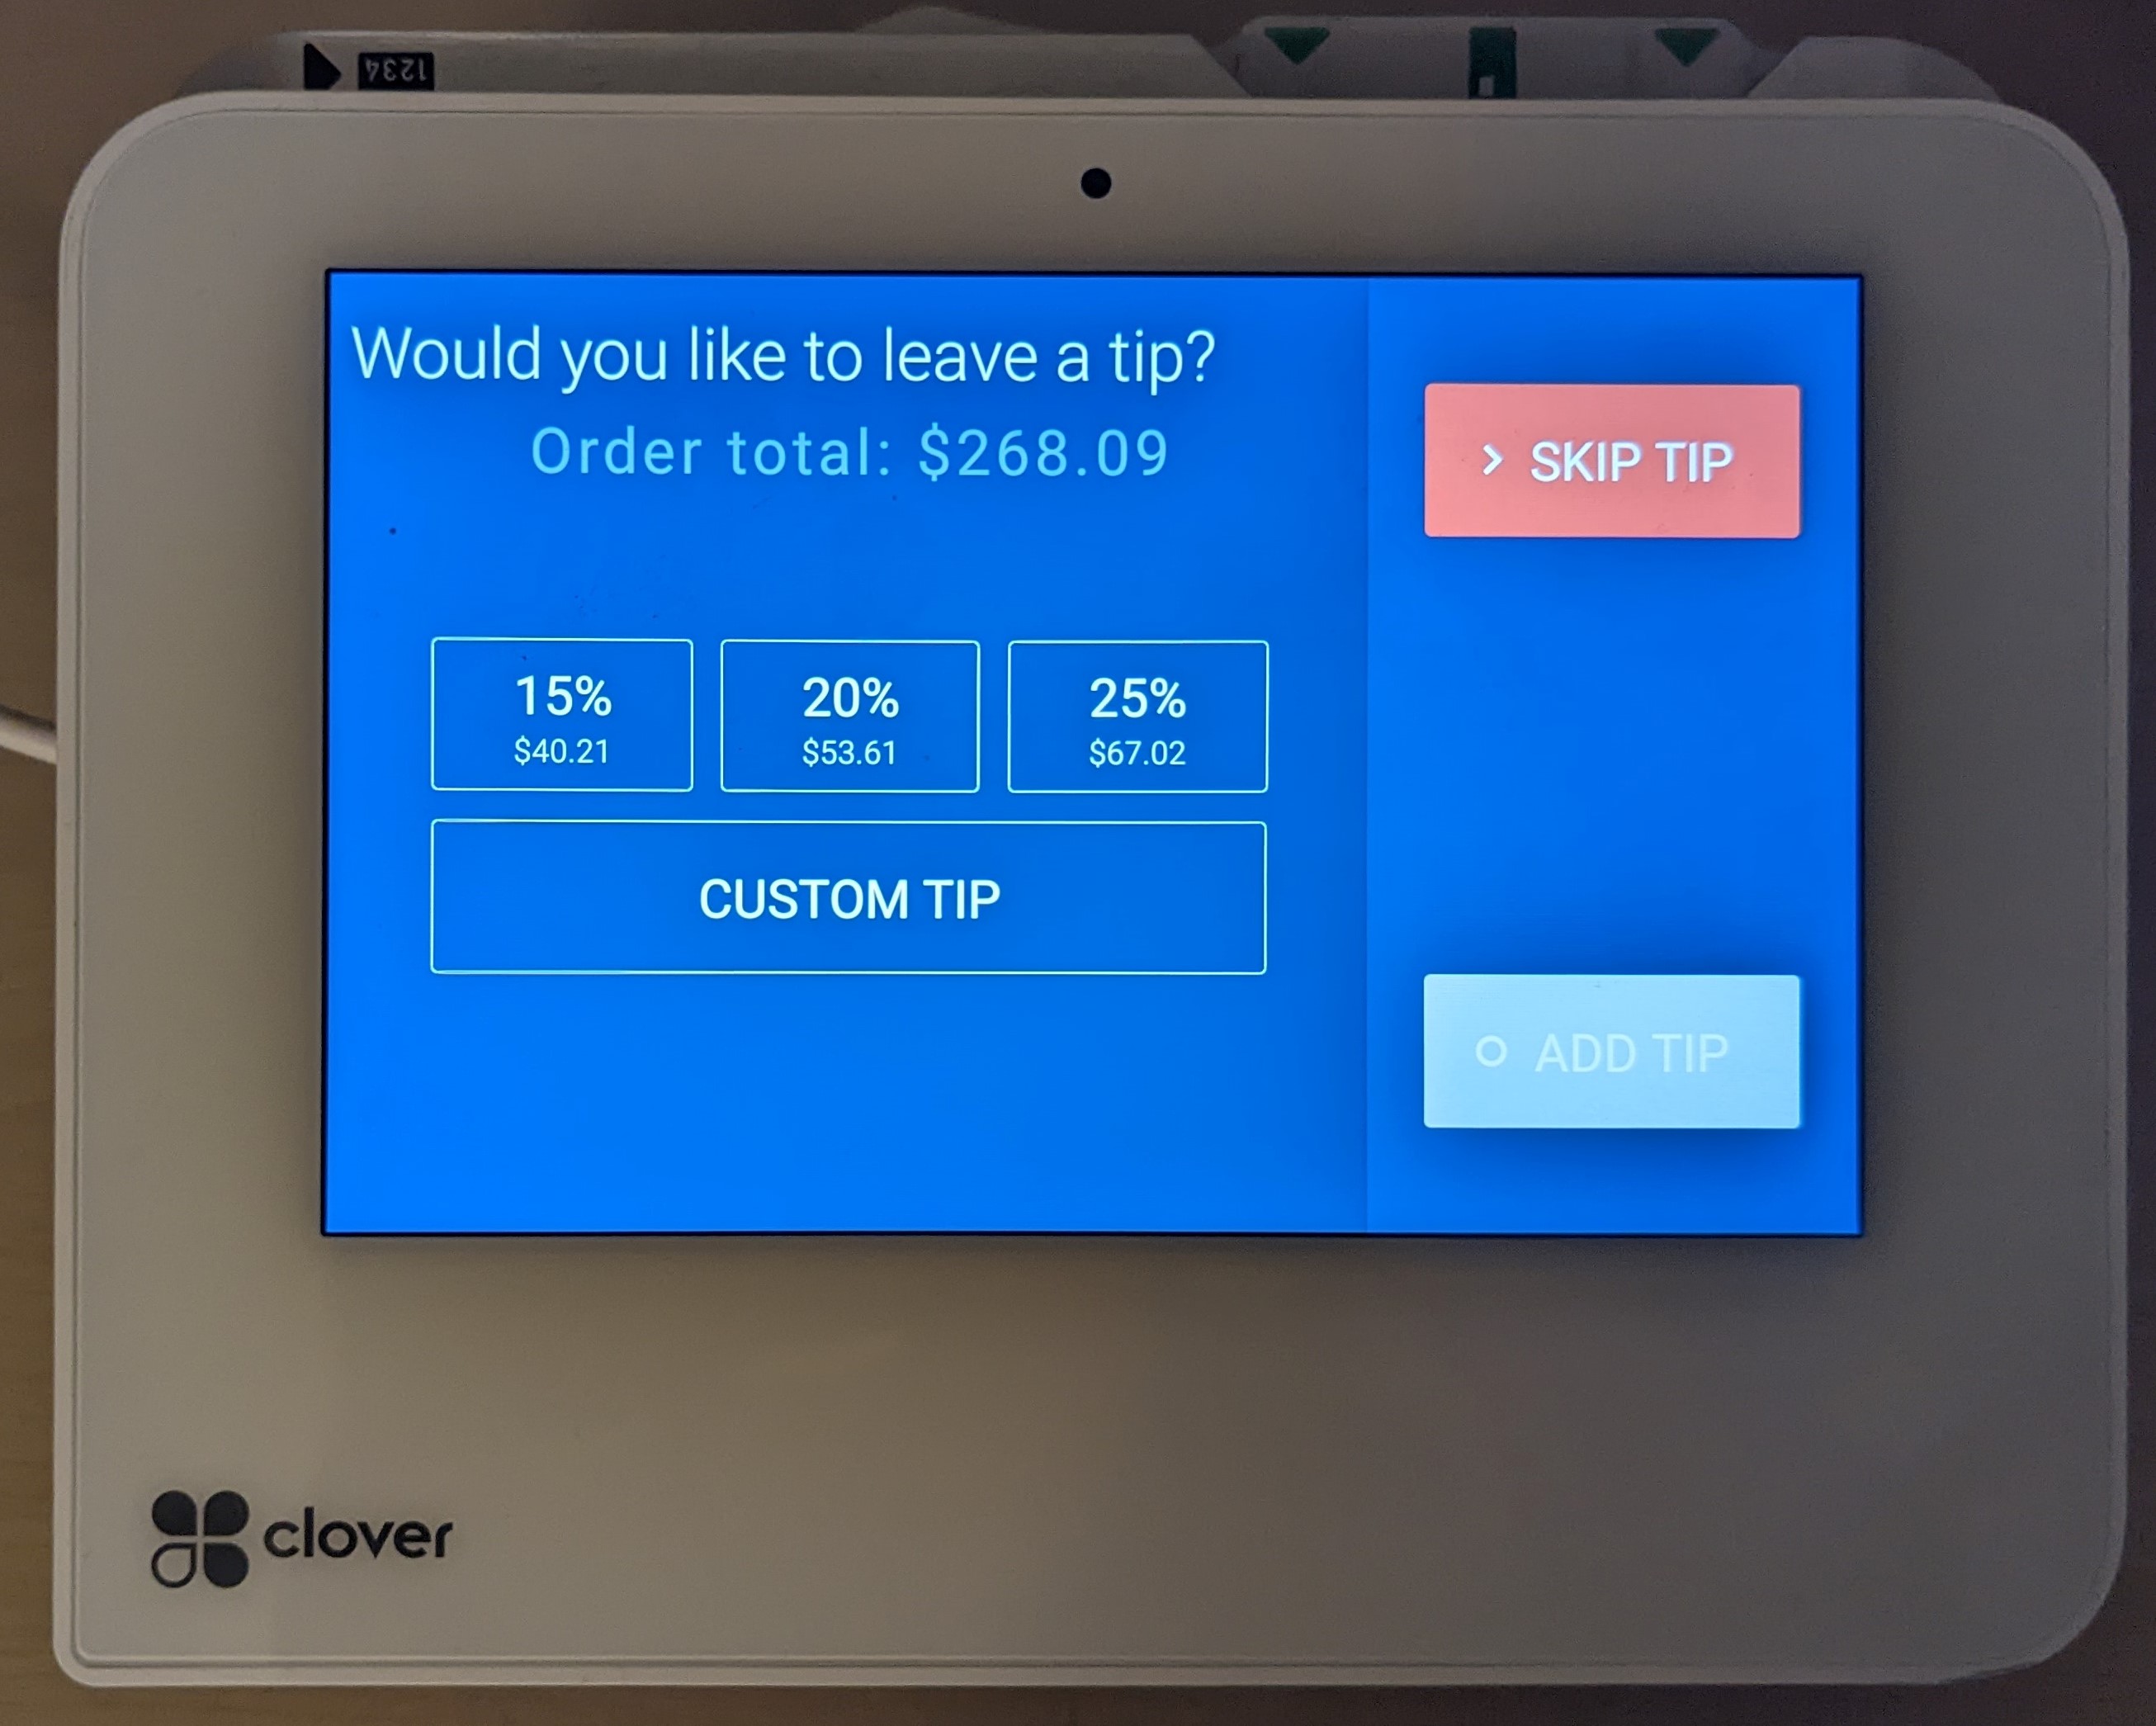
-
The client tips on the Clover machine
-
The payment is processed for the first merchant
 ➜
➜
-
The client can remove their card and the payments are then processed for the other merchant accounts with message displayed to the client on the Clover device and staff see the progress bar in ScheduleAnyone
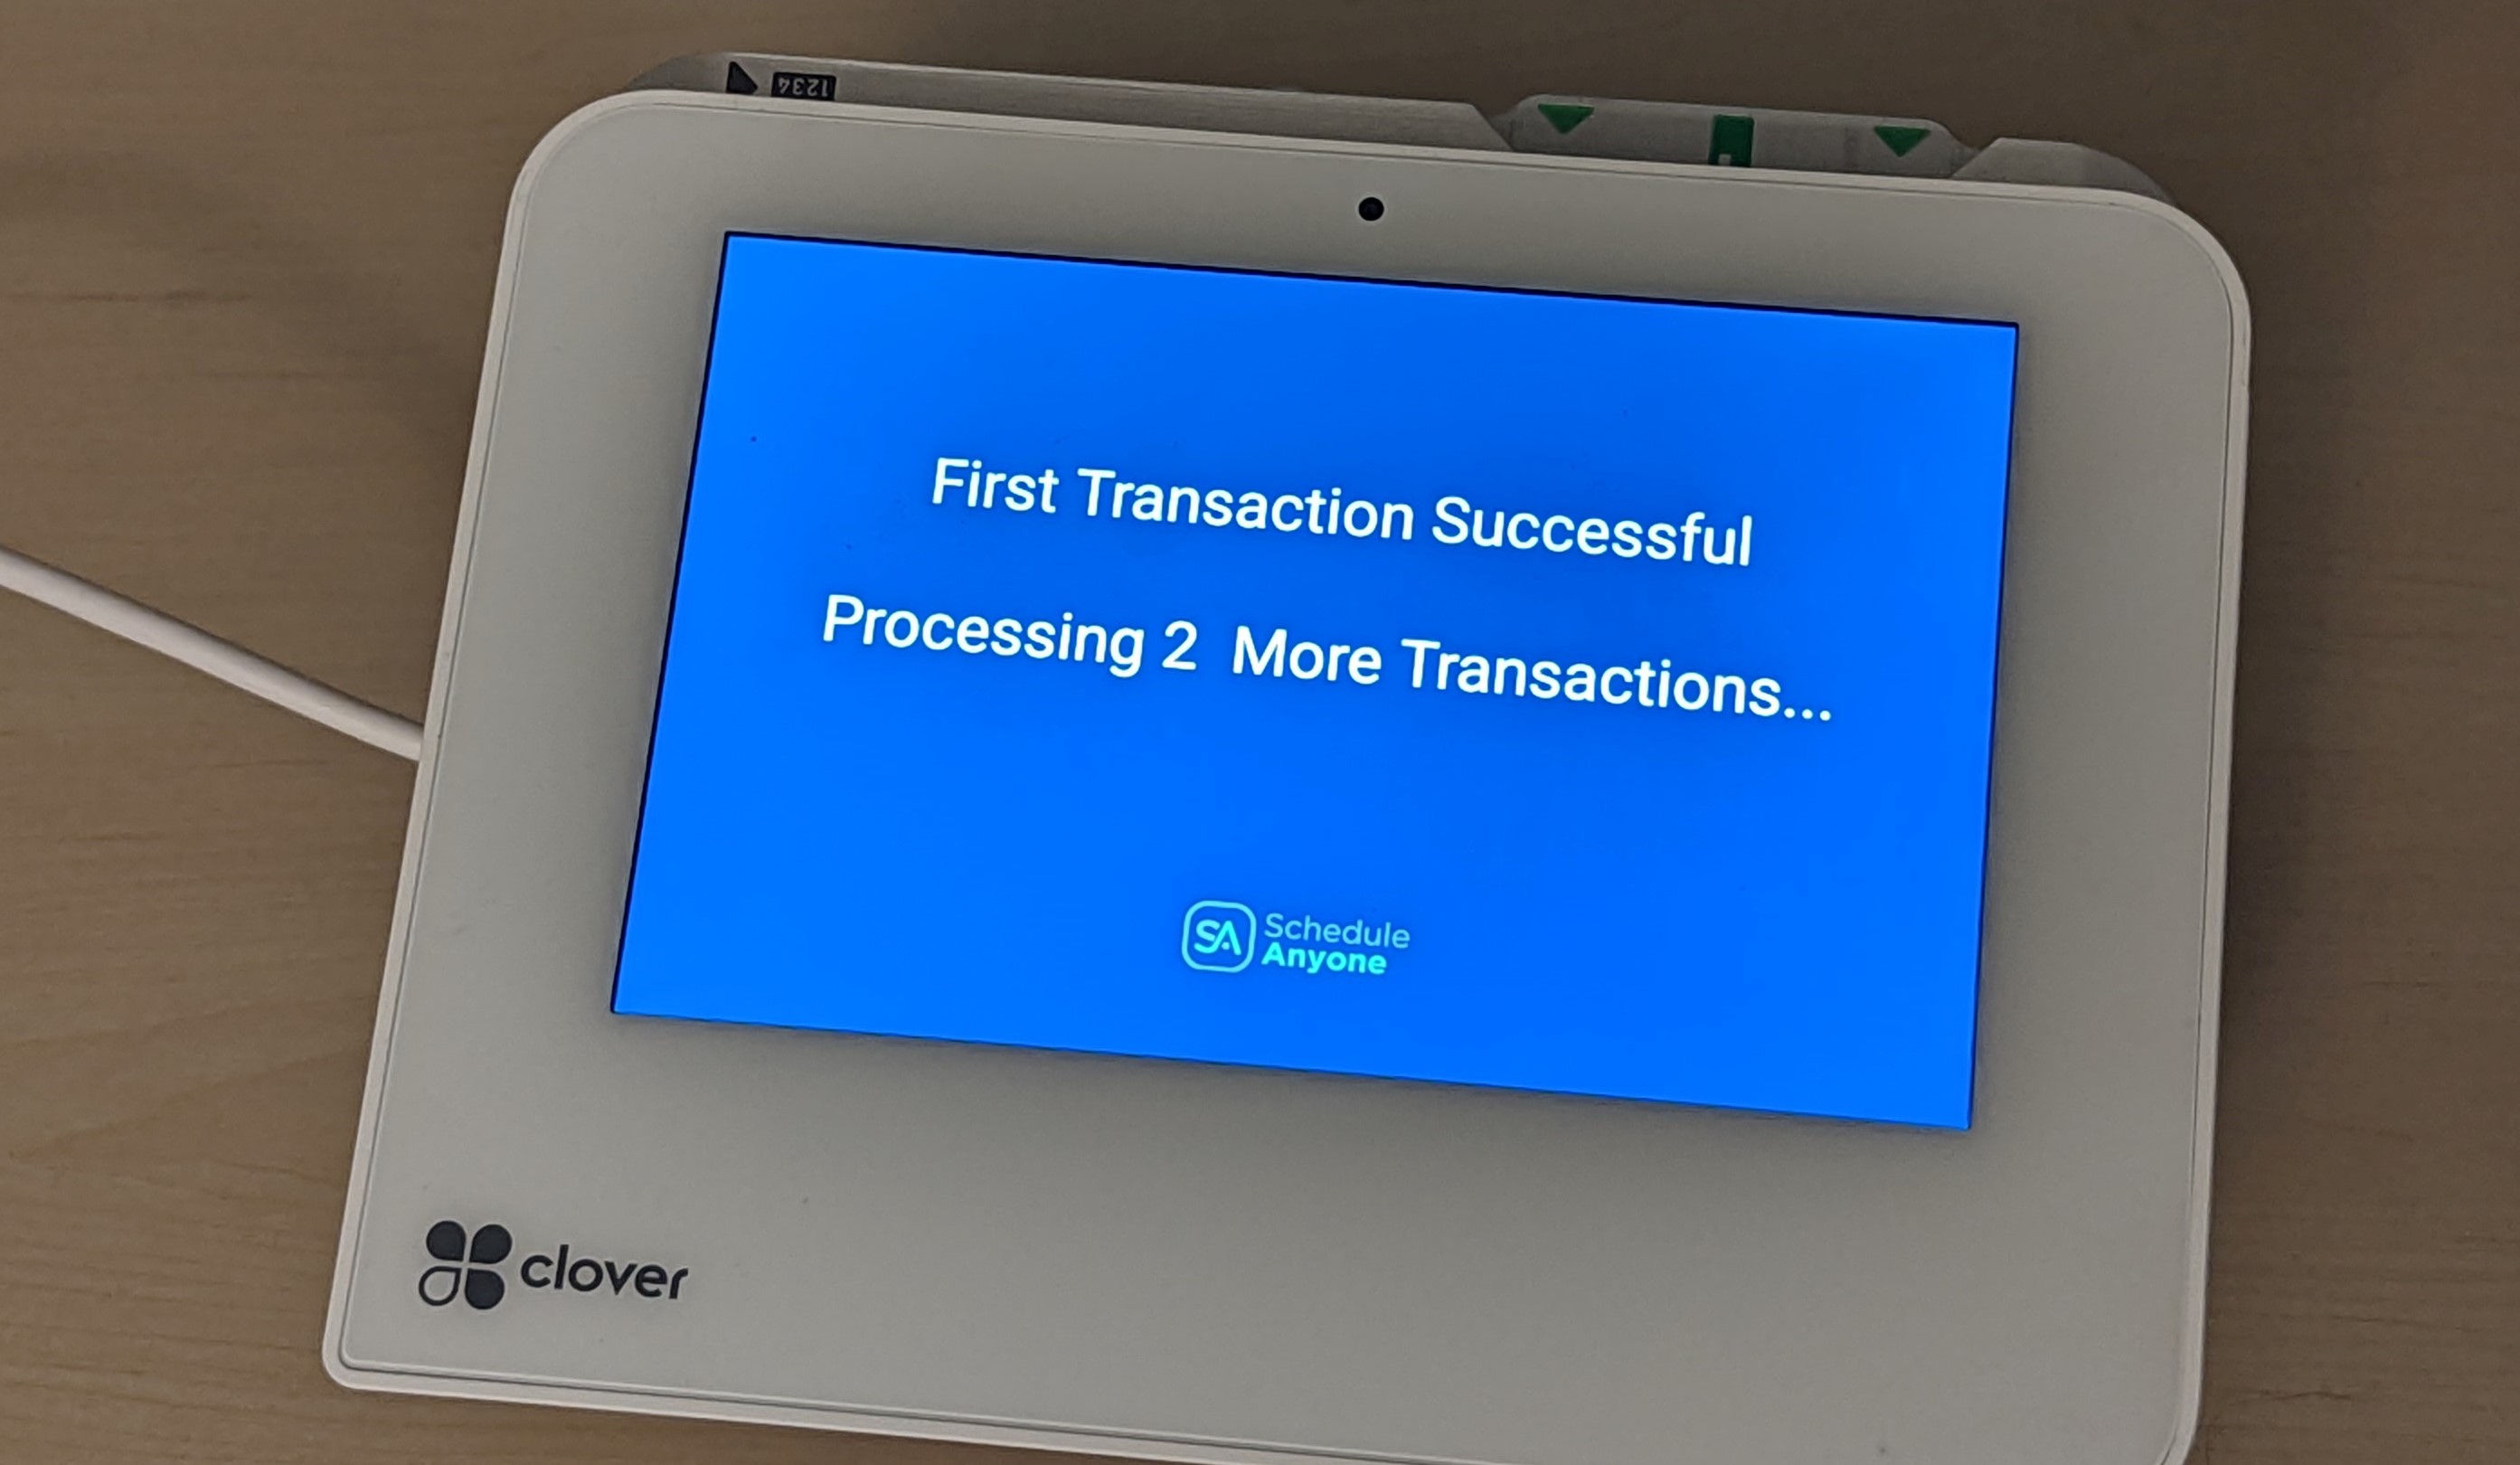
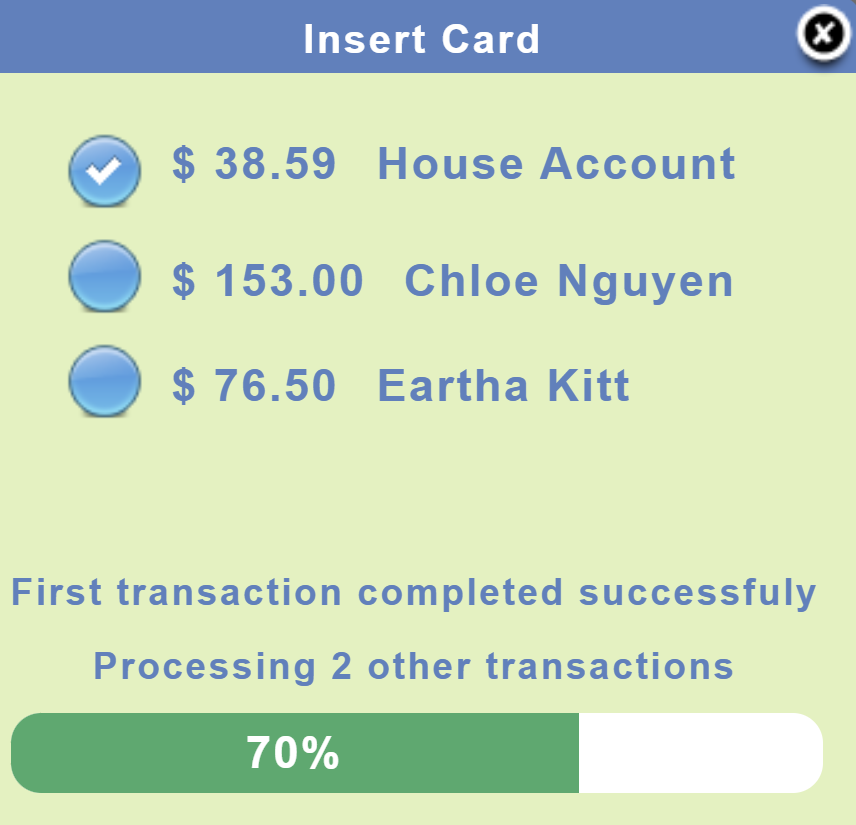
There is a 20-30 second delay between the first transaction and the 2nd transaction
There is typically only a 1-2 second transaction between the 2nd and 3rd transaction
How does Storing Cards-on-File work?
When processing a credit card you have the option to store the card on file
If a staff member marks a card to be stored online the client receives an email or text confirmation that their card was successfully stored on file at your business
The actual credit card number is not stored, instead a token authorization is stored
This token only works with your merchant account, even if somehow someone found this token it could only be used at your business
How Store Card-on-File?
-
After processing a credit/debit card the Ticket popup displays each payment

-
Pressing the button Store Card opens the Confirm Store Card popup
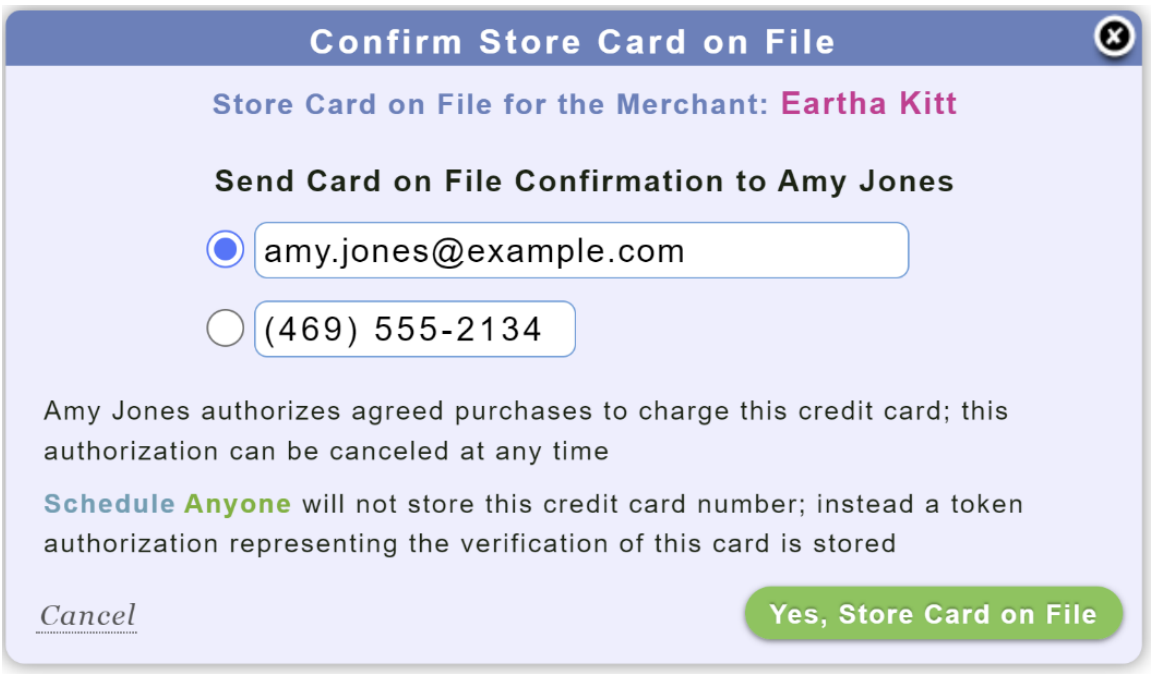
- Storing the card-on-file will text or email the client informing them that their card has been stored on file at your business
-
For example, the store card confirmation text message sent to the client looks like:
Your Discover card ending in 3091 is now stored on file at Candle Nails
How Use Card-on-File?
When a client has a card-on-file their name on reports and the calendar will have the card-on-file icon to the left of their name
To process the card on file just select the payment method Credit Card like you normally would then you’ll see the button Use Card on File
Card-on-File is the easiest way to process payments for regular clients
How Issue Credit/Debit Card Refund?
To refund a credit/debit card transaction
- From the ticket popup press Edit Payment (next to the credit card payment)
- In the Edit Payment popup set the New Amount (to refund the entire payment set the New Amount to "0")

To open the Ticket Popup for an Appointment
- Open the Appointment ➜ can open from the calendar or click the appointment/ticket date on any report
- Press the price ➜ top left corner of Edit Appointment popup
To open the Ticket Popup for a Class
- Open the Appointment ➜ can open from the calendar or click the appointment/ticket date on any report
- Press the price ➜ top left corner of Edit Appointment popup
- Press the client name
How Reimburse Credit Card Fees
You can setup a Credit Card Convenience Fee that charges your clients a small fee to offset your credit card fee
Go to the Add-On Fee Report and create an Add-On Fees that will always apply if the client pays with a credit card
Client Tipping
How Can Client's Add Tip to Credit/Debit Payment?
It is easy to enter the tip on a Clover device connected to ScheduleAnyone
How Can Staff Add Tip to Credit/Debit Payment?
Staff can enter the tip amount before or after payment
If the staff enter the tip amount before taking payment then the Clover device will skip the tip screen and allow the client to simply insert or tap their card

If staff enter the tip after taking the credit card payment then simply add the tip then press the save button
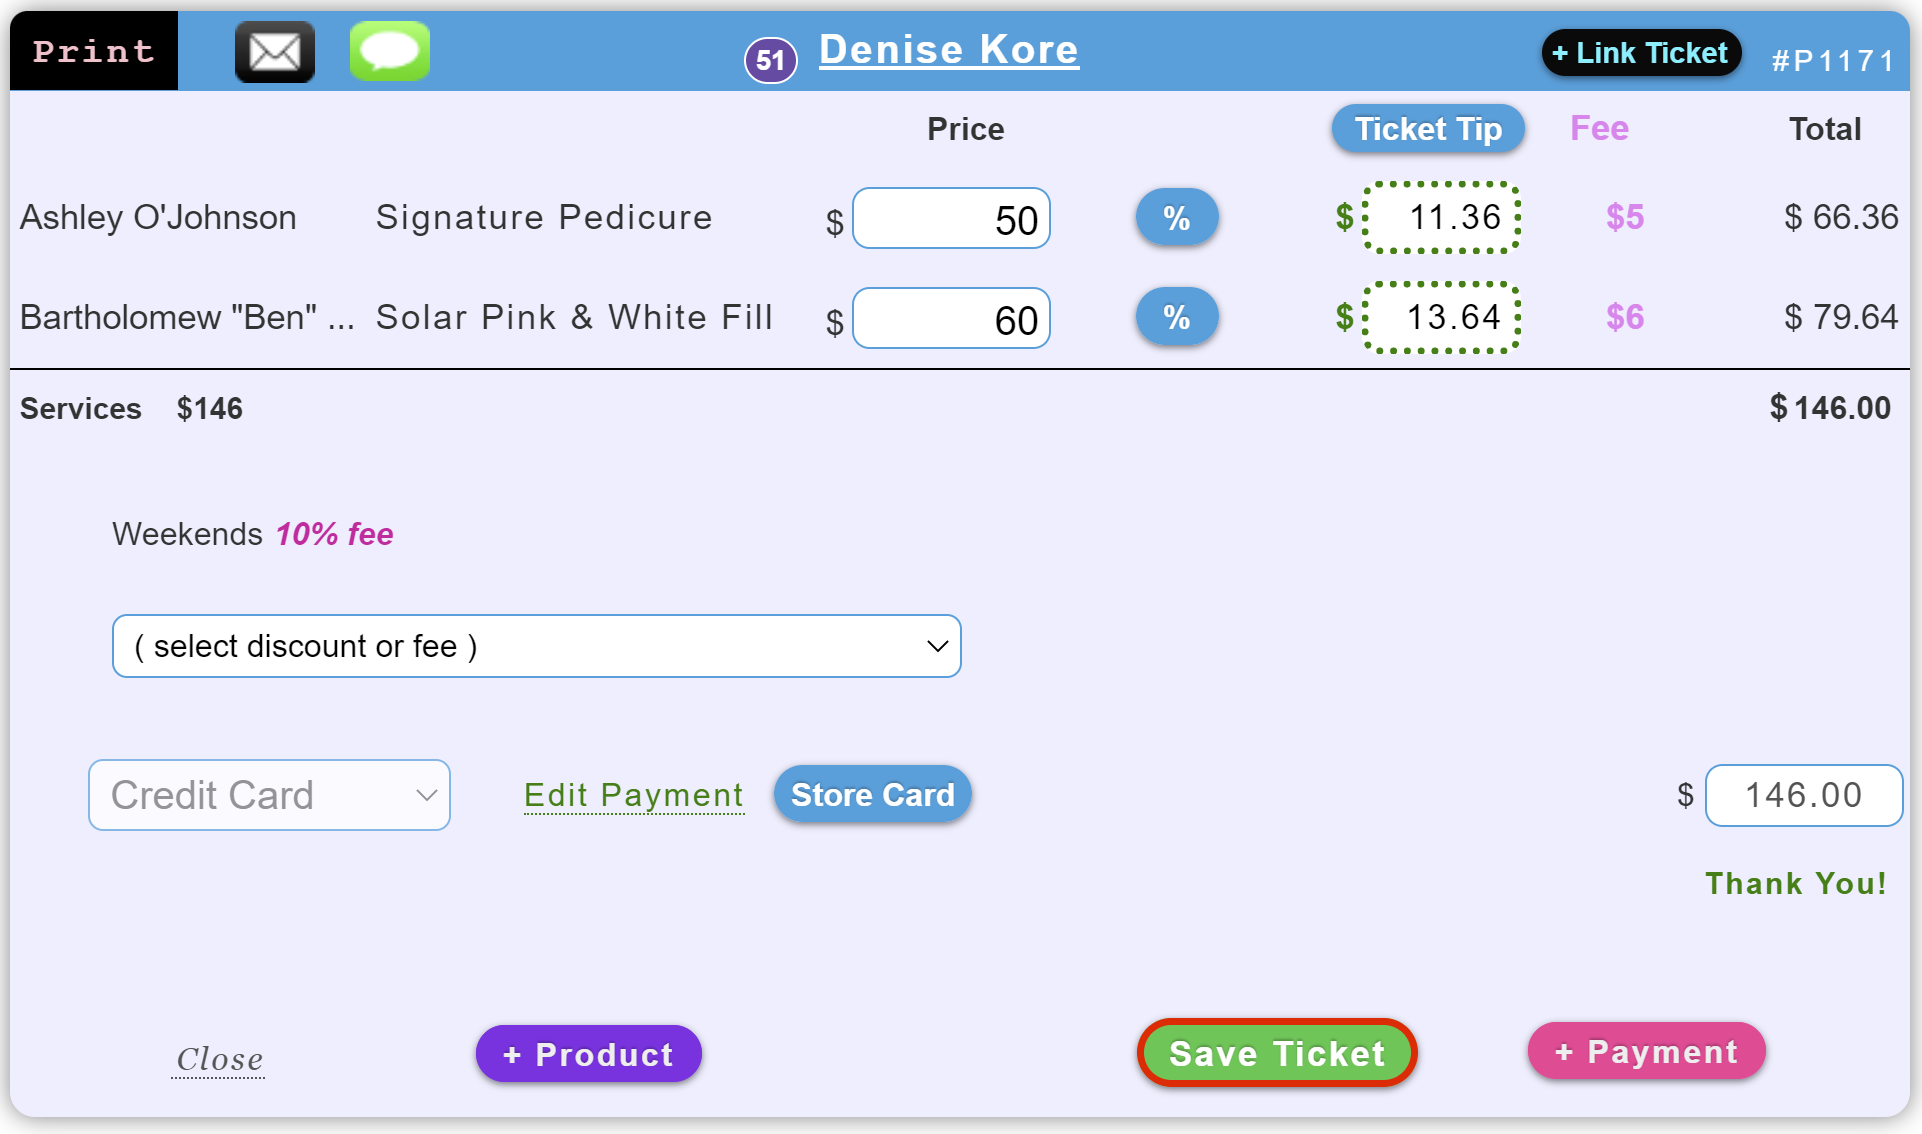
The green dotted border around the tip amounts indicate that the $25 tip ($11.36 to Ashley + $13.64 to Ben) will be charged to Denise's card
Customize Client Tip Process
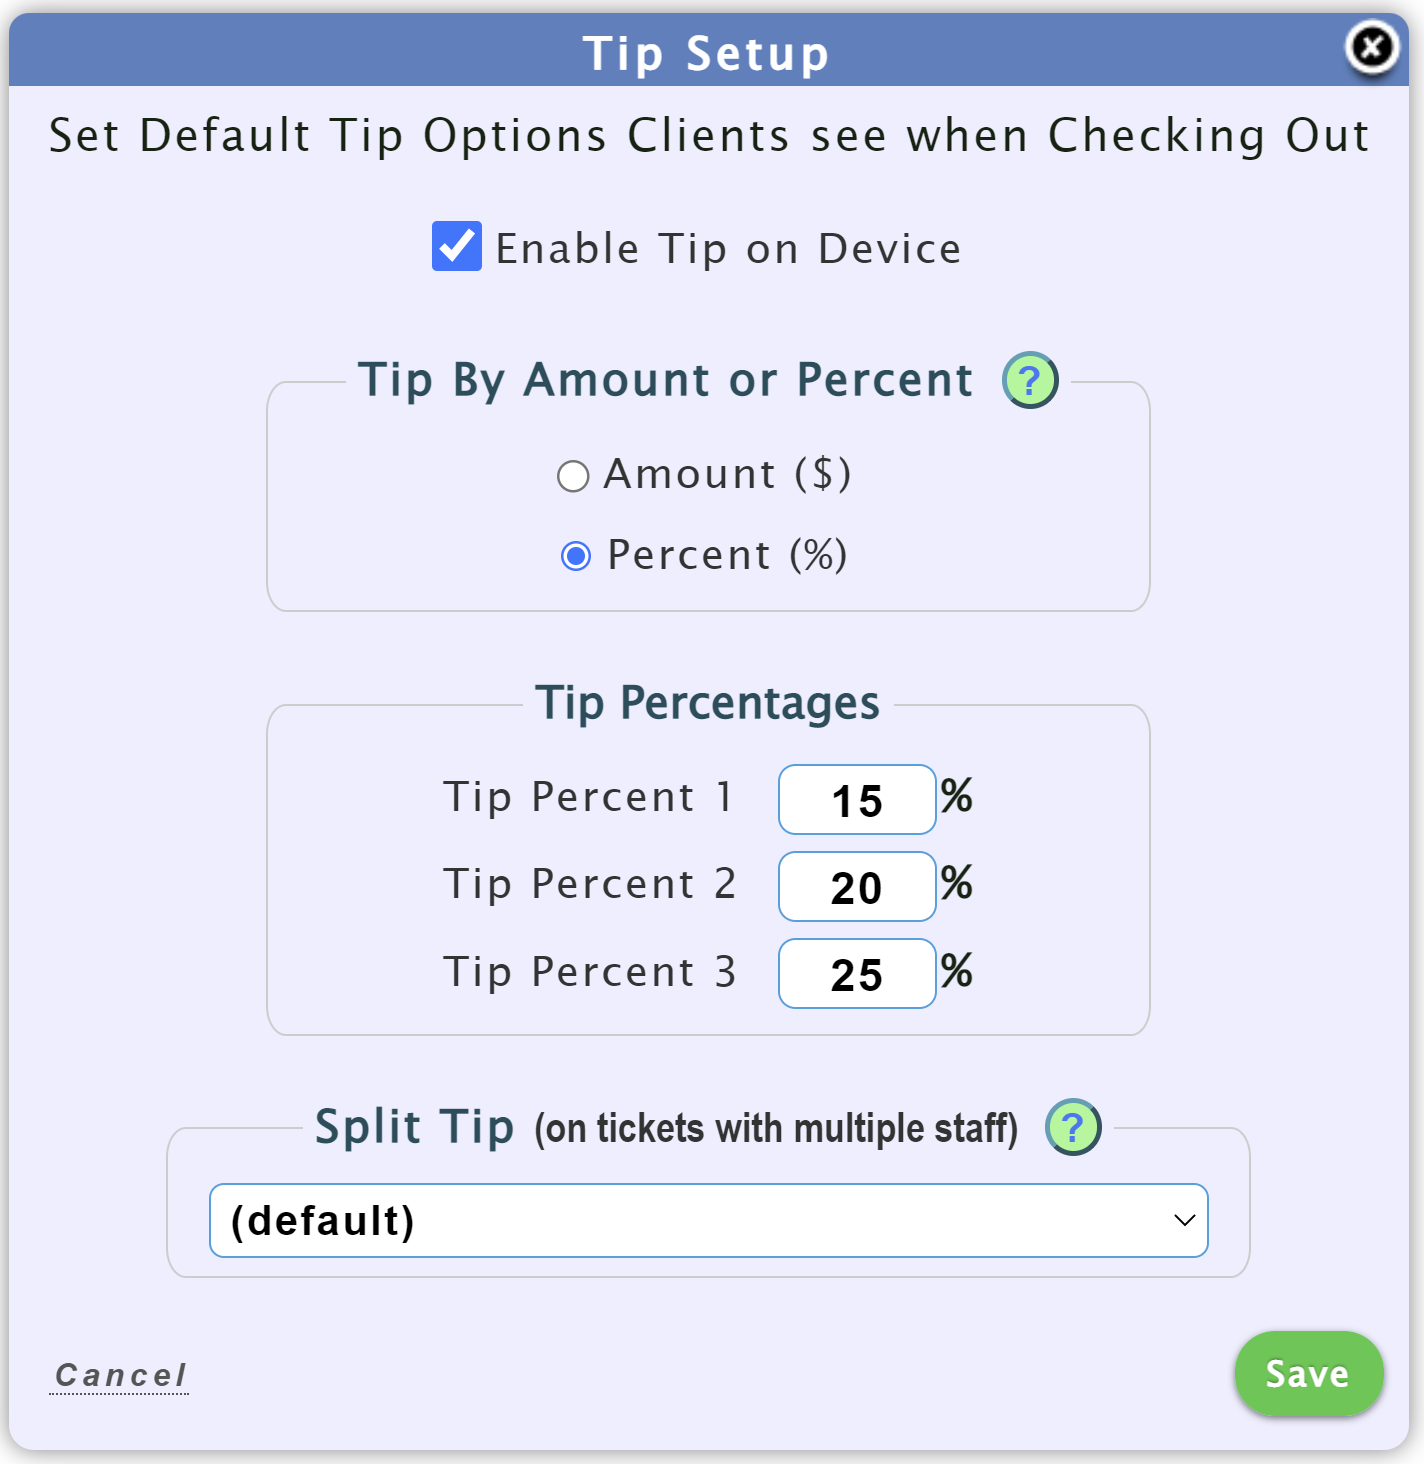
Your Clover machine (or other credit card device) can be customized how the client enters the tip (or turn off tipping)
- Go to Profile -> Advanced, Payments tab
- Pess the button Setup Payment Devices
-
On the Manage Payment Devices screen press the button Setup Tips
-
In the Tip Setup popup select how you want the Clover device to ask for the tip, and how the tip is split between staff (when there is more than 1 staff on the ticket)
Split Tip Between Staff
ScheduleAnyone offers an easy way to split the tip between staff on a specific ticket
On the Ticket popup press the button Ticket Tip
The Ticket Tip popup allows you to quickly enter the tip by percent or amount, as well as increase/decrease a current tip amount + many options for how you want to split the tip between the staff on the ticket
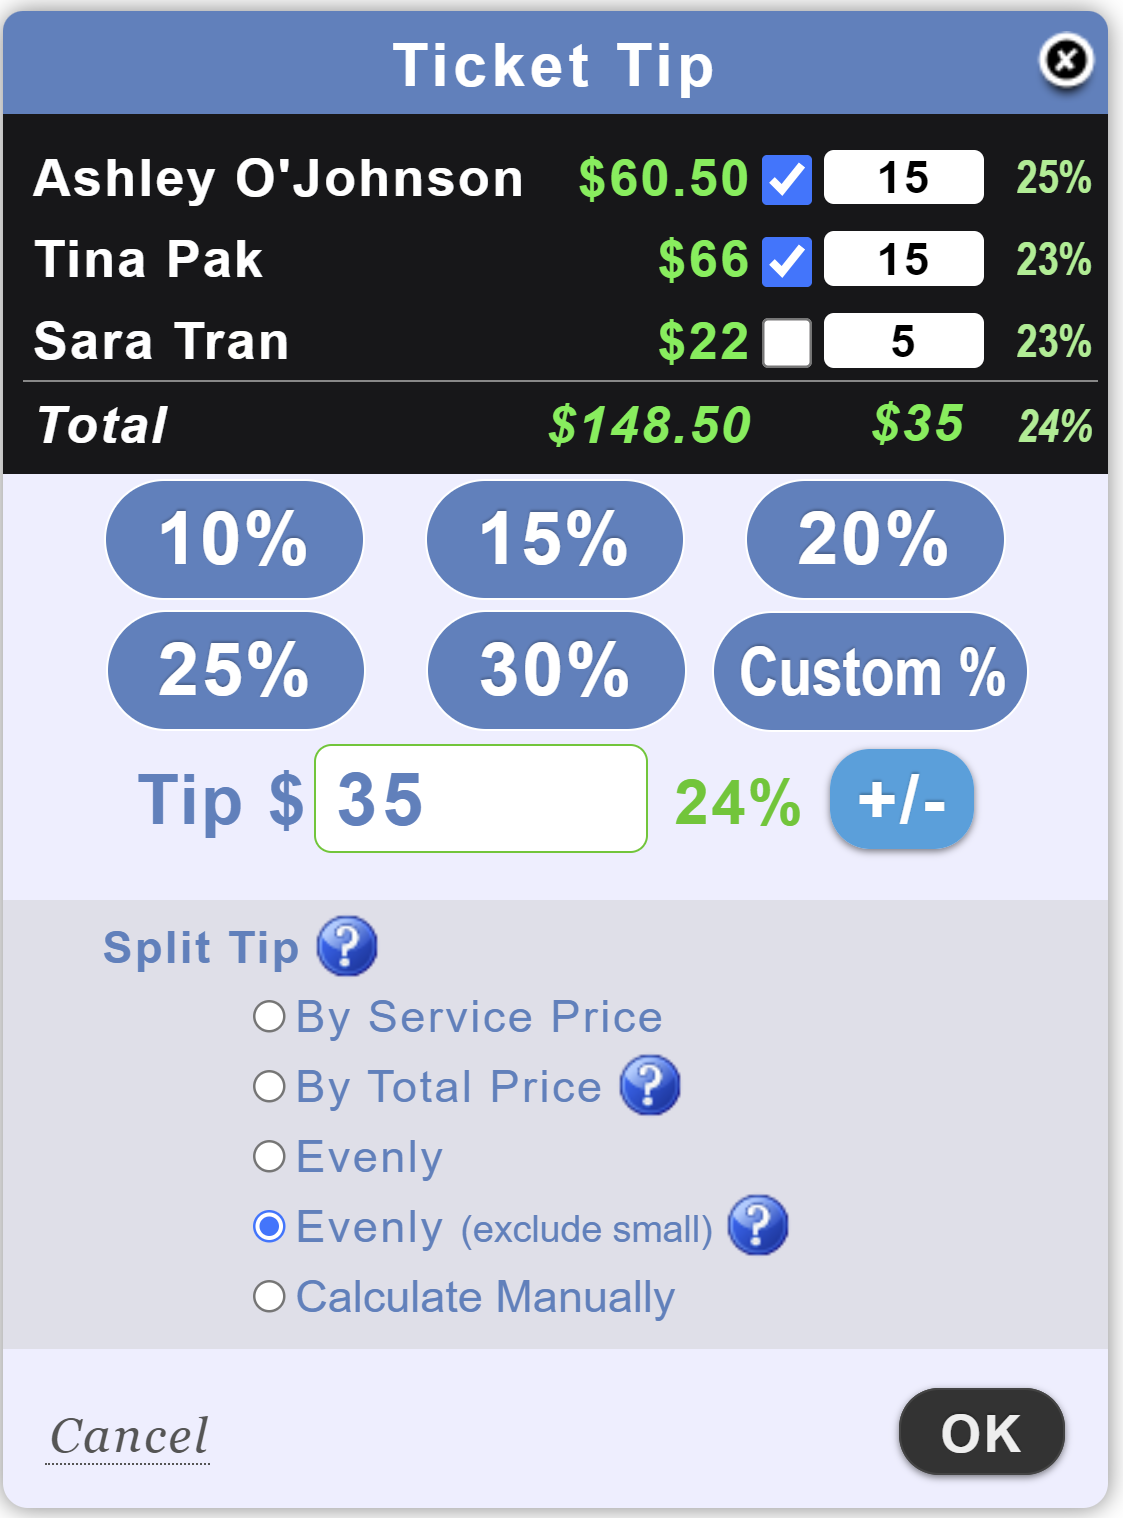
So you can throw away the calculator at the front desk! ➜ The Ticket popup and Ticket Tip popup have enough options where the calculation is simplified and displayed in an easy way for staff to understand
The Default Tip Split setting can also be changed
Discounts & Add-On Fees
Add, Edit, or Remove Add-On Fee?
On the Manage Add-On Fees screen you can create/edit Add-On Fees that should always apply based on different rules or can optionally be applied before or during checkout
Add-On Fees are either a dollar amount or a percentage of the matching products/services on the ticket
Add-On Fees can be setup to only apply during a certain date range (or leave the date range empty if you want the Add-On Fee to never expire)
Add-On Fees can also be set to apply only when a minimum purchase amount is reached
Add-On Fees can also be applied based on a specific combination of products and/or services, or many other rules
Add, Edit, or Remove Discount?
On the Manage Discount page you can create discounts that should always apply based on different rules or can optionally be applied
Discounts are either a dollar amount or a percentage of the matching purchased products/services
Discounts can be setup to only apply during a certain date range (or leave the date range empty if you want the discount to never expire)
Discounts can also be set to apply only when a minimum purchase amount is reached
Discounts can also be applied based on a specific combination of products and/or services, such as when a client
- does both a manicure and pedicure
- gets a hair cut, hair color, and buys a product
- gets a massage and buys a product
- buys a certain combination of products
- Or comes in on a slow day (like on Monday or Tuesday) or slow time (like 10 am - 2pm)
- or many other options...
Change Service Discount or Add-On Fee on a Specific Ticket
Staff with the role Limited Receptionist role can change the default service discount or service add-on fee on any ticket by pressing the discount or add-on fee on the ticket
This opens the popup where you can customize the ticket's discount or add-on fee by service
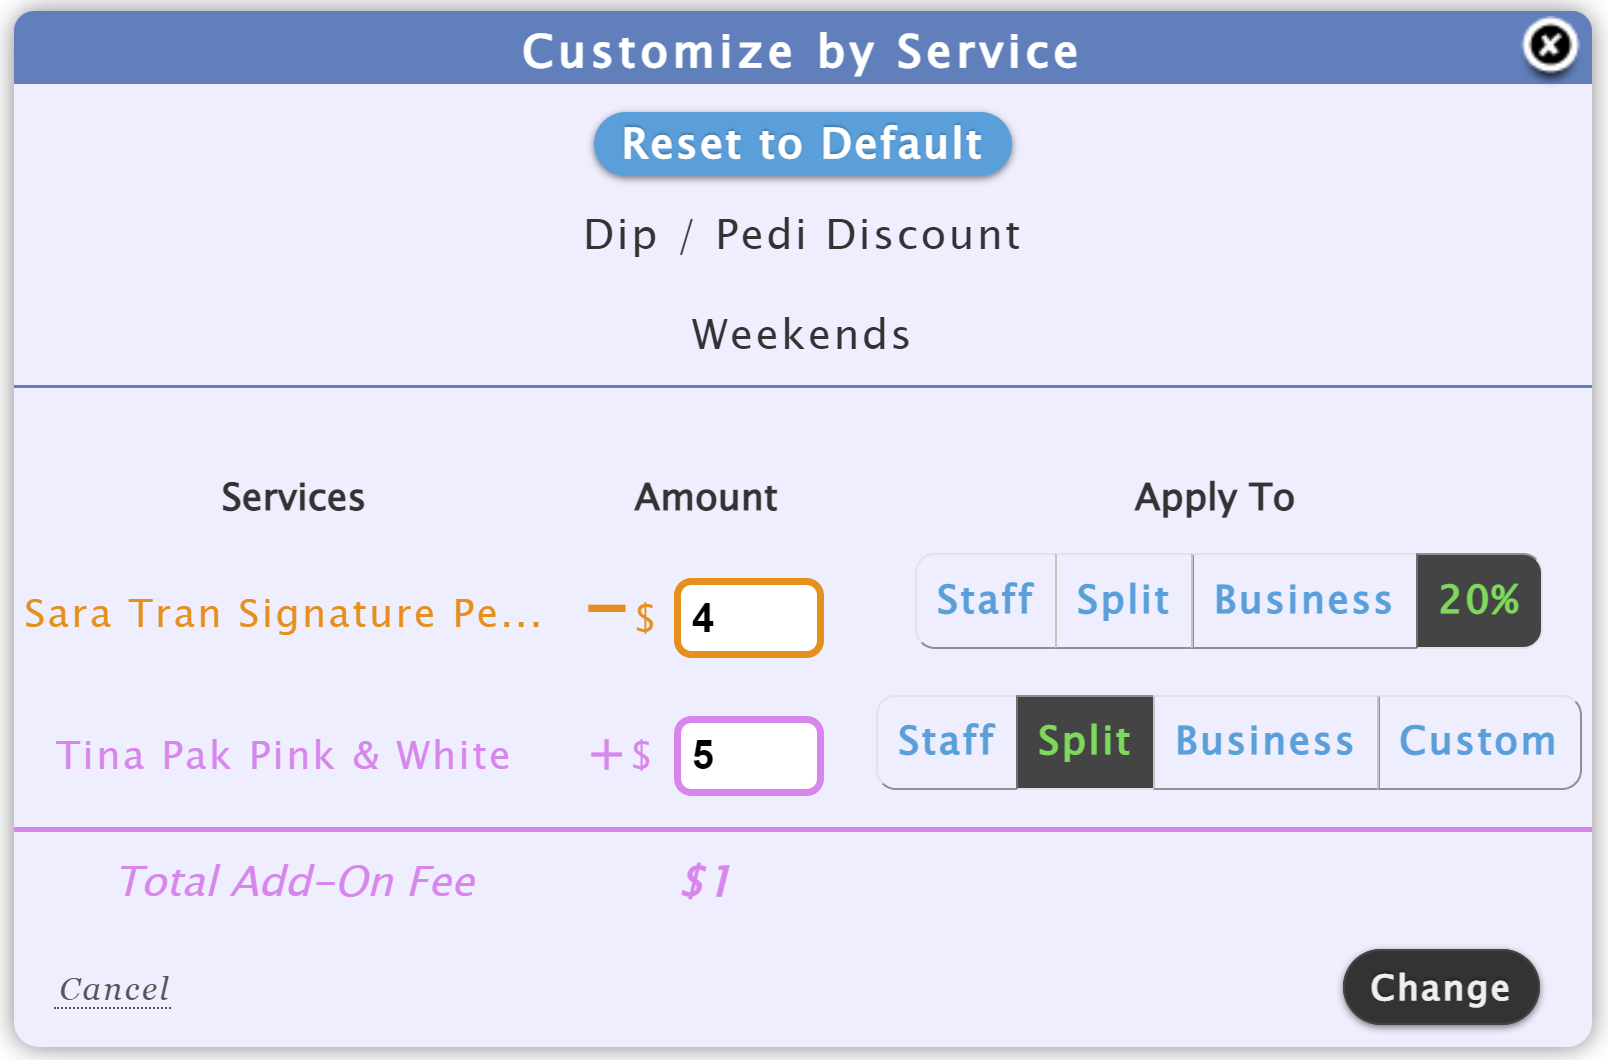
The Customize by Service popup also allows changing how the Discount Commission or Add-On Fee Commission is applied on the ticket (is the discount/fee taken out of the business profits, staff commission, or split between the business and staff)
How Change Ticket's Discount or Add-On Fee?
Discounts and Add-On Fees that qualifiy for a ticket (based on the Discount or Add-On Fee rules setup when creating the discount or fee) will be displayed
Discounts and Add-On Fees setup to Always Apply (when applicable) will automatically apply, other discounts can be selected as desired
After an appointment is checked-out the discount or add-on fee cannot be changed
If you need to change a discount or add-on fee after an appointment is checked out, simply change the appointments status to anything other than "Checked Out" (so just mark in as "Checked-In" or empty
Loyalty Points
What is a Loyalty Program?
Encourage repeat business from clients by creating a Loyalty program
You can customize how clients can earn loyalty points and how clients can redeem loyalty points
Clients then automatically earn loyalty points after checkout when they pay for their appointment - it's as easy as that!
How Setup Loyalty Rewards Program for Clients?
Clients earn loyalty points when they spend money at your business
- Go to Profile ➜ Advanced, clients tab
- Near the top of the screen press the purple button Setup Loyalty Program
- Check the box at the top of the screen Earn Loyalty Points to turn on your loyalty program
-
Setup how you want clients to
- Earn loyalty points
- Redeem loyalty points
- Once you enable your loyalty program then you are done, ScheduleAnyone automatically adds the loyalty points to the client's profile when the appointment is paid and checked-out
- Loyalty points are displayed at the top of the client's profile
- When creating or opening an appointment the loyalty points are displayed next to the clients name in a purple bubble like ➜ 15
View Loyalty Points?
Whenver you create or open an appointment it automatically displays how many loyalty points that client has
Loyalty points are also displayed at the top of every client's profile (if they have loyalty points)
You can also view loyalty points on the Client List and Ticket History report
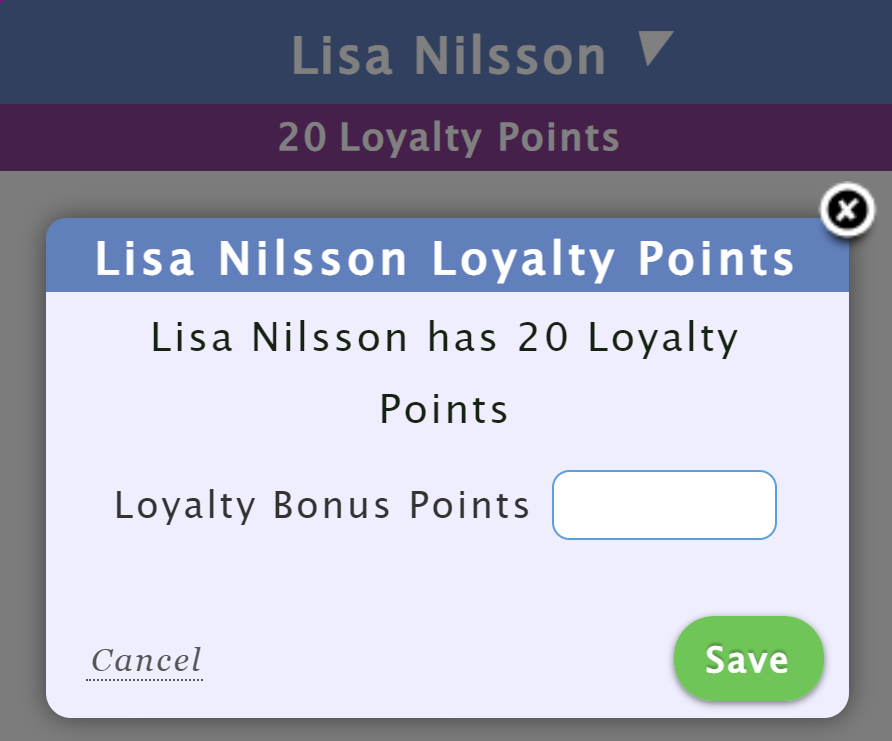
Give Client Bonus Loyalty Points?
Only staff with the role of manager or admin can add bonus loyalty points
Loyalty points are also displayed at the top of every client's profile (if they have loyalty points)
Press the loyalty points banner at the top of the client's profile to update their bonus points
Receipt Printer
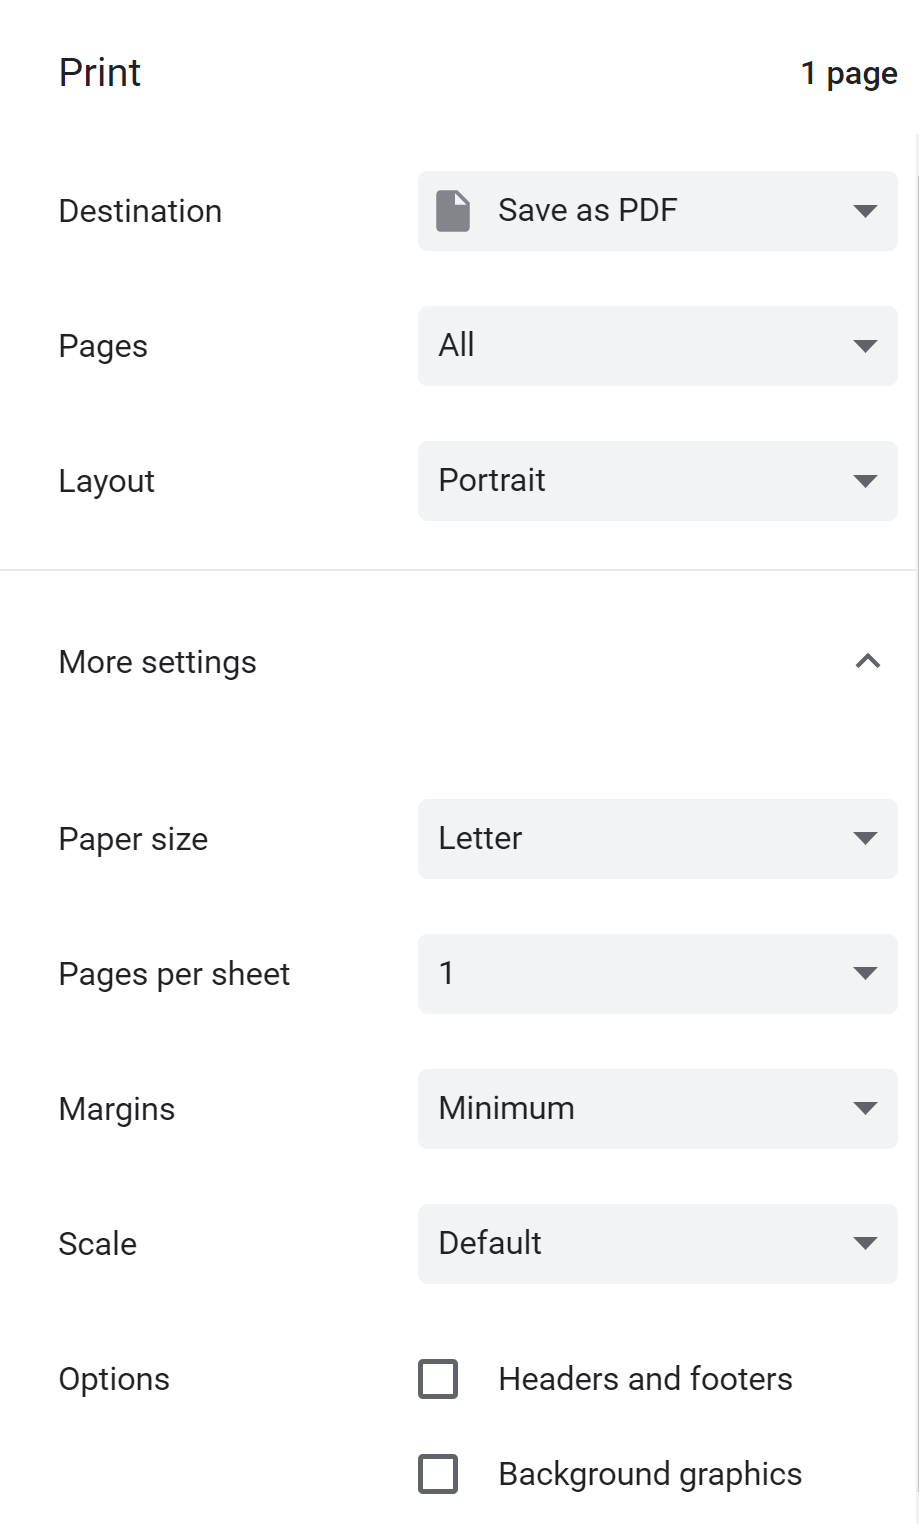
Setup Computer Printer Margins
When printing from a computer (Windows, Mac, etc) we suggest using the Google Chrome browser
Here is how to adjust the print margins in Google's Chrome browser
- Open appointment
- In Edit Appointment popup press price (top left corner)
- In Ticket popup press print button (top left corner)
- In the print preview, in the area on the right press More Settings and here are how the settings should look
- Change the settings to the above and press Save (bottom right corner)
There are many receipt printer options that can also be set in ScheduleAnyone go to Customize Receipt
Open Cash Drawer
You can install the ScheduleAnyone Printer Utility to automatically open the cash drawer on cash payments and also display an open drawer button the Calendar and POS Screen
Go to the Cash Drawer report and press the button: Open Drawer Setting
In the Open Cash Drawer Setting popup select the option Display Open Cash Drawer Button + Select Receipt Printer
This will display the option to install the ScheduleAnyone Printer Utility ?
Follow the instructions to install the ScheduleAnyone Printer Utility
Print Receipt after Card Payment
After taking payment you can print a receipt for the client by pressing the print button on the ticket popup
You can also automatically print a receipt on either the Clover device or a receipt printer (or both) ➜ this can be setup differently on each device (so for example you can have: 1 computer auto print, 1 iPad auto print, and other devices not auto-print the receipt)
In ScheduleAnyone, go to Profile -> Advanced, payments tab and press the button Customize Receipt
To print the receipt only on the receipt printer: On the Customize Receipt screen
- Under Use Clover Printer select Never Use This Printer (if that is already selected select Ask Customer wait 5 seconds, then select Never Use This Printer)
- Change On Credit Card Payments to Print Receipt on receipt printer
- On a computer, setup Kiosk Mode to print without the print preview popup
Troubleshoot Printing Receipts (on Windows Computers)
- Open ScheduleAnyone in Google's Chrome browser (not in Kiosk Mode)
- Open an appointment, then in the Appointment popup press the price (top left corner) to open the ticket popup
- In the ticket popup press the print button (top left corner)
- In the print preview (the area on the right of the screen) verify the destination is correct
- Press print to verify the receipt prints
- If the receipt does not print, go to the windows task bar (bottom of screen) and enter "Printers" to open ➜ your computer's Printer Settings, if the printer is not listed you will need to install it
- If you do not know how to find your printer drivers to install send an email to contact@ScheduleAnyone.com with a picture of your printer and we will email you more instructions
Other
Sell Gift Cards Online?
Selling gift cards online is a great way to increase revenue and grow your business
Happy customers will bring you even more customers when they can easily buy gift cards for their friends and family members
Go to your Gift Card Setup screen to customize how your gift cards are sold online
How Setup Client Membership Program?
Build recurring revenue and reward your most valuable customers with a Membership program
Learn How to Setup a Membership program for your clients in ScheduleAnyone
Setup Front Desk User
You can create a Front Desk staff to allow staff to use the front desk computer(s) with the ability to manage the schedule as well as check-in and checkout clients, but with restricted access such as
- Hiding Client Contact Information
- Requiring Password on Edits
- Setup your company devices then ➜ Restricting logging in to only company devices
Each staff can also have their own username/password with different staff roles and permissions
ScheduleAnyone has everything you need to mange your client database and keep your customers coming back with reminders, automatic follow-ups, email/text marketing blasts, and more; check it out in our ➜ Client List Guide
How View All Notes for a Client?
At the top of a client's profile and at the top of the Edit Appointment popup is client's name ➜ and a white triangle next to the client name

Press the white triangle to see the client profile menue, then select Note History
The Client Note History displays all the notes and images for that client and the notes are color coded by note type
Add a Client?
When you create an appointment you can just enter the client name and when you click save it will open the add client popup with the name already populated.
You can enter more information about the client now or just click save. (You can save even more infomation about the client by going to the client's profile).

How do I lookup a client?
To pull up a client's profile, enter the client name in the search box that is at the top of every page.
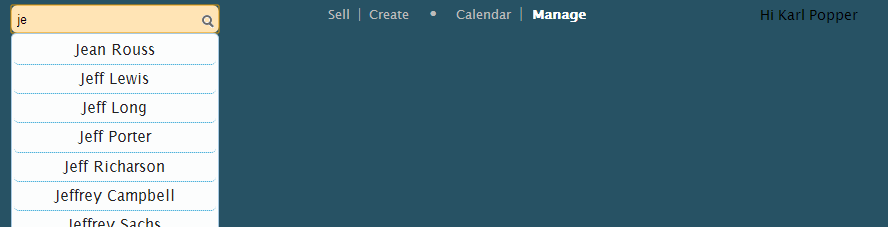
If you enter two letters and space and two more letters (such as "br bo") it will search for clients where the first 2 digits of last name + first name match (for example "br bo" --> finds "Brian Bober")

You can also search by phone number (it will ignore area code, unless you enter more than 4 numbers).

Also, if you say the client's name anywhere (for eample: when editing an appointment, in any report, etc) just click their name to pull up their profile.
Set How Long Before Appointment Client Can Create/Update/Delete Appointment?
In your profile go to the Business tab and change:
Clients can CREATE appointments until hours before the appointment date
Clients can UPDATE appointments until hours before the appointment date
Track Client Referrals?
On the Manage Referrals page you can add, edit, and remove different types of referrals. You can even have the system automatically apply a discount to the client’s first purchase.
Enter an expiration date if you want the referral to expire (for example: a few weeks after an advertising campaign ends) otherwise just leave that field blank.
You can enter the referral when you create a client (When you create a new client with a referral, that referral is automatically added to their first appointment)
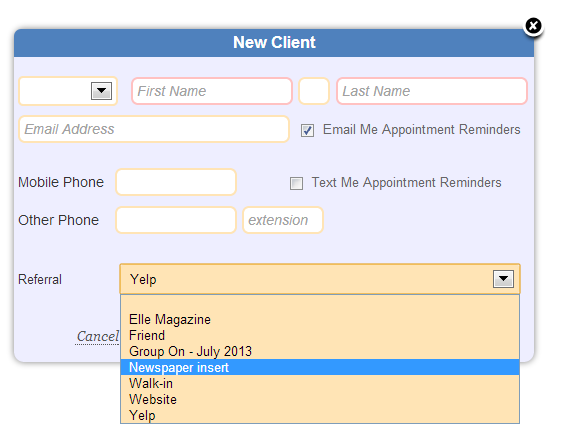
Or you can go to the client’s profile and set how they were originally referred to you:
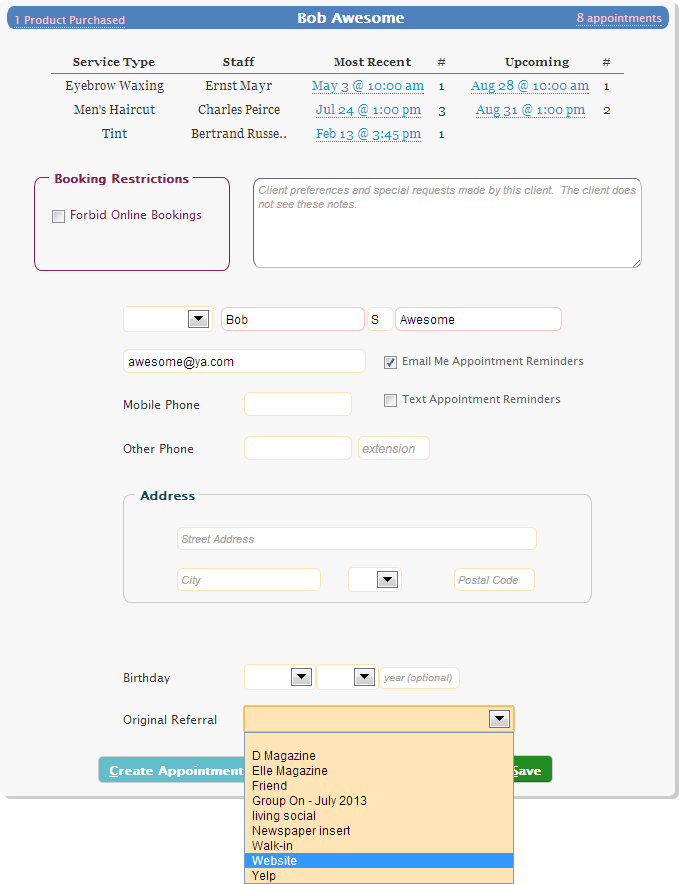
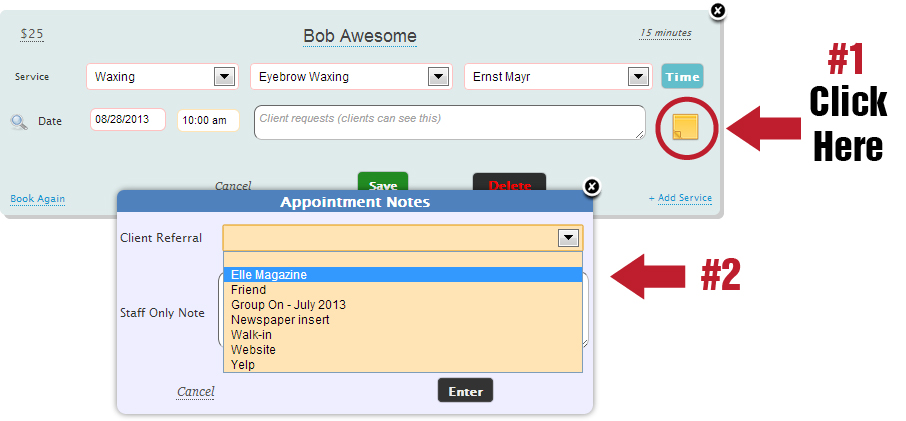
Or you can set a client’s referral for a specific appointment from the edit appointment box by clicking on the staff note icon and selecting the referral from the drop down. This is useful if you have an existing client who you may not have seen for a while return based on an advertisement or because of a coupon.
You can Track Referrals on several reports
- Client Referral Report
- Ticket History Report
- Sales Summurry Report press the Full Summary button at the bottom of the report, then scroll down to the Referral section (if there are no referrals during the time period searched then there will be no referral section)
How Merge Duplicate Clients
Automatic Merge Every weekend duplicate clients are automatically merged (clients with same name and phone and/or email)
Merge Specific Client At the bottom of a Client's Profile press the Merge button which will give you a popup to lookup the client you want to mege with this client staff role must be at least Limited Receptionist to be able to merge clients staff where client contact information is hidden cannot merge clients
Lookup Duplicates or Merge Go to Profile -> Advanced, Client's tab then press the button View Duplicate Clients or Merge Clients
How Create and Add Tags to Clients?
- Create a custom tag in the Tag Manager
- Can add tag(s) to a client by pressing the + Add Tag / Relationship button on the client's profile
- If a client has any tags they are displayed on both the Create Appointment and Edit Appointment popup
- Schedule → Reminders displays client tags next to any client that has a tag
- Can filter both the Ticket History report and Client List report by client tags, relationships, and even notes on those tags/relationships
- Can setup discounts for clients with a specific tag
- For More information click ➜
How Create and Add Relationships between Clients?
Client Relationships are an extended type of Client Tags where you can create a relationship between clients (for more information see the question above)
Can I search deleted client profiles?
Yes, you can! Go to Profile -> Advanced, client tab and press the button: Search Deleted Clients
You can also, un-delete client profiles
Can a client delete their profile?
Clients can request that their profile by deleted - this is required by Apple, Google, and other regulators
Clients cannot delete their profile if they have any current or future appointments
Clients that delete their own profile will not show up in the deleted clients search and cannot have their profile un-deleted
Deleting client profiles will not change sales reports, payment reports, or other reports
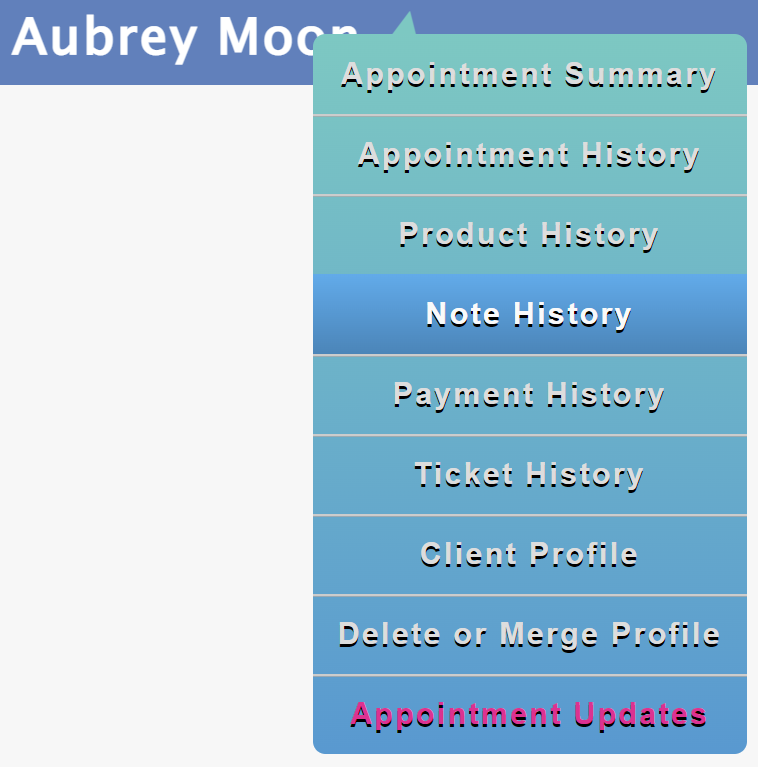
Client Drop Down Menu
The Client Drop Down Menu offers more information about the client including client history and appointment updates
To open the Client Drop Down Menu press blue triangle to right of client name ▼

If opened on the Client's profile (by a Receptionist, Manager, or Admin) the menu includes the ability to Delete the client or Merge the client profile with another client profile
If opened on the Edit Appointment popup the menu includes the ability to
- Remove client from appointment (must be Receptionist, Manager, or Admin)
- Print the appointment
- Add Note / Images
What a staff member sees on the Client Drop Down Menu depends on their staff role and any access restrictions on their specific staff profile
-
- Most Staff roles see
- Employee + Read-Only role see
- Limited Receptionist role see
Client Drop Down Menu Item Overview
- Summary of past and upcomming services by each staff
- Lists each services filtered by date range
- Product purchase history
- Displays all notes on the client's tickets (Requires Client Note Access)
- Lists each payment by client, filtered by date range
- Lists client's tickets, filtered by date range
- Client information (Requires Client Profile Access)
- History of all updates made to appointment
- Remove client from ticket (must be receptionist, manager, or admin)
- Add notes and images to appointment
- Get directions to client's address (must enable in Profile -> Advanced)
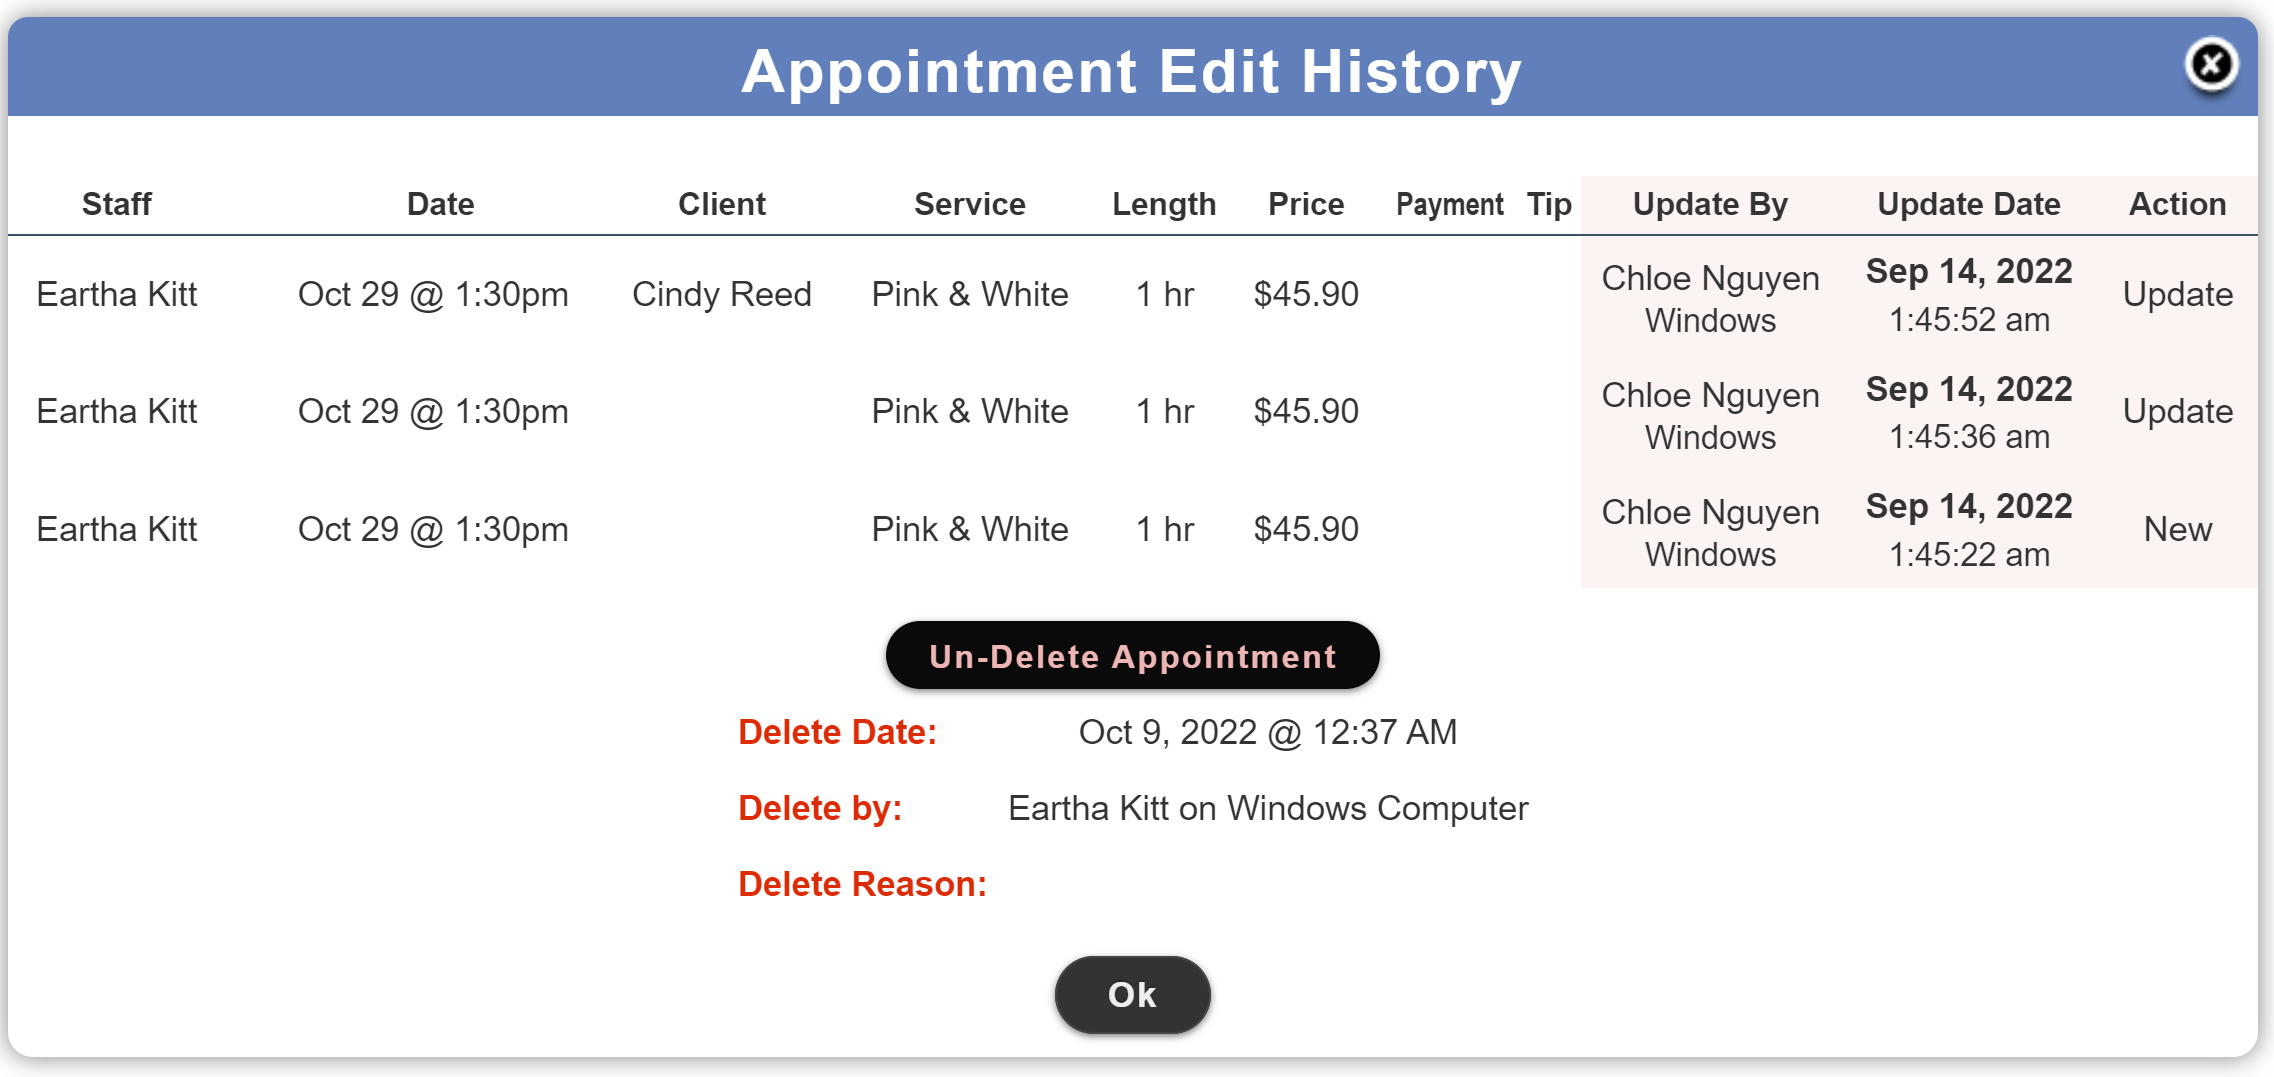
How View Appoiment Updates?
You can all updates ever made to an appointment. Below are the instructions to see the updates by opening an appointment. To quickly see all recent updates go to Schedule → Activity
- Open the Edit Appointment popup and press blue triangle to the right of client name ▼
-
In the Edit Appointment Drop Down Menu Select Appointment Updates
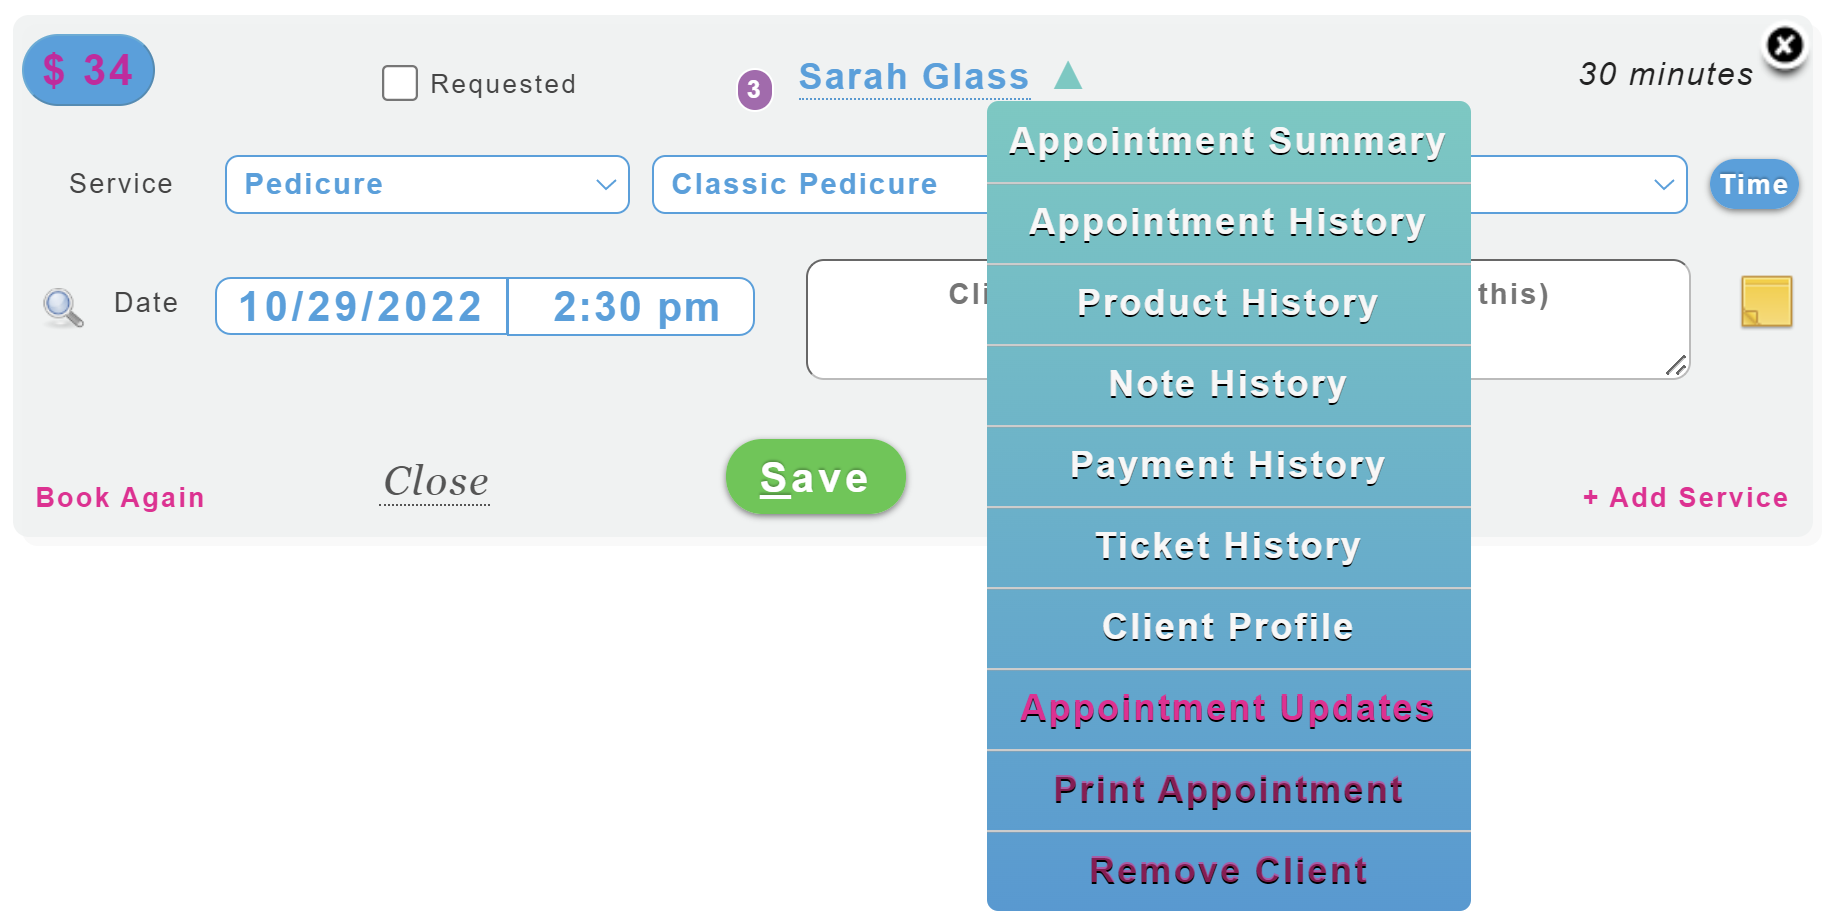
-
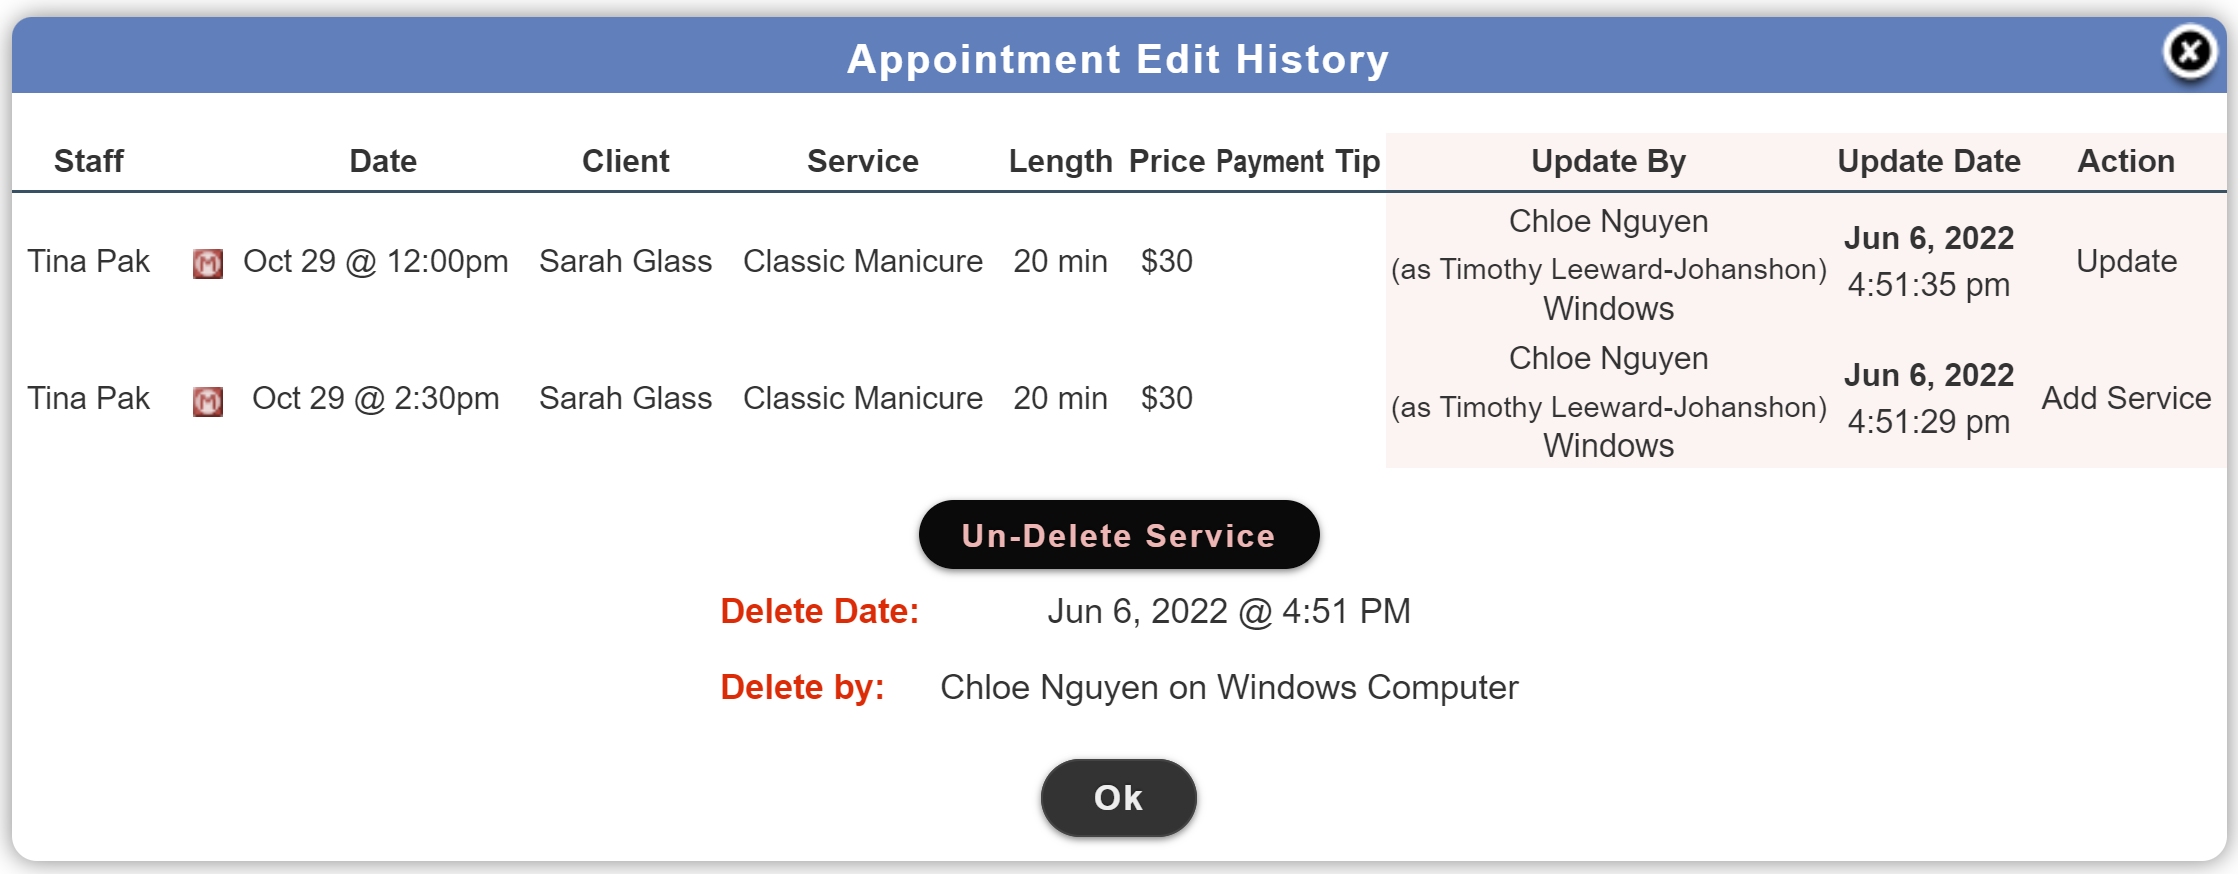
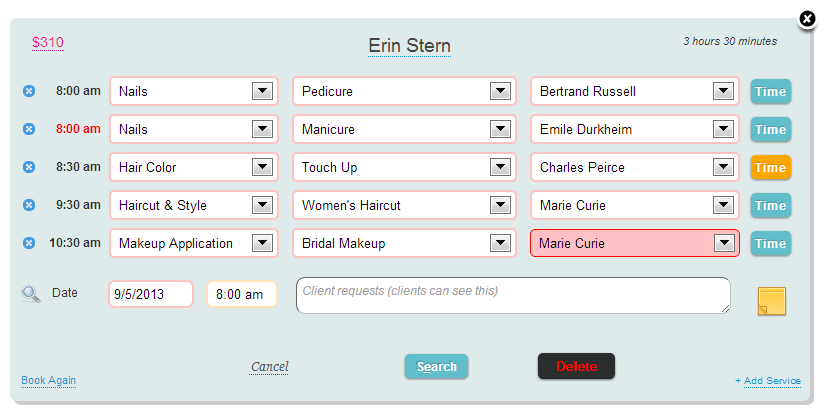
If the appointment has more than 1 service, then the services will be displayed (if the appointment has only 1 service this step is skipped)
- Services with a red background indicate they have been deleted
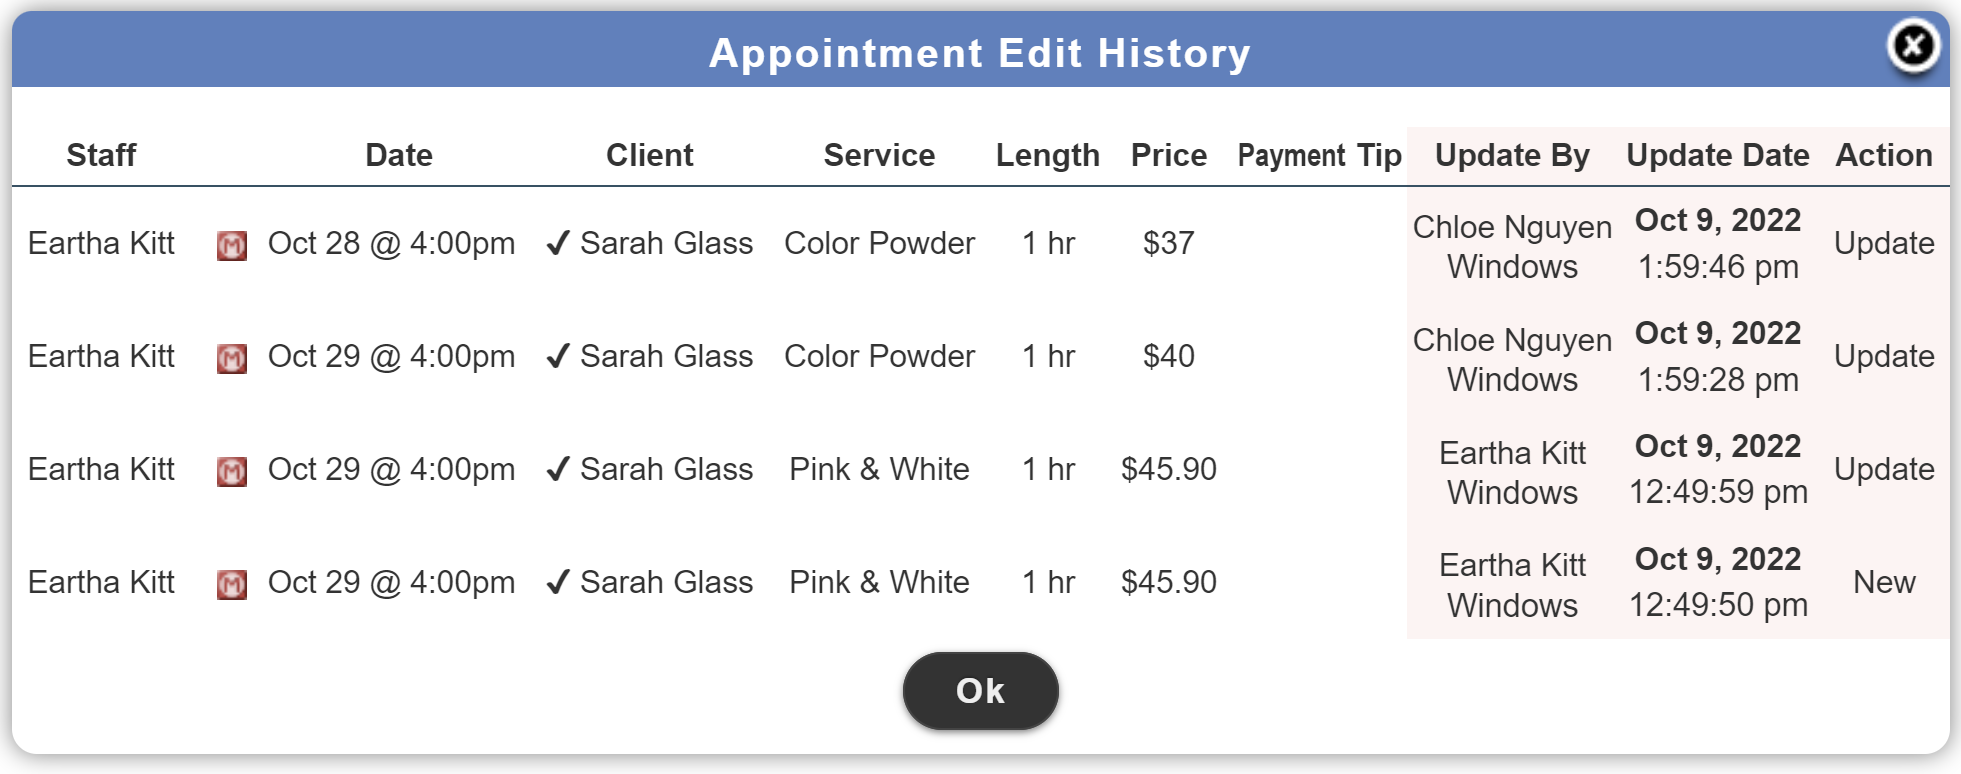
- Select the update history for any service by pressing the last column (In the image below press where it says 45 seconds ago or 2 minutes ago)
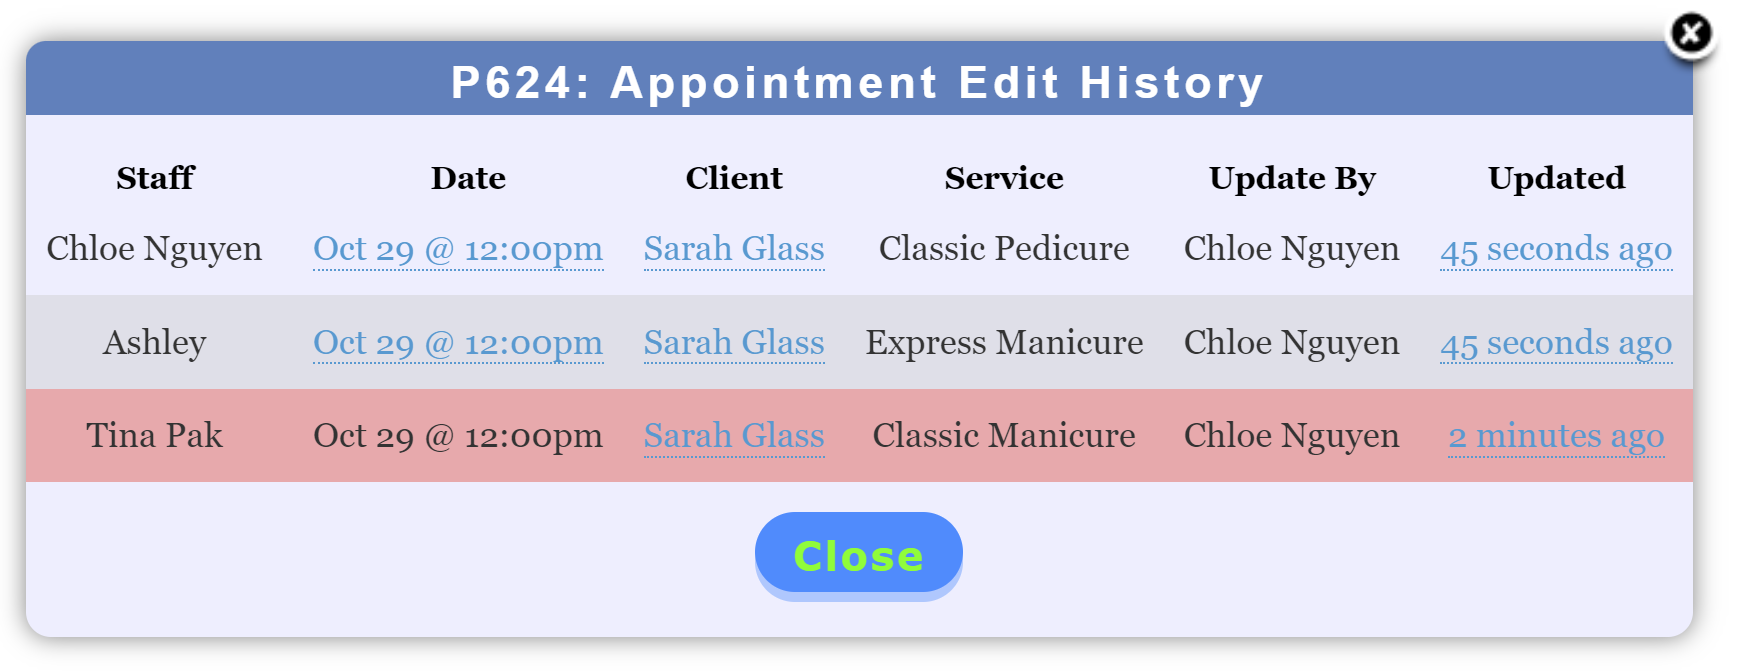
-
The Appointment Edit History displays all the edits ever made to this service on the appointment
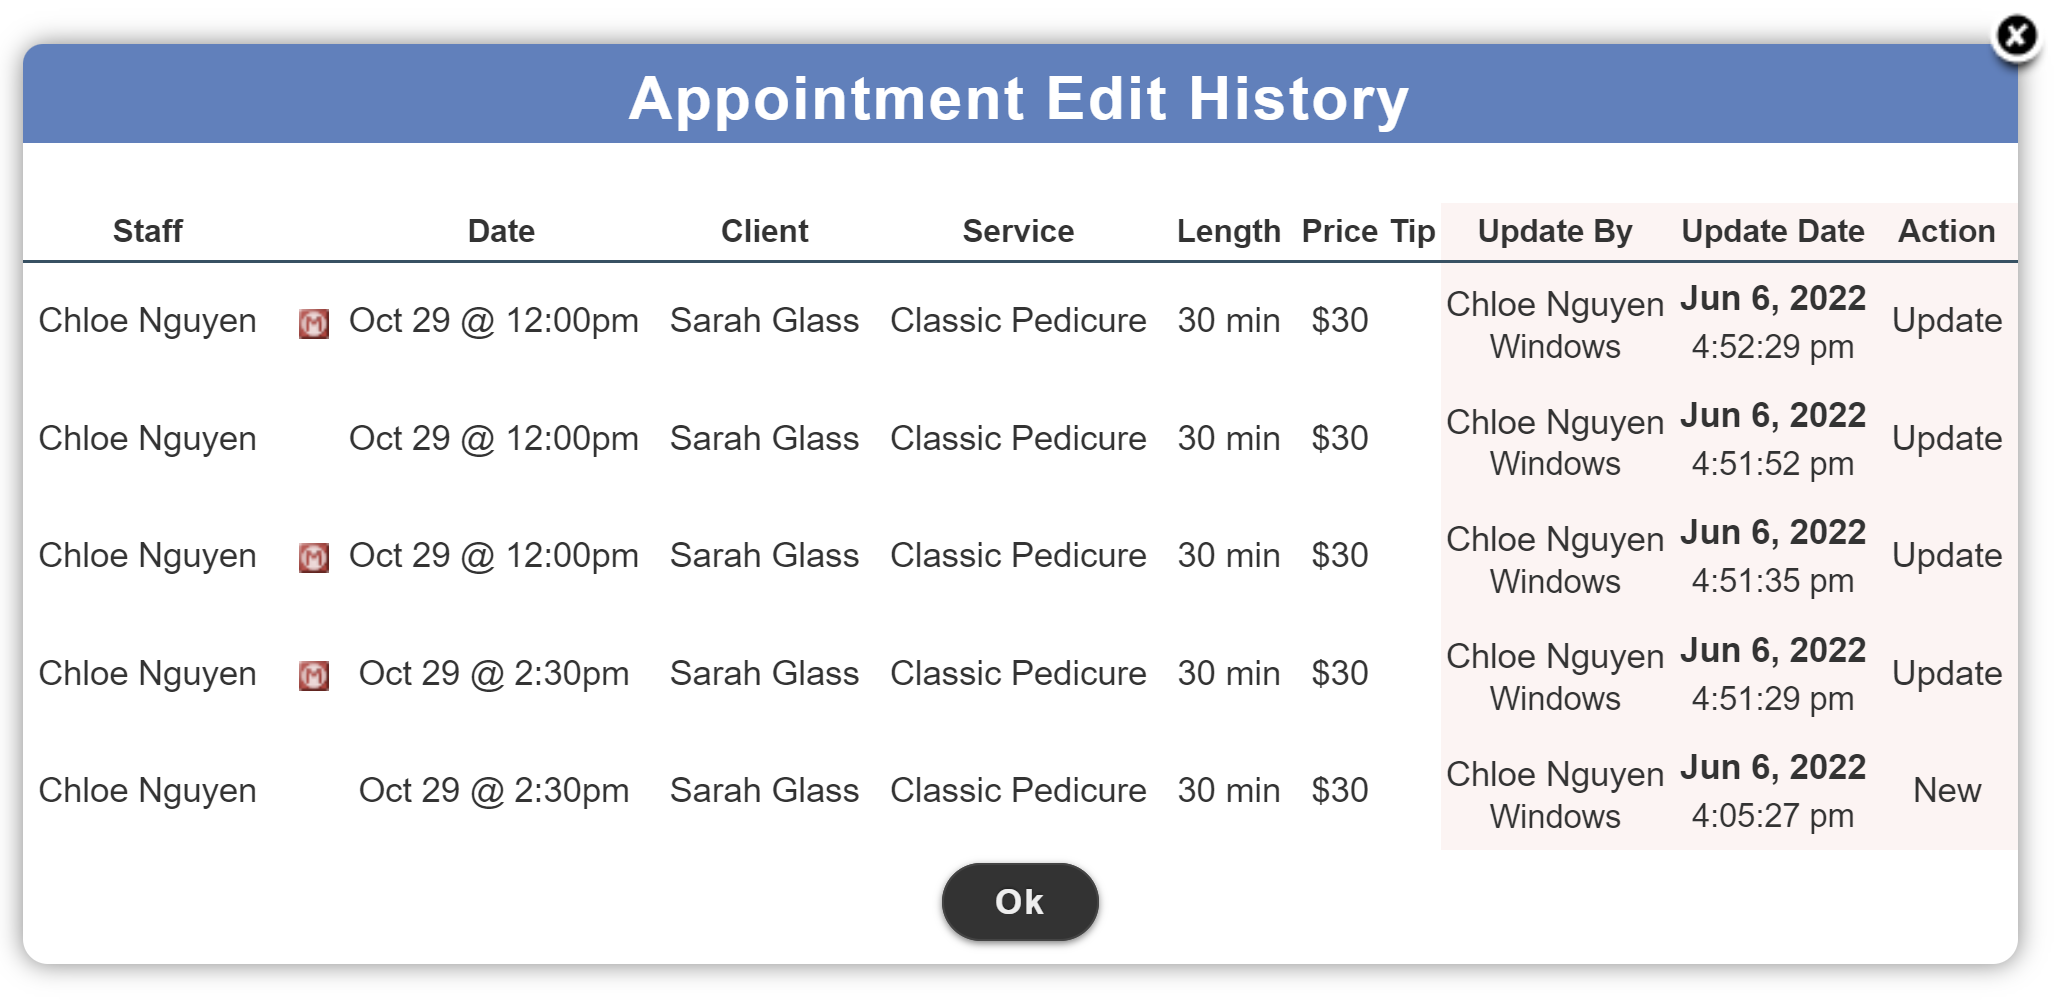
-
When select the update history for a deleted service - you'll have the option to un-delete the service
How view all appointment creates, updates, and deletes?
Go to Schedule ➜ Activity
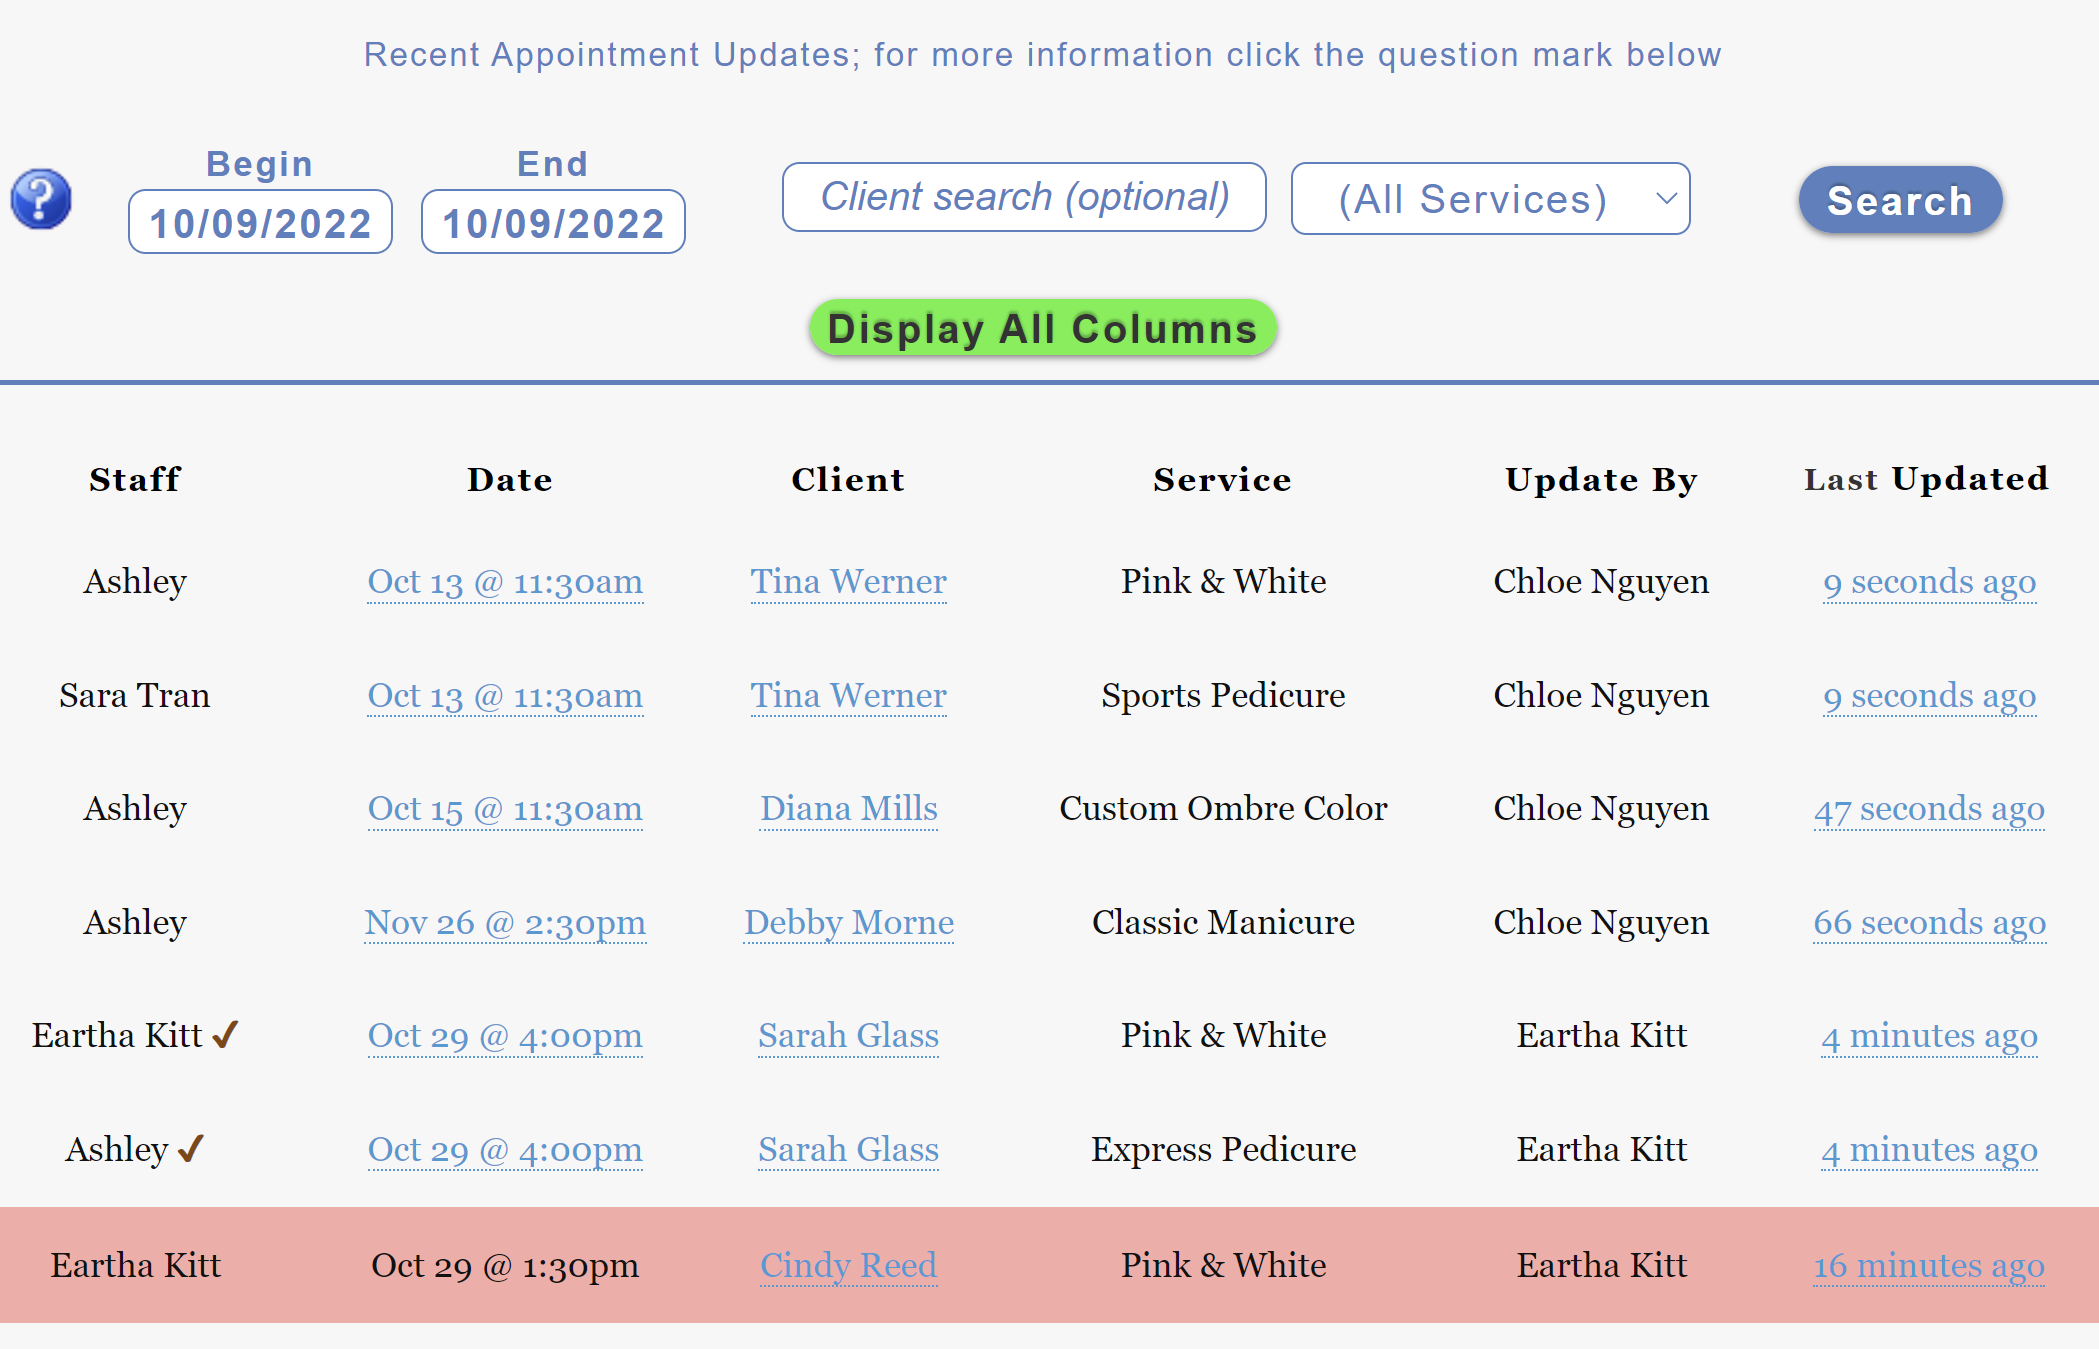
Each row represents one service scheduled
Deleted services and appointments are displayed with a red background
Press, the updated column (the last column on the right) to see the update history for any service
Notes About Staff Access
Staff with the Receptionist, Manager, or Admin role can see all appointment edits
Staff with Independent or Full Calendar role can only see the update history for their own appointments
Staff with the Limited Receptionist, Employee, or Read-Only role do not have access to Schedule ➜ Activity but they can see the updates to a specific appointment
Un-Delete Appointment?
To un-delete an appointment go to Schedule ➜ Activity
Deleted services and appointments are displayed with a red background
On the deleted appointment row press, the updated column (in the example above where it says 16 minutes ago ) to see the appointment update history
Press the button Un-Delete Appointment
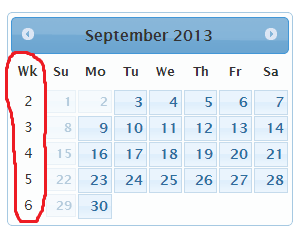
How Create Appointment 1, 2, 3, 4, ... Weeks from Today?
When opening any date picker and selecting a day you can easily see the number of weeks from today on the left side
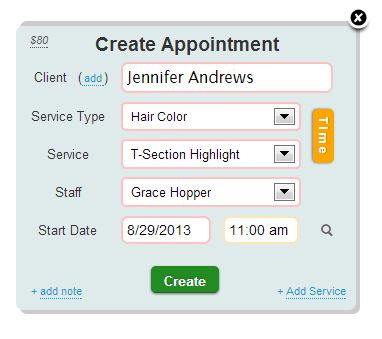
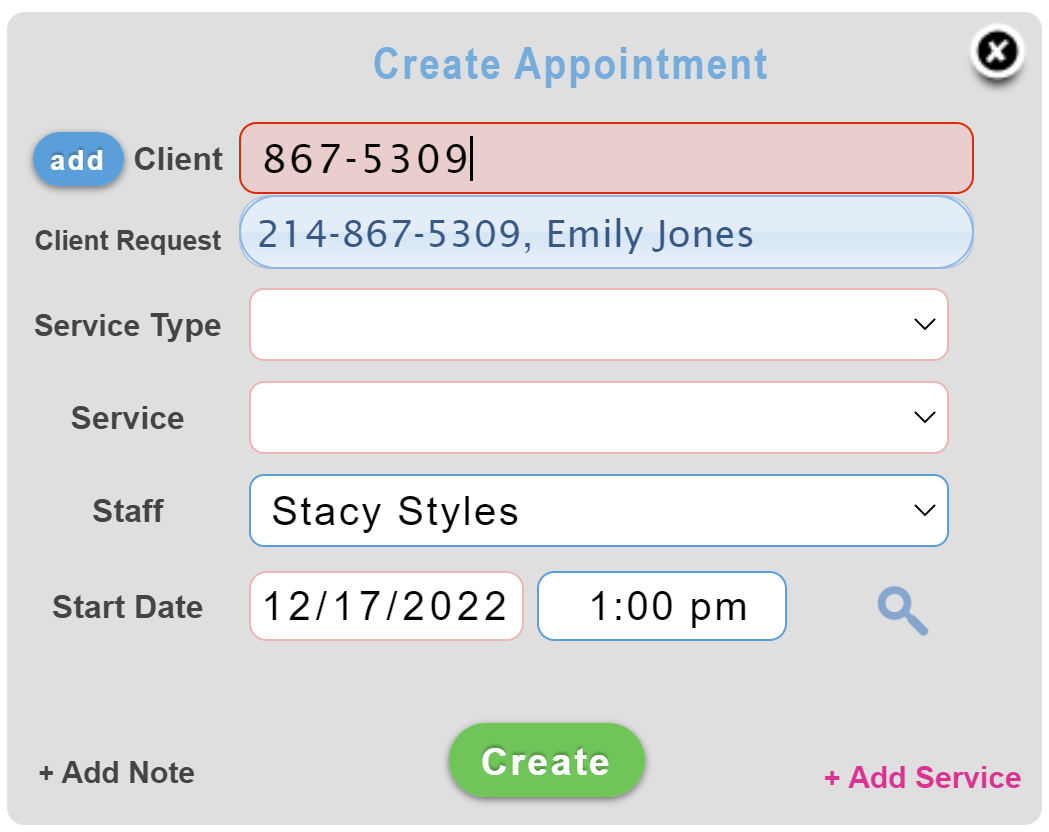
How do I Create an Appointment?
Click on the calendar where you want to create an appointment
- The client name will automatically be completed as you start to enter it (you can also enter the client's phone number if you do not know their name)
- Select the service type and service from the drop down
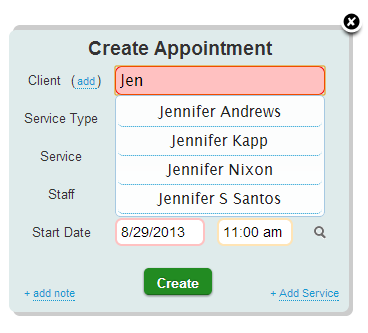
Create Appointment with Phone Number
Can enter the client's phone number in the client name field of the Create Appointment popup
Save Note on Appointment?
Clients and staff can save a special request on any appointment which can be seen by the client and staff
You and your staff can also save a staff only note on any appointment
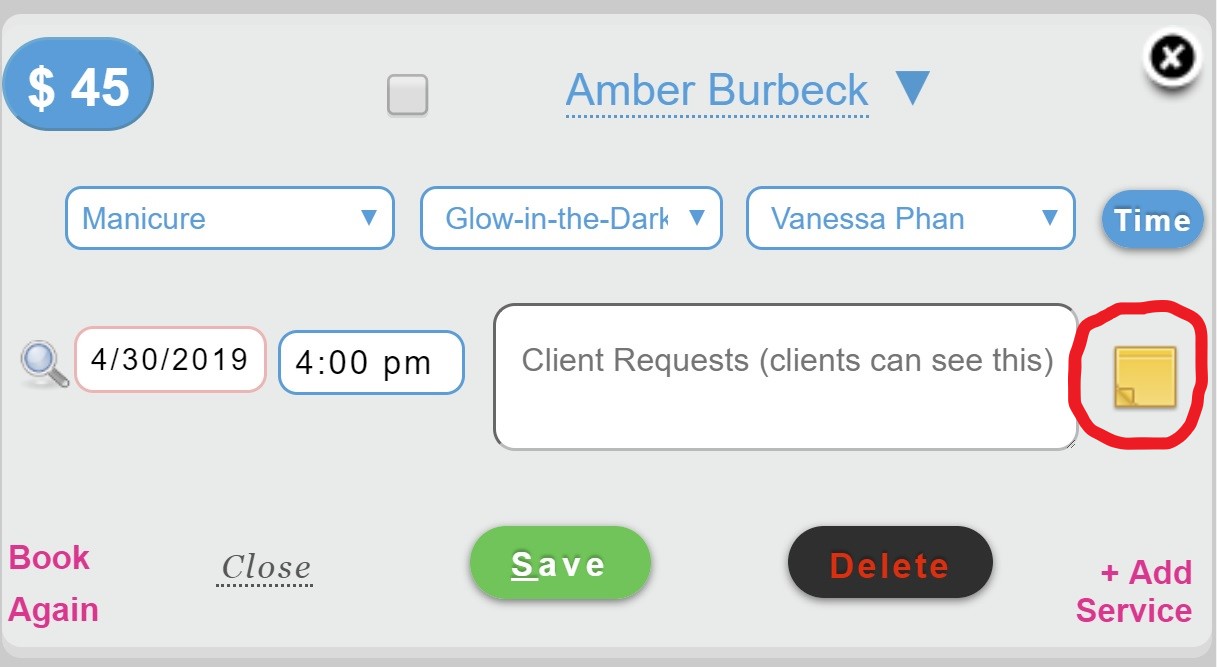
Click the + add note link when creating an appointment or click the note icon
![]() when editing the appointment
when editing the appointment
If there is a staff only note the note icon changes to: ![]()
Appointment Images and Notes can be viewed
- By opening the appointment
- On the Ticket History report
- Client's Note History
Change Appointment Length?
You can simple hover over the bottom of the appointment and drag the bottom of the appointment to make the appointment longer or shorter.
You can also click the time button  when creating or editing an appointment.
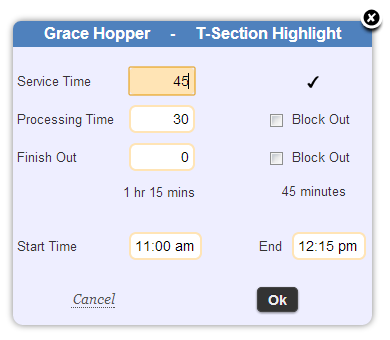
If the appointment has processing or finish out time the button will be orange 
Add Service to Appointment?
Click the + Add Service link when creating or editing an appointment. One appointment can have up to 5 services.
Change Appointment Price?
Click the price $120 at the upper left hand corner of the create appointment or edit appointment box.
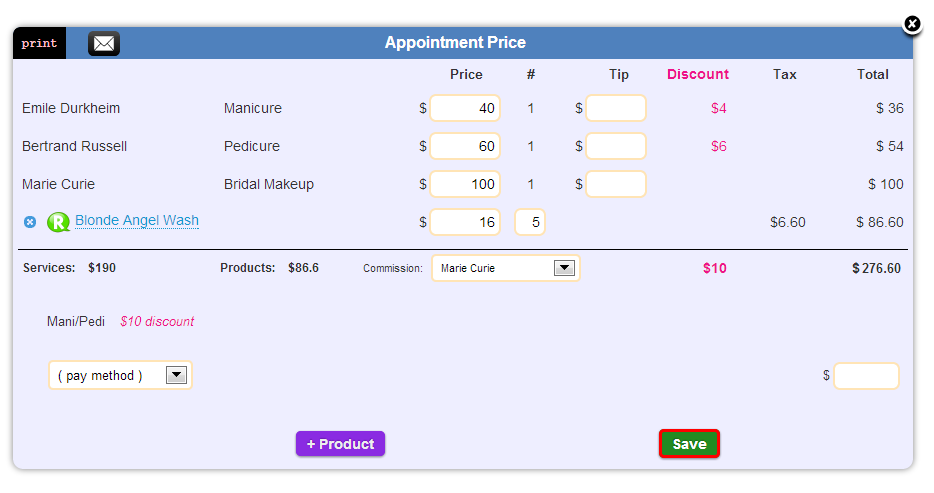
You can change prices, add discounts, add products, and set payment method (including support for multiple payment methods). You can also print or email the receipt to the customer.
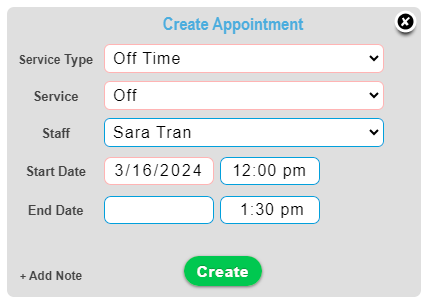
How Block Off Time (for lunch, regular time off, etc)?
Create an appointment like you normally would and select the Service Type Off Time, this will remove the Client input box and display the End Date and Time input fields
The End date and time input fields are both optional
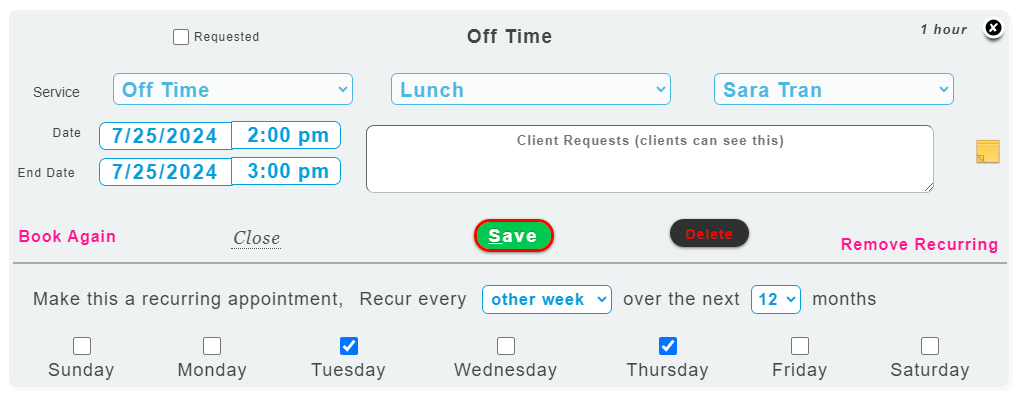
Create Recurring Off Time Appointments (lunch, regular time off, etc)?
Click on the appointment that you want to make recurring and at the bottom right corner click on Make Recurring and fill out the recurring section as desired.
Create Recurring Client Appointment?
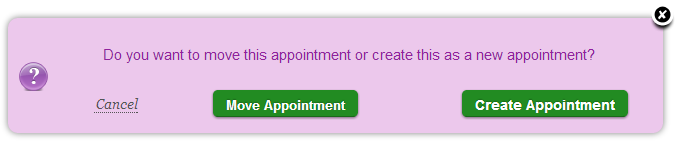
There are several ways to do this. One is to drag the appointment to the next desired date and clicking the "Create Appointment" button on the confirmation popup. It is easiest to do this on the Month view.
Also, on the edit appointment box you can click on Book Again to create a copy of the appointment.
Change Service Order on Appointment with many services?
On the calendar simply drag and drop the services in the desired order.
Vertical Bars on Appointments?
On the calendar, appointments that have been confirmed via text or email reminder or through a phone call from your business will have a vertical color bar indicating the appointments confirmation status
-
Dark blue indicates text confirmation
-
Light blue indicates email confirmation
-
Client un-confirmed through text or email confirmation
see question below for more information
-
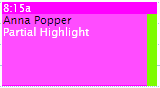
Green indicates phone confirmation
-
Left message when called for phone call reminder
-
No response when called for phone call reminder
-
Wrong Number when called for phone call reminder

What happens when a client un-confirms their appointment?
You can allow your clients to un-confirm appointments from both the text reminder and email reminder
When the client un-confirms they immediately see either
- A large popup asking them to call to cancel (click to view popup)
- Or a call/edit the appointment popup (if they are allowed to edit the appointment)
When a client un-confirms it does not delete the appointment, it adds a red vertical bar to the appointment on the calendar (see question above)
You can enable/disable the ability for clients to un-confirm appointments (as well as enable a text alert when clients un-confirm)
- Go to Reports -> Profile -> Staff, Clients tab
- Press the staff name in the report
- Select the Messages Sent to Clients tab at the top of the popup
Add Image to Appointment?
-
In the Edit Appointment popup press the note icon (on the right of the edit appointment popup)
-
In the Appointment Notes popup press the Upload Image button and select your image
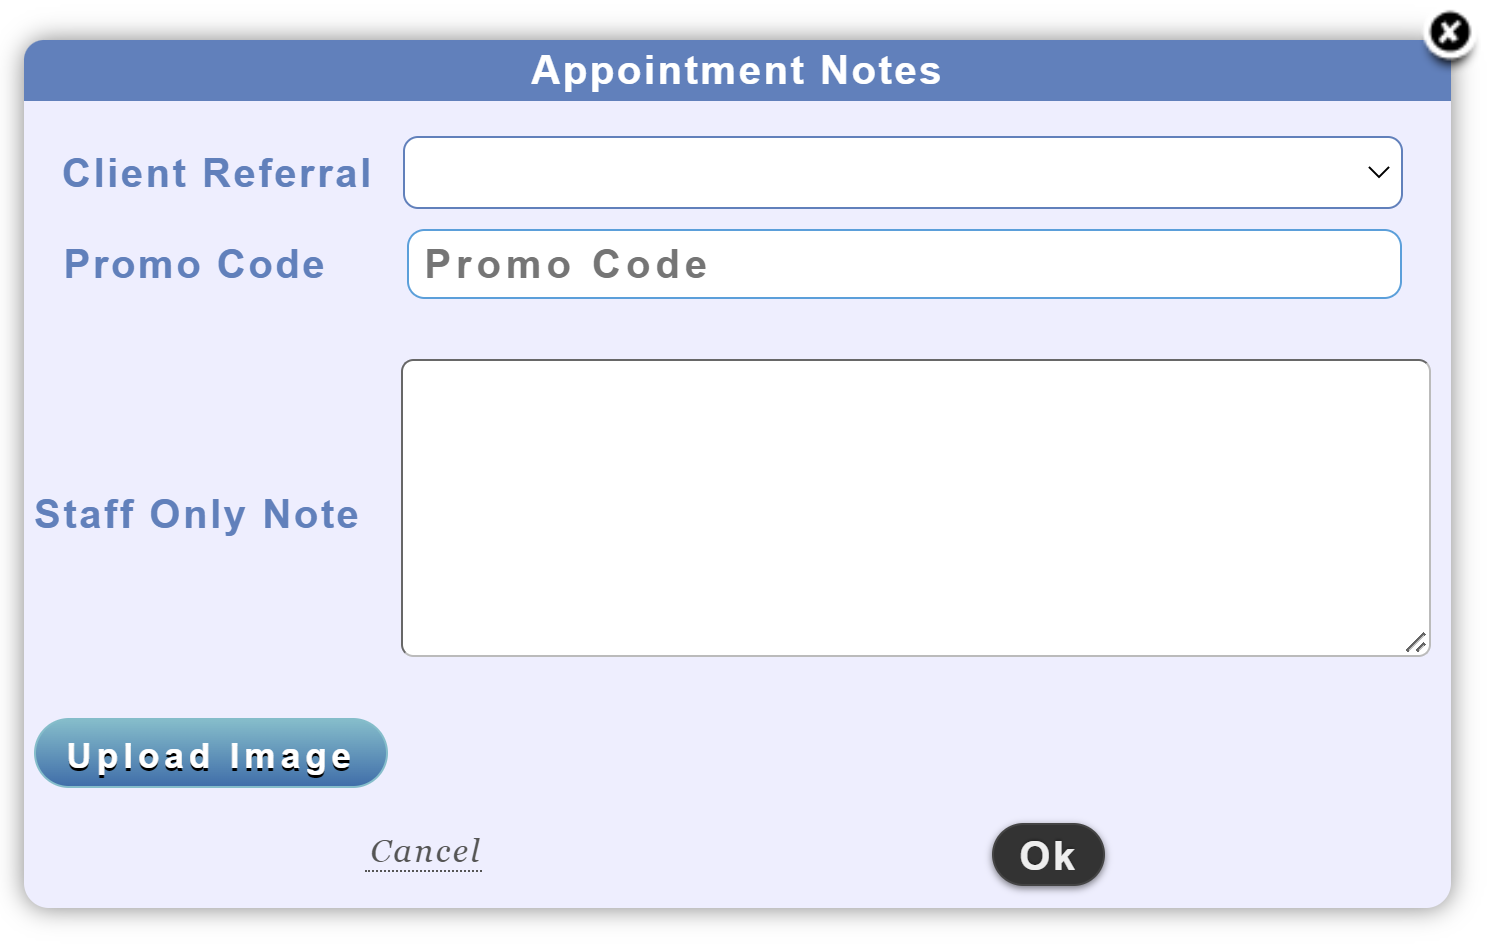
You can upload as many images as you would like to an appointment
-
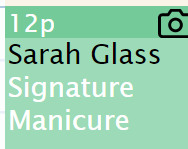
Appointments with image(s) with have the camera icon on the appointment
Appointment Images and Notes can be viewed
- By opening the appointment
- On the Ticket History report
- Client's Note History
Open Edit Appointment Drop Down Menu?
The Client Drop Down Menu offers more information about the client, client history, appointment updates, and ability to remove client from appointment
-
Open the Edit Appointment popup
-
Press blue triangle to right of client name ▼
For more information on ➜ Client Drop Down Menu
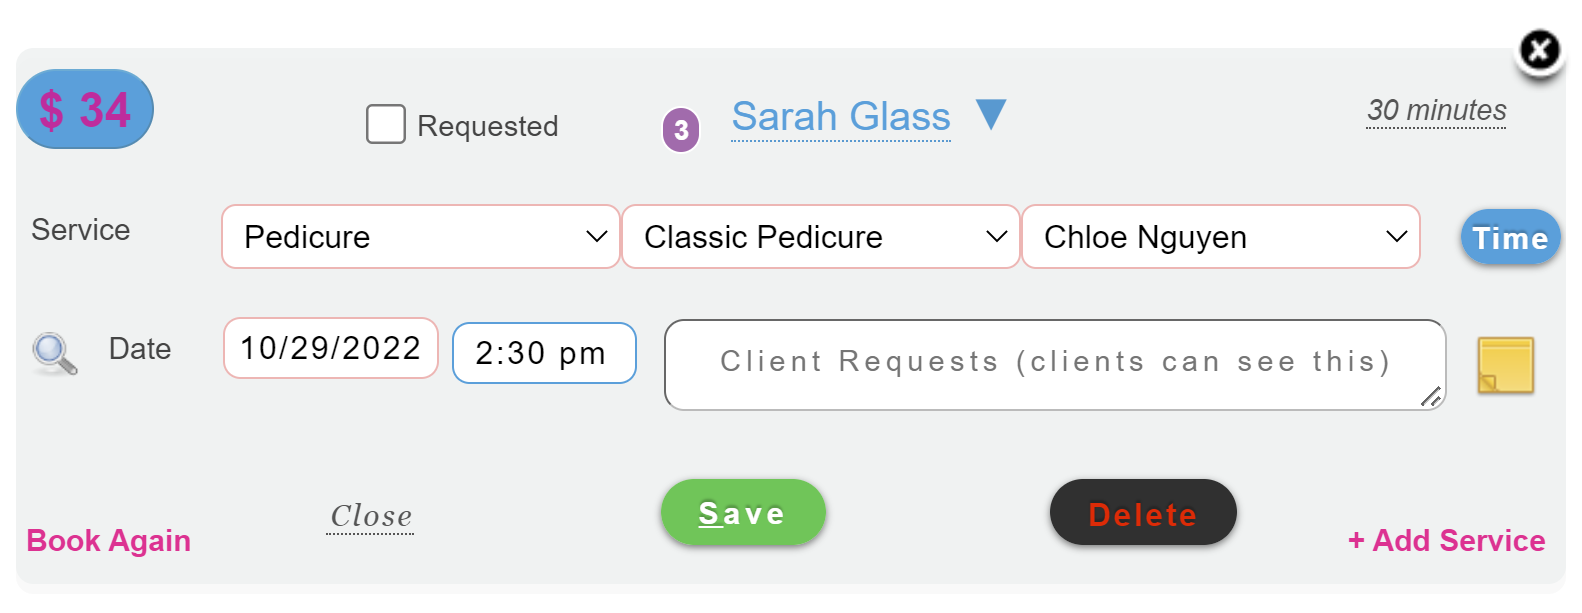
What is a Hidden Appointment?
ScheduleAnyone prevents deleting appointments that have a payment - this is to allow easily refunding or adjusting the payment in the future
When attempting to delete an appointment with a payment this popup will appear
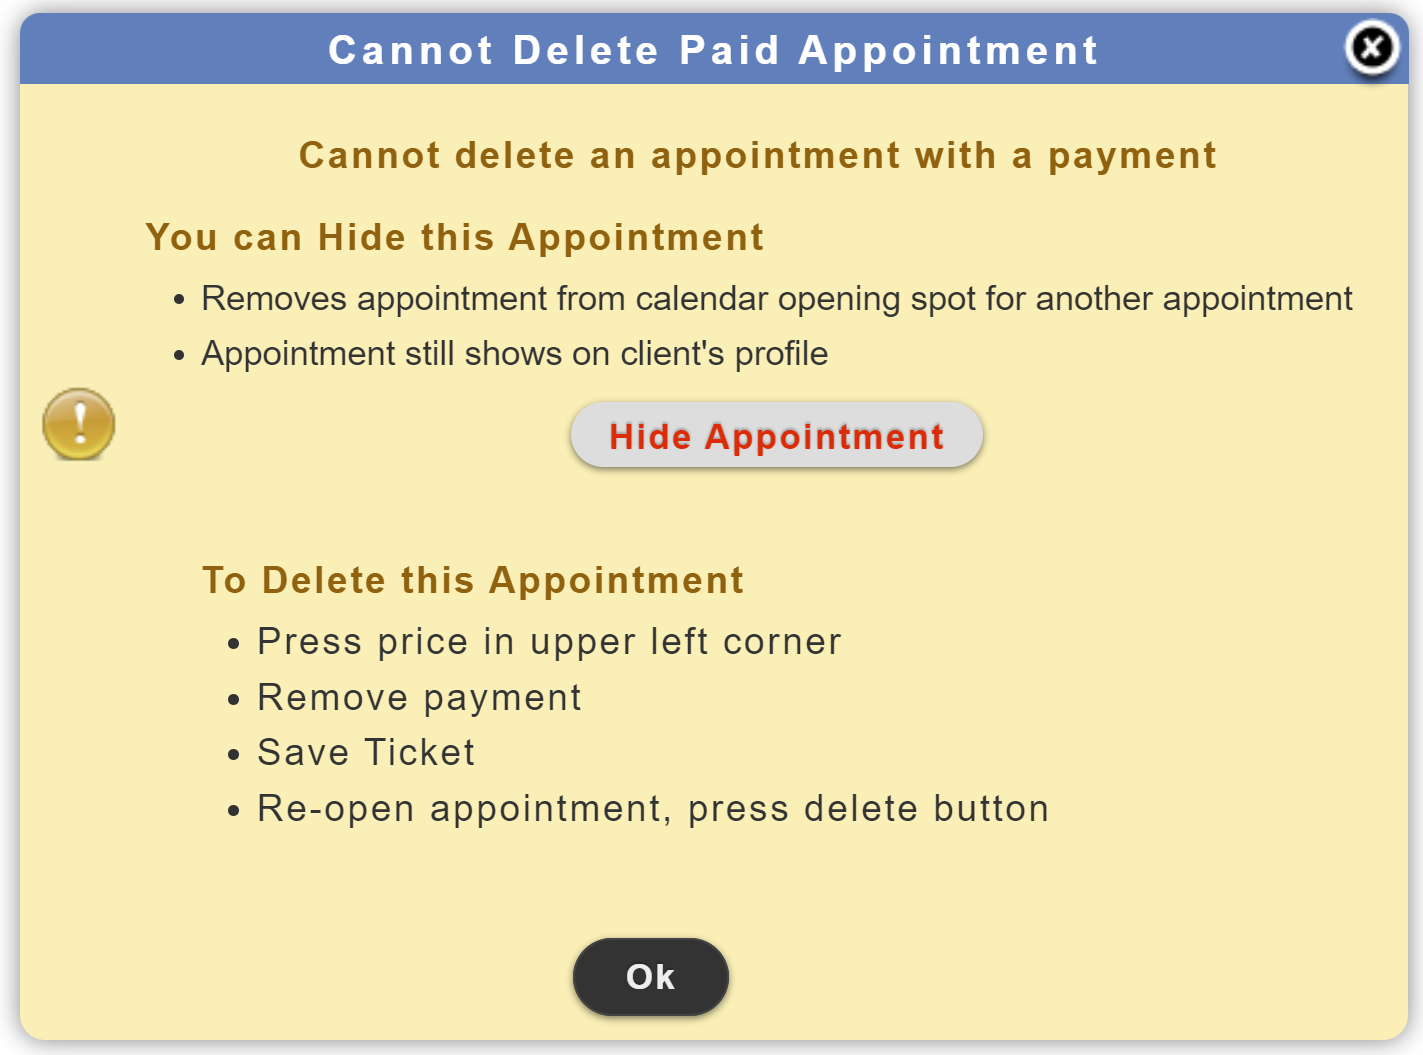
If the appointment is deleted the appointment will still be displayed in the reports
The Sales Detail report, Ticket History report, Last 10 Sales report, and Client History report the appointment will be marked as HIDDEN

How to Enable Class Services?
To enable classes in ScheduleAnyone go to Profile ➜ Advanced, Appointments tab and scroll down to the bottom of the screen and check the box The Business Accepts Appointments
You can also choose if you want to offer Classes or Events
Then go to Profile ➜ Services, press the button Add Service Type you will see the popup to create Appointment services or Class services

How to Create + Book Classes?
Only Staff can create classes, then staff and clients can reserve a spot in the class
To create a class, staff create an appointment but choose a Class service type

Then staff can open the class on the schedule and add clients to class

And (unless disabled) clients can go on your ScheduleAnyone website and reserve a spot in the class

Change Calendar Date?
In the calendar header click the date range  on the calendar's header
This opens the datepicker so you can quickly navigate the calendar to any date.
Change Normal Business Hours?
In your profile go to the Hours tab
Change Normal Business Hours, for specific staff member?
In your profile go to the manage staff page, and click on the days you work.

Change Hours I Work on a Specific Day?
You can change your start or end time for a specific day:
- Go to specific staff member's calendar (cannot do this on Front Desk calendar that shows all the staff)
- Navigate to that specific day in the calendar's Day View
- Hover over the edge of that day's off time
- Click and drag the edge to adjust that day's start or end time
If a day's start and/or end time is adjusted you will see the edit pen icon on the left day's header

Change Time Range on Calendar?
You can change the start time and/or end time of your calendar
- Go to Profile -> Me
- Press the button My Normal Hours
- At the bottom of the Regular Hours popup change the Calendar Start / End
By default the calendar’s time range is your Regular Business Hours earliest start time and last end time. So if Monday-Friday you work 9:00 am - 6:00 pm and on Saturday you work 8:00 am - 5:00 pm then your calendar's start time is 8:00 am and end is 6:00 pm.
Appointment Outside Hours Displayed on Calendar?
When a day has an appointment that either ends before your calendar's start time or starts after your calendar's ending time - then there will be a purple header with an up arrow (indicating appointment before calendar starts) or a pink header with a down arrow (appointment after calendar ends)

To view the off hours appointment
- In the calendar's day view, navigate to the day with the off hours appointment.
-
Click the purple or pink header


-
You'll see the off hour appointment(s) that you have that day.
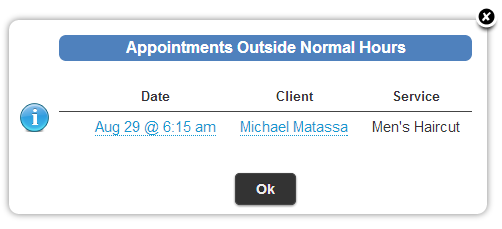
- Click the appointment date to view or edit that appointment.
If you have a lot of appointments outside the time range displayed on your calendar ➜ you probably want to increase the time range displayed on your calendar (see question above ⇧)
How Bookmark Calendar in Web Browser?
Simply go to https://www.scheduleanyone.com/provider/calendar and add the bookmark.
Setup Staff
Assign Staff which Role?
Review the different staff roles ➔ Quick Summary and Detailed Overview
Typically Commission and Hourly Staff are asigned the Employee role
Typically Independent Staff (like booth renters) are asigned the Independent role
We suggest creating a generic Front Desk user that is assigned either the Receptionist or Limited Receptionist role
How Setup Payroll?
The Payroll Guide contains all you need to know to Setup Commission, Manage Timesheets, and use the Payroll report
Set Default Service Time?
Go to your Profile and press the button My Services
Change Staff’s Username and Password?
Admins and Managers can change any staff's username and password by going to Profile -> Staff and pressing the staff's name
Other Staff can only change their own username/password which they can do by simply going to Menu -> Profile
If a Receptionist adds a new staff, they can set the username/password when creating the staff (but after creating the staff profile cannot go back in and change username or password)
Staff setup with an email can go to Forgot Password to have a new password emailed to them
Add + Delete Staff
Add Staff?
In your profile go to the Staff tab and click the
 button.
The new staff member will be added at the top of the staff list (highlighted in pink).
Don’t forget to click each column next to their name to set the new staff’s permissions and when they will receive appointment change notifications, configure their services,
define their normal hours, as well as if their clients can book online and when theirclients receive reminders.
button.
The new staff member will be added at the top of the staff list (highlighted in pink).
Don’t forget to click each column next to their name to set the new staff’s permissions and when they will receive appointment change notifications, configure their services,
define their normal hours, as well as if their clients can book online and when theirclients receive reminders.
Easiest way to Add New Staff (automatically set their permissions and services)?
In your profile go to the Staff tab.
To make things easier check the box next to an existing staff member who will have similar permissions and services and then click the
 button.
This way the new staff will be copy the permissions and services of the selected staff member and you only have to modify a few differences.
button.
This way the new staff will be copy the permissions and services of the selected staff member and you only have to modify a few differences.
Delete Staff Members?
In your profile go to the Staff tab.
Check the box next to the staff member(s) you would like to delete and click the  button
Un-Delete Staff?
On the Deleted Staff Report check the box next to the staff member(s) you would like to un-delete then press the Undo Delete button
Company Device
Setup Company Devices
You can setup company devices then allow some logins (like the receiptionist or front desk login) to only login to company devices
You can also only allow staff to clock-in/out on company devices
To setup this device as a Company Device
- Login with a login that has the manager or admin role
- Go to Profile -> Security
- Give the device a name (any name you can use to identify that device)
- Logout then login as a receptionist
Remote Company Device Setup
When a staff (who is only allowed to login on company devices) attempts to login on a non-company device ➜ given option to request verification code from admin

Press the "Begin Remote Setup" button to send your admin an email with the verification code

The admin just needs to give the staff the verification code, then the staff can enter their username/password (not the admin login) + the verification code to login and mark that device as a company device

Remote Setup Notes
- Company Device Verification Code can only be used once
- Verification Code is valid for 24 hours
- IP address of device requesting company device access must match actual device setup (i.e. deivce that verification code entered)
- Device type requesting company device setup must match device that verification code is entered (i.e. cannot request company device from Windows computer then enter verification code on an iPhone)
Restrict certain staff to only be able to login to company devices
- Setup your Company Devices
- Go to Profile -> Staff
- To the right of the staff name press the staff's role (in the Alerts & Role column)
- At the top of the Alerts & Role popup, press the Role tab
- Check the box next to Can only login to a company device and press Save
Allow Staff to Clock-In/Out?
Press the clock in/out icon which is in the top left corner above the main calendar
If you do not see the clock in/out icon go to the Commonission report and assign staff an hourly wage (must be logged in as manager or admin)
For the clock in/out icon to show up on the main calendar when logged in as a receptionist ➜ Setup this computer as a Company Device
For more information checkout the Payroll Setup Guide
Customize Staff Access
Change Front Desk Staff Report Access
You can view the acess that each staff role has to reports
Admins can change the access a specific manager or receptionist has to Payroll, Commission, and Timesheet reports as well as the profit information on sales reports
By default, mangers have full access and receptionists have no access
To change the Report Access for a staff member (who has the Receptionist or Manager role)
- Login as a staff with the Admin role
- Go to Profile -> Staff
- To the right of the staff name press the staff's role (in the Alerts & Role column) the selected staff must have the Receptionist or Manager role
- At the top of the Alerts & Role popup, press the Role tab
- Change the Report Access drop down
Change Access to Client Profile
By default, staff with the Read-Only role and Employee role cannot access client contact information, but have access to client notes
You can change these defaults Change Client Profile Access Change Client Note Access
Want to learn more about Staff Role? ➔ Quick Summary and Detailed Overview
PIN Code
If desired, many features in ScheduleAnyone can be setup to require staff to enter their password or PIN Code
Passwords must be 8 characters or longer while PIN Codes can be as short as 4 characters
Staff can use their password or shorter PIN code when either of these features are enabled
-
Require Password on Edit
- Create, update, or delete appointment
- Sell, exchange, or return a product
- Process or update payment on a ticket
- Change business or staff profile
- Hide Client Contact information Enter PIN to display full client profile (PIN must be for staff with Independent or higher role)
-
Staff Report Role can require password to view reports
On each staff's profile can set if PIN Code is required to view report (especially helful for front desk login)
- PIN Code must be from staff with role that has access to that report
- Typically must be entered when accessing each report with some exceptions (like the inventory reports Order, Audit, Return, + Product Detail can be accessed by entering the PIN once)
- If PIN entered more than 2 minutes after last time report accessed (like changing the filter and pressing the Search button on the report) or 15 minutes after originally entering the PIN Code
- The Report PIN that was entered is cleared if the staff navigates back to the Front Desk Calendar or POS screen
How Change Services a Staff Offers?
In your profile click on My Services . This will list all the services offered by the business. You can select what services you offer. If you leave the price and minutes blank it will use the business’ defaults.
So if, by default, the business lists a finish out or processing time for a service but you do not have one just enter “0” (zero). For example, if the default (for the entire business) is to have a 30 minute finish out and you don't do a finish out; then set the finish out time to "0" minutes.
Services Only Staff Can See
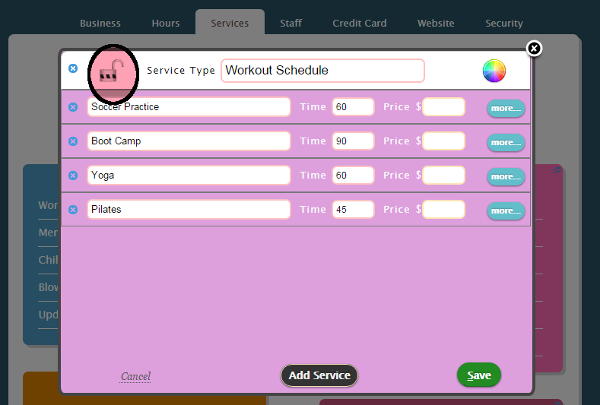
In your profile go to the Services tab and click the 'Add Service Type' button or click on the service group that you would like to edit.
Click lock in the upper right hand corner of the edit service type popup and select 'Staff Only' then click 'Save'.
Appointment with Manicure and Pedicure
By default, an appointment with a manicure and a pedicure will have the services start at the same time if the services are performed by different staff
These defaults can be turned off completely or over-ridden on a specific appointment by changing any service's start time on the appointment
Salon Haircut and Color Logic
By default, an appointment with hair color and haircut will remove the hair color's finish out time
Also, if a client books online and puts the haircut before the hair color - ScheduleAnyone will automatically put the hair color first
These defaults can be turned off completely or over-ridden on a specific appointment by changing any service's start time on the appointment
Barber Haircut Logic
By default, when there are 2 or more barber haircuts on the same appointment the haircuts will occur at the same time if the staff are different
This is useful when a father books their own haircut and their son's haircut
These defaults can be turned off completely or over-ridden on a specific appointment by changing any service's start time on the appointment
Appointment with back to back massages
By default, when an appointment has back to back massages then any finish out time on the first service will be removed
For example, like adding extra minutes to a regular massage service
These defaults can be turned off completely or over-ridden on a specific appointment by changing any service's start time on the appointment
How Can I view My Service Categories
You do not need to do anything, service categories are automatically set when you setup your services
Service categories improve the information we provide to Googlebot, Facebook, and other companies to improve your websites Search Engine Optimization
Service categories help to automatically correctly set the service times for your appointments with multiple services, for example appointments with a
99% of the time it is best to not adjust these defaults, but as always ScheduleAnyone gives you full visibility to how your appointments are being booked
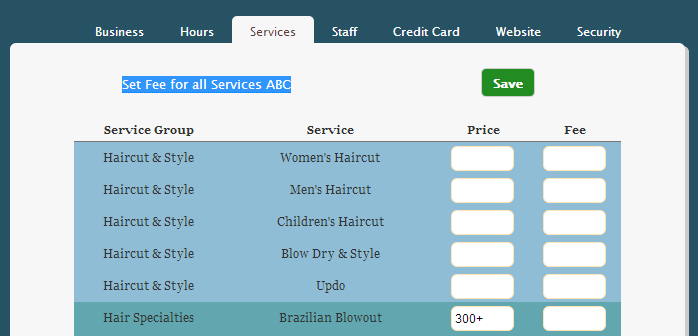
Set Staff Service Fee?
In your profile go to the Service tab and click Fees & Prices. The price column displays what the client is charged and the fee is what is subtracted from commission employees before their commission is applied.
Getting Started
Anytime you add a new brand or product line you can send ScheduleAnyone the product order (just ask for a receipt as a spreadsheet) and we will upload the products into the system for you
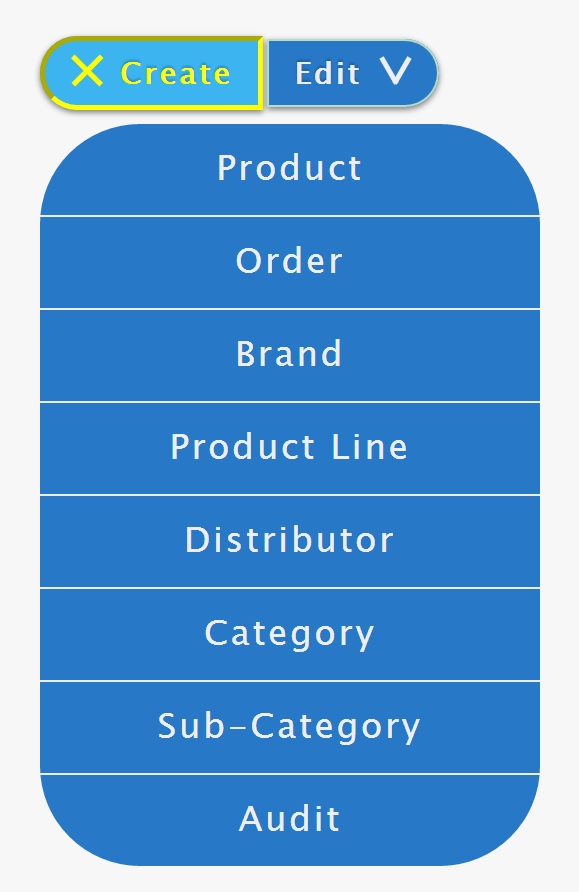
You can add and edit products, brands, product lines, categories, orders, and audits through the create and edit buttons at the top of the Manage Inventory Screen

Use the Filter Row to filter what products are displayed; press the Reset button to reset the filter

How Do I Order Products?
Gold Package Only
We created this tutorial of how to create an order, send the order to your product distributor, then receive the order - which adds the products to your inventory
Pressing the button above allows you to view the tutorial but not create orders; if you want to use this feature contact ScheduleAnyone and we can upgrade you to the Gold Package to try it out for free for 30 days
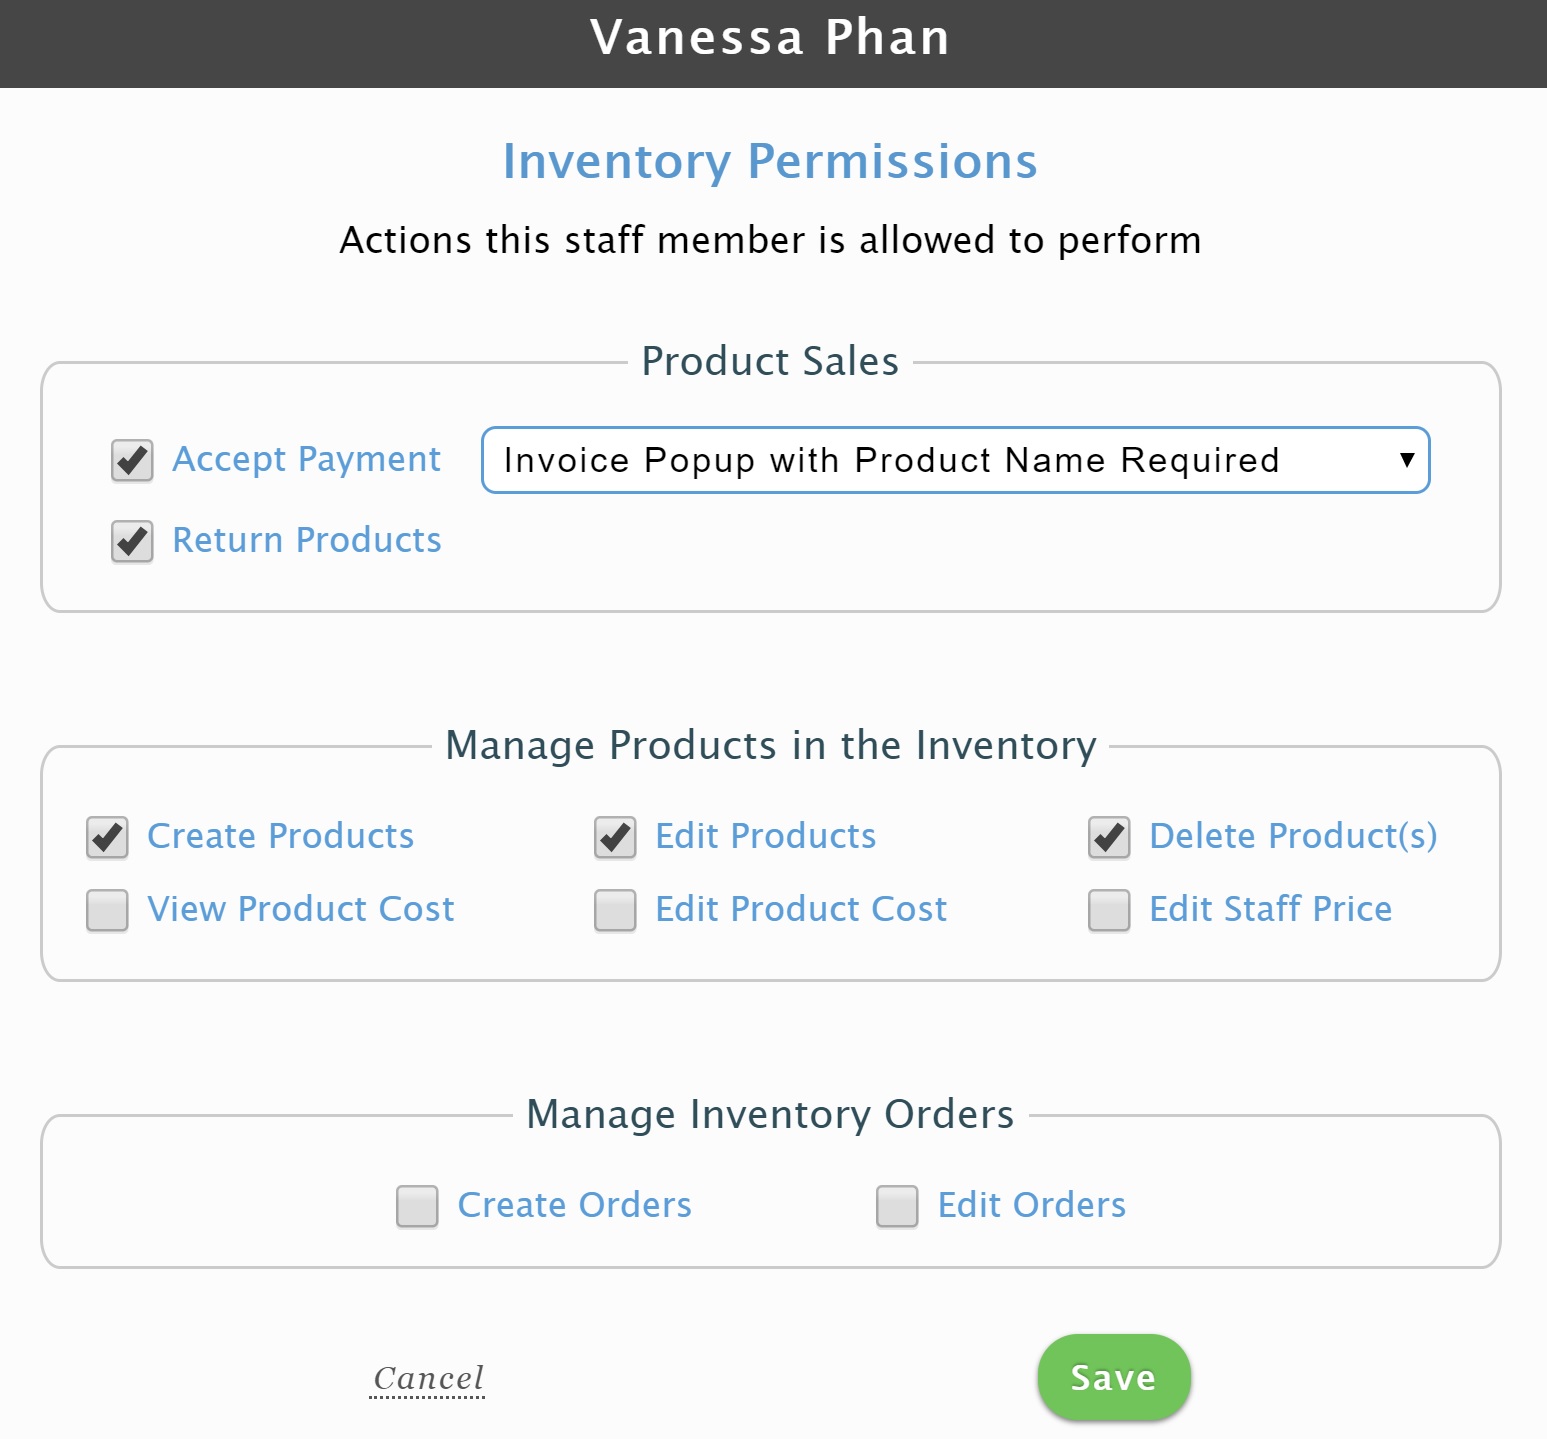
How Change Staff Inventory Permissions?
Gold Package Only
Login with the manager or admin role, then go to Profile -> Staff and by pressing the far right column for any staff you can set the permissions for that staff
How Track Products My Staff Use?
Gold Package Only
Do you buy products that you and your staff use, but are not sold to clients?
Keep track of these products' cost and count with usage invoices:
- Create Products with the setting for Internal Use
- Create Order for these products and include the cost (this updates the product count and cost)
-
As these products are used Create Product Usage Invoices so you can record the used product cost and count
- You might want to create a generic client like "Internal Usage" for these invoices
Setup Staff Product Price Discount
Gold Package Only
In the Product List header section press Edit then select Staff Setup to Setup Product Discounts for Staff
You can set staff product prices to be a fixed dollar amount over cost (like $2 above cost), a percent above cost (like 10% above cost), or a percent below the regular price
Setup Product Commission
Gold Package Only
You can setup a default product commission for all your staff in the Product List header section press Edit then select Staff Setup and then set the Staff Commission on Product Sales
You can also set a different product commission percent for specific staff on the Commission report
Assign Staff Product Commission
Gold Package Only
ScheduleAnyone can automatically calculate product sales commission for staff
If a product is added to an appointment with only 1 staff performing the services - then that staff is automatically assigned the commission
On product only tickets select the staff who should receive the product commission
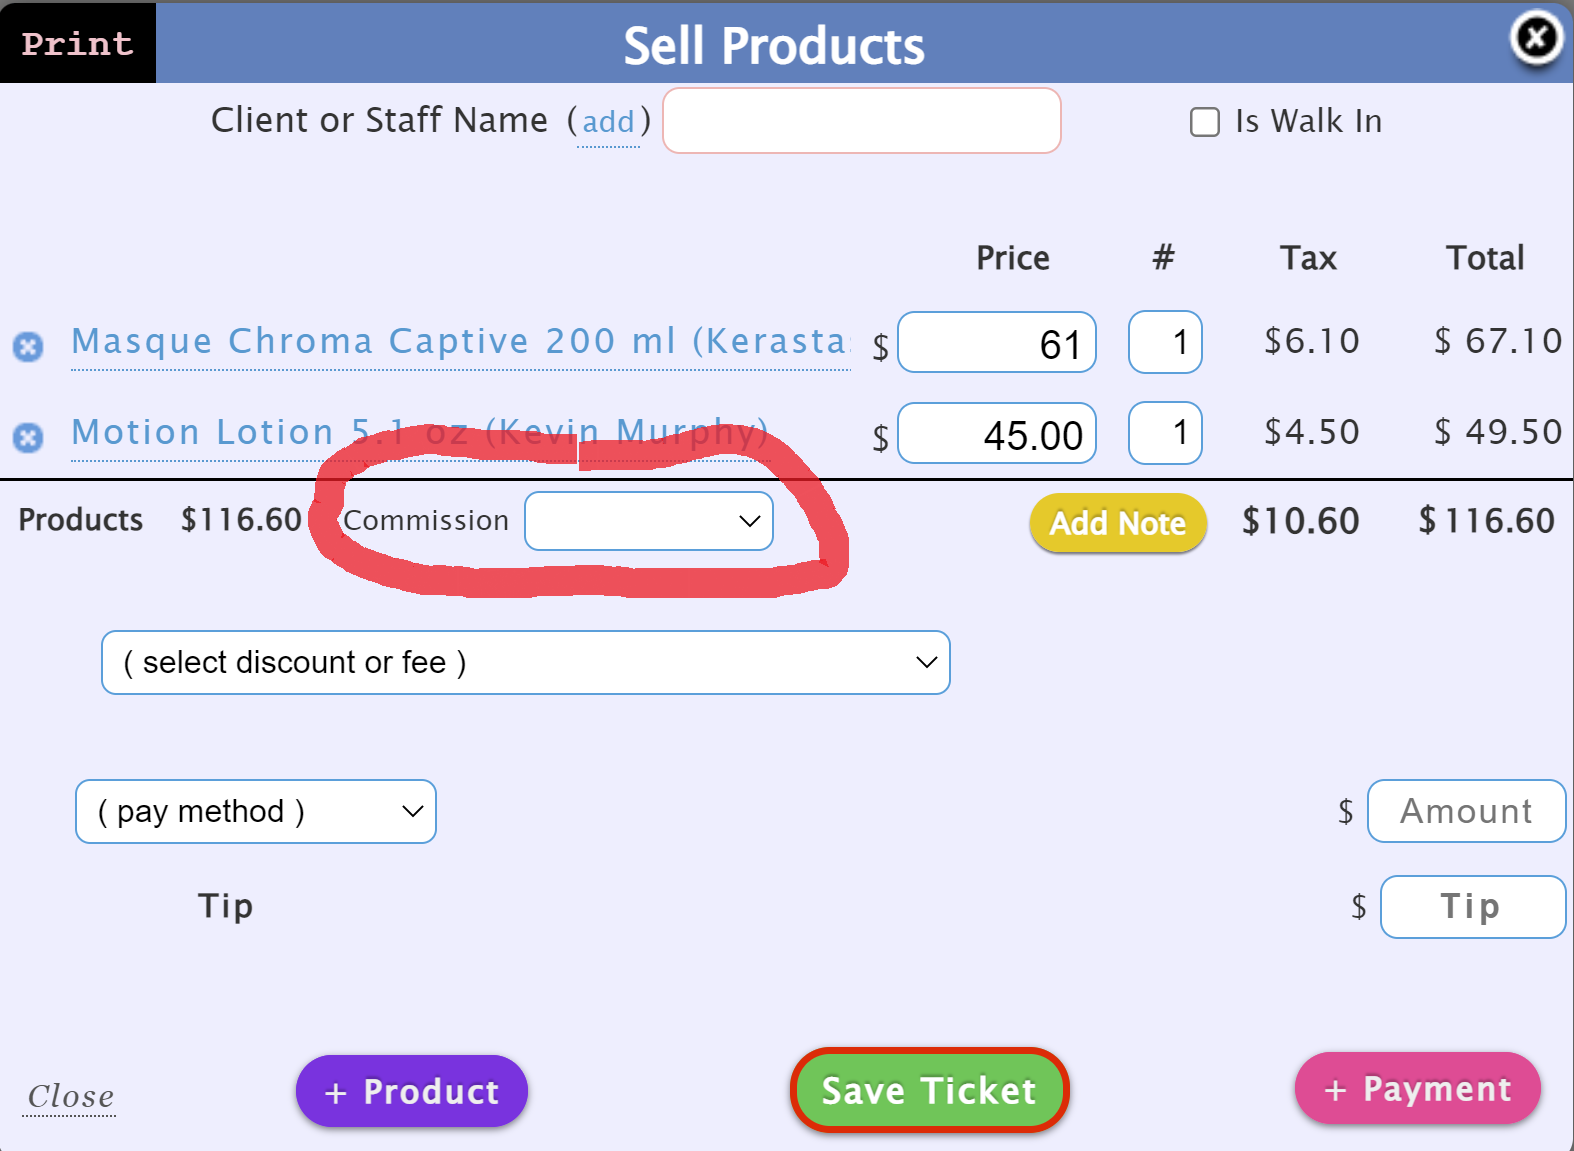
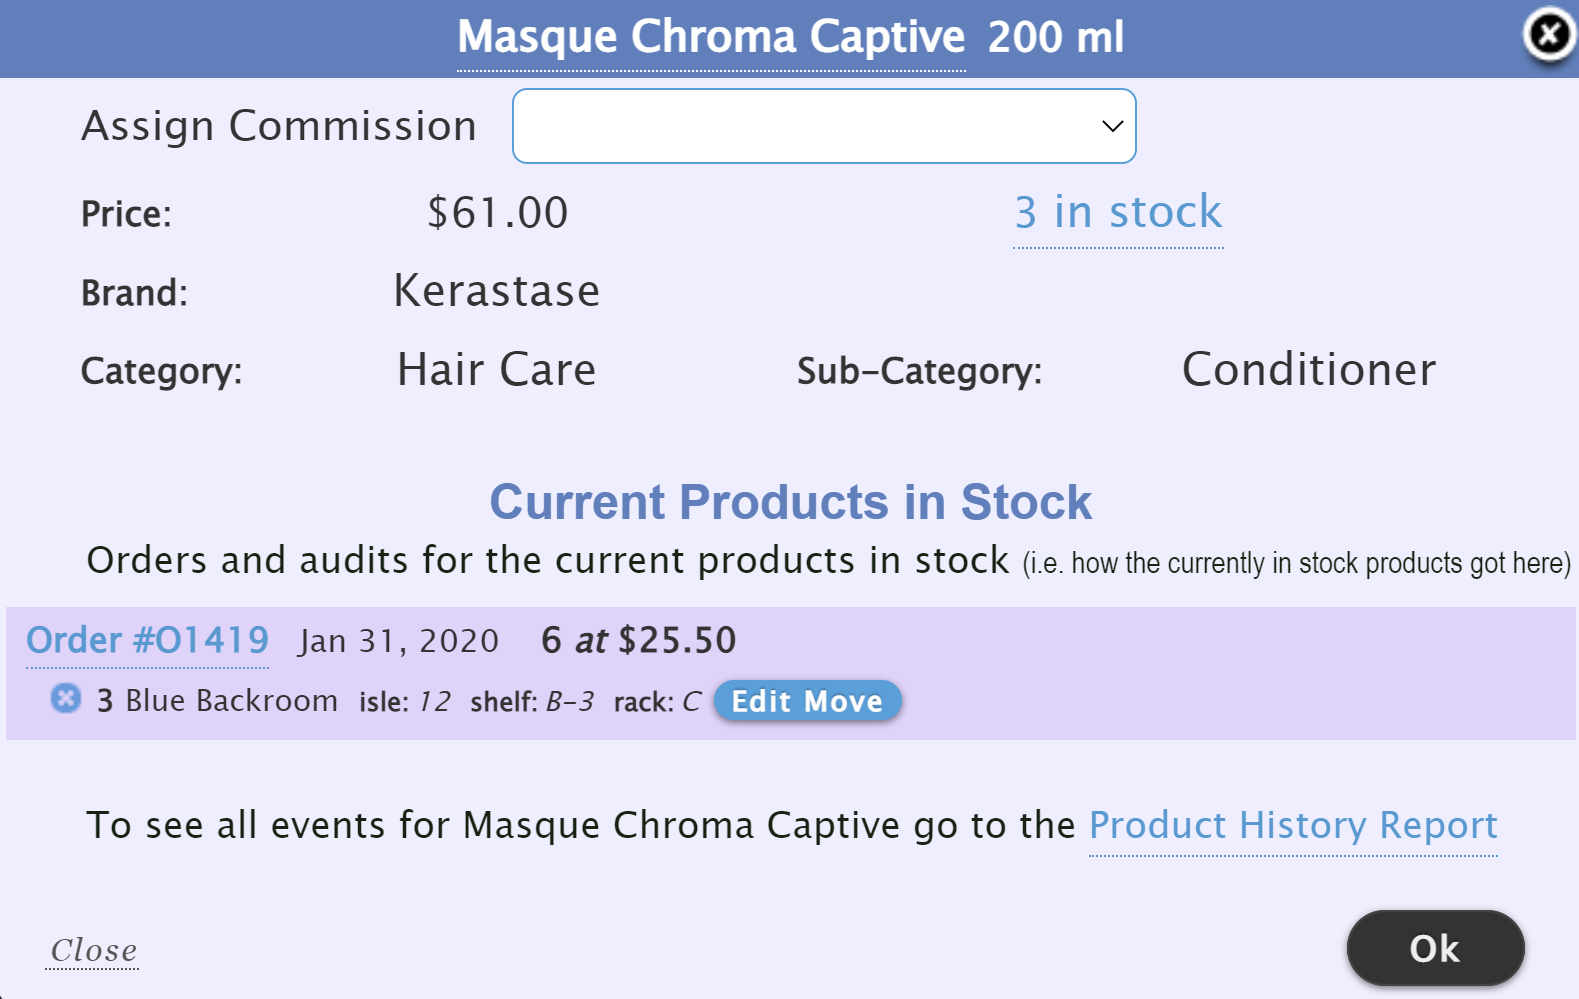
You can also click on the product name on the ticket to open the Assign Commission Popup where you can assign the product commission for each product separately (helpful if you have multiple products and want to assign product commission to different staff)
Verify Correct Product Stock Amounts
Gold Package Only
By creating orders and selling products in ScheduleAnyone you can easily track product levels, cost, and profit
We suggest also performing Product Audits on a regular basis to verify accurate stock amounts
This way you will catch any missing order, missing or incorrect product sale, or another inventory related issue
How Link Other Locations?
Does your business have more than one location? If so, you can create ScheduleAnyone accounts for each location then link those locations together so you can manage all your location together!
- Go to Profile -> Advanced, Locations tab
- Press the button: Link Schedule Anyone Account
- Enter the Admin Username/Password for the ScheduleAnyone account you want to link
How Send Client Invoice to Pay Online
Can email/text invoice for any ticket
Email or text an invoice to a client so they can pay the full ticket price or part of the ticket on your website
Send Invoice
You can easily email or text your client an invoice by opening the Edit Appointment popup, then opening the Ticket popup and pressing the email receipt icon or text receipt icon
You can also email/text a product-only ticket by pressing the email receipt icon or text receipt icon
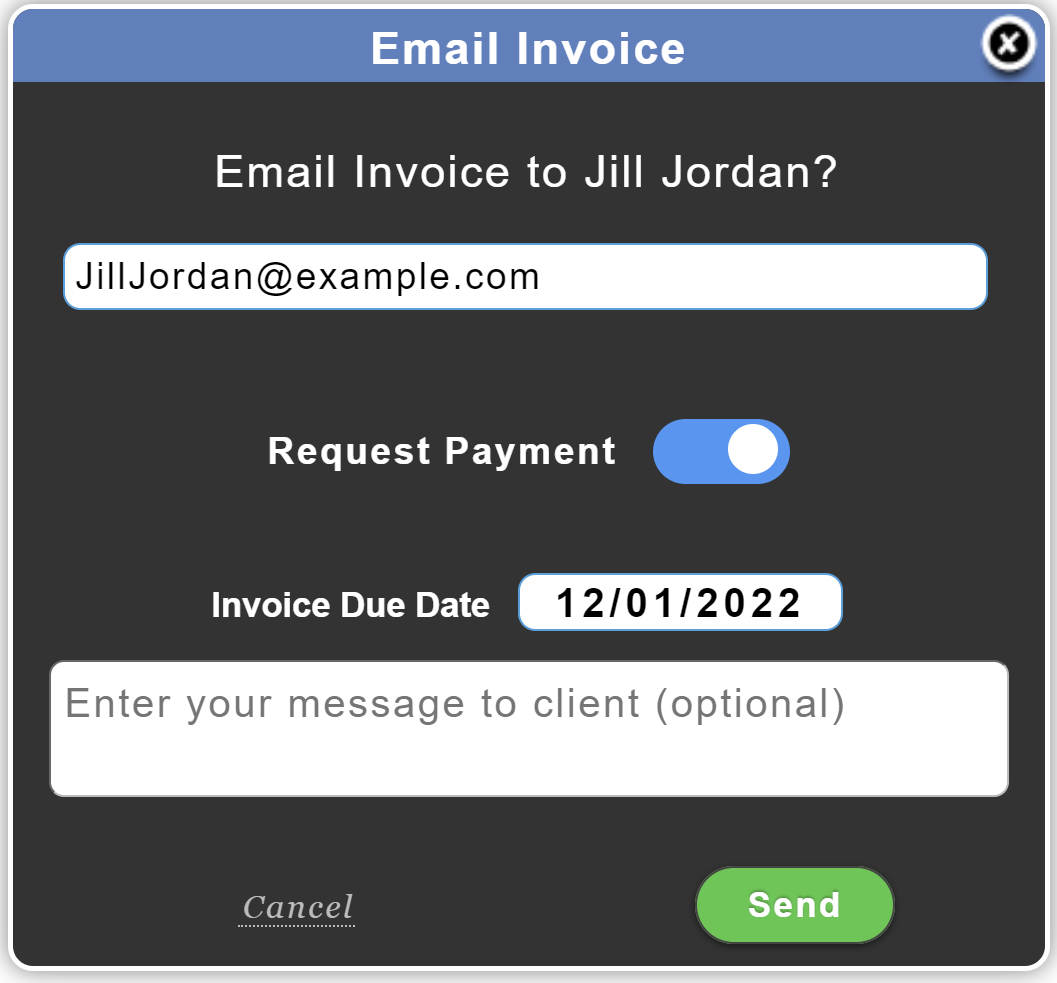
Online Invoice
When a client goes to pay the invoice the invoice total will always be the total ticket amount
So if you send the invoice then change the ticket price the pay invoice web page will display the new ticket price
The pay invoice web page is not visible on your website, the client must click the link in invoice email or text you send them
The client can change the payment amount to be less (if only paying part of the ticket now) or more (if want to add a tip) than the total invoice
Cancel Invoice
After sending an invoice you can cancel an invoice
Canceling an invoice cancels the ability for the client to pay the invoice online
Cancelling an invoice allows you to change the invoice note or invoice date then re-send the invoice to the client
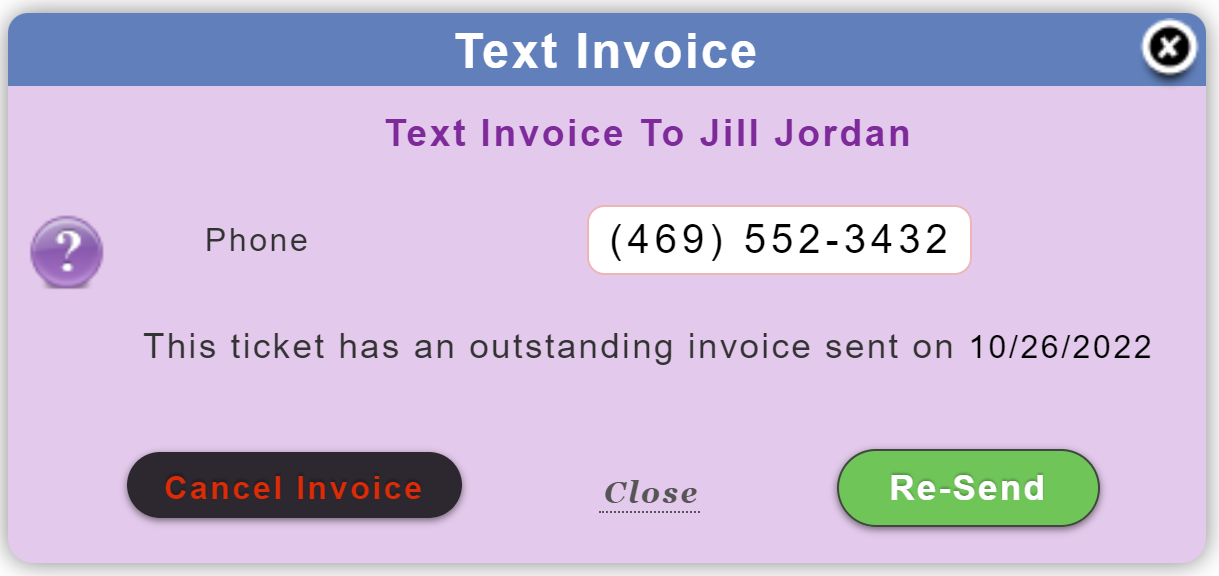
Re-Send Invoice
If you want to simply re-send the same invoice press the button Re-Send
This is helpful if the client did not see the email invoice and you want to send the invoice over text or just want to re-send the same email or different email
Print Staff Sales
Conveniently give staff their sales list at the end of the day or week
- On the Main Menu go to Reports -> Sales -> Detail
- Press the Print button (located on the left, above the Report)
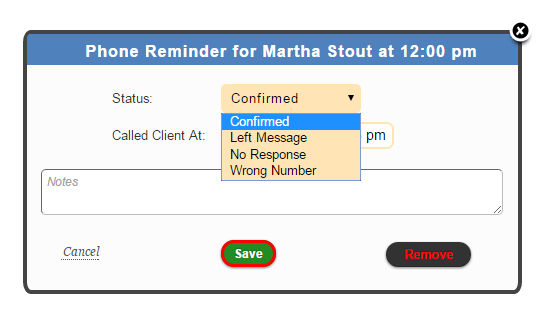
Mark Client Phone Call Confirmations?
To mark that you made a phone call confirmation on the reminder view check the box in the Phone column.

If you need to write a note or set a phone confirmation status other than 'confirmation' click the date to open the phone reminder popup
Add Shortcut to your phone's Home Screen
- Here are the instructions to add the "SA" icon to your phone's home page:
-
Android:
- Open the browser and go to https://www.scheduleanyone.com
- Press the menu button (the button to the left of your home button, on the bottom of your phone)
- Press "Add shortcut"
-
iPhone:
- Open the browser and go to https://www.scheduleanyone.com
- At the bottom of the screen you'll see an icon depicting an arrow that is pointing up out of a box. Click this icon
- Click "Add to Home Screen"
- At the top-right corner of the page click "Add"